9 Ways To Clear System Data On Mac [Effective Cleanup]
Before we dive in
Before we dive in, let's make sure you stay safe online. We created SpyHunter because your security matters to us.
Protect your computer today — download SpyHunter right here! Check out our top tips below to keep your computer safe and secure.
Ever find yourself scratching your head, wondering why your Mac’s “System Data” storage takes up so much space?
This elusive category, brimming with everything from browser caches to Time Machine backups, can often feel like a black hole consuming your computer’s space.
But what if you could manage it effectively, reclaiming precious storage and enhancing your Mac’s performance?
In this comprehensive guide, we’re diving deep into Mac System Data. From uncovering exactly what falls under this mysterious category to practical tips on freeing up space and maintaining an efficient system, we’ve got you covered.

What is System Data on Mac?
System data is a collection of files that ensure your macOS runs without a hiccup.
This category contains the leftovers and support files from your applications and system processes. Among these are disk images or installer files you’ve downloaded, plugins, and extensions that enhance the functionality of apps or browsers, and system and browser caches that make your computing experience faster.
It also encompasses system backups and temporary files that apps need to run but haven’t deleted properly. Understanding what comprises system data can help you make informed decisions about managing your Mac’s storage effectively.
Examples of system data include temporary files that applications generate, browser caches that speed up web browsing, system logs that help diagnose issues, and even local snapshots created by Time Machine for backup purposes.
It’s important to know that not all system data is disposable. Some of it plays a key role in the operational efficiency of your Mac.
How to check System Data storage on Mac?
Wondering how much of your Mac’s storage is being taken up by System Data? The process to check this varies slightly depending on your macOS version, but here’s a simplified guide to get you started:
- Begin by clicking on the Apple menu at the top left corner of your screen.
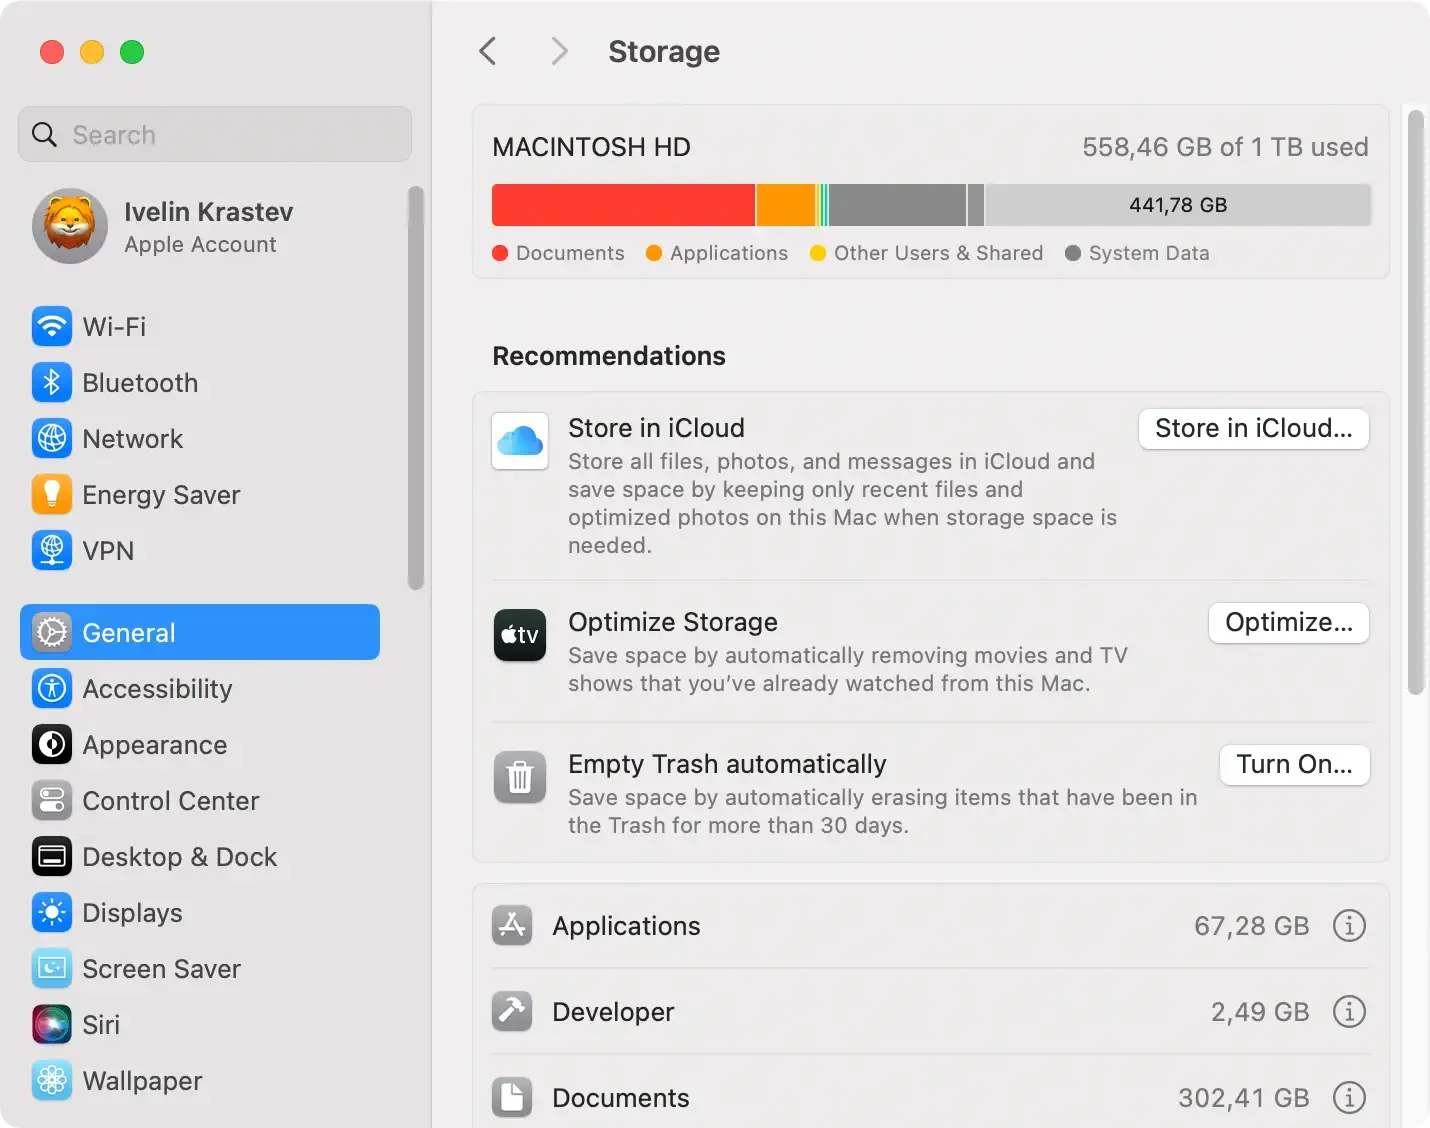
- If you’re using a new macOS version, navigate through
System Settings > General > Storage. For those on macOS Monterey and earlier, chooseAbout This Macfrom the menu, then click on theStoragetab. - You’ll see a graphical representation of your storage usage, segmented by category. Look for the segment labeled as
System Data, often depicted in dark gray. - Hovering over it or clicking, depending on your macOS version, will reveal the exact amount of storage it occupies.
This method not only shows you how much space System Data is consuming but also gives you a comprehensive overview of your overall storage situation.
Recognizing the size of your System Data can be the first step in managing your Mac’s storage more effectively.
We also have a full article that deals with checking your system’s storage space in more detail, which you can use for future reference.
Why is your System Data storage so full?
Have you noticed that your Mac has begun to slow down, or maybe it’s running out of space unexpectedly? One common reason could be the size of your System Data storage.
System Data, essentially a collection of files your system uses to operate efficiently, can balloon over time due to several factors. These include frequent app installations and deletions, accumulation of cache files, and generation of large system logs.
While System Data is crucial for your Mac’s performance, too much of it can end up consuming valuable disk space, leading to operational inefficiencies.
How to clear System Data on Mac
When your Mac starts running slow, or you’re getting those dreaded “Your disk is almost full” notifications, it’s time to take action.
The clutter consuming your system’s storage can often be invisible, buried in layers of unused files and forgotten downloads.
By applying a few smart strategies, you can reclaim those precious gigabytes and keep your Mac running smoothly.
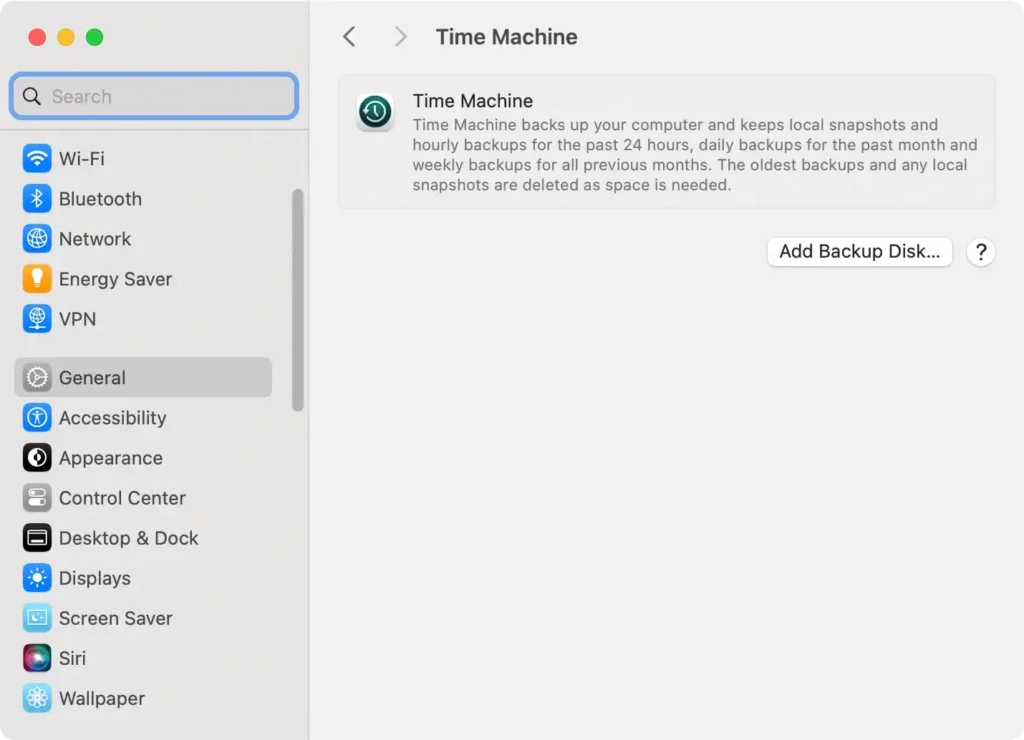
1. Delete outdated Time Machine backups
Time Machine snapshots are a lifesaver for backing up your Mac, but they can also be a significant consumer of space.
Those incremental backup snapshots it creates can accumulate, especially if you’ve had your Mac for a while. Thankfully, trimming these can free up a lot of space. Here’s how:
- Open a new
Terminalwindow. - Type
tmutil listbackupsand pressReturnto see a list of all backups.
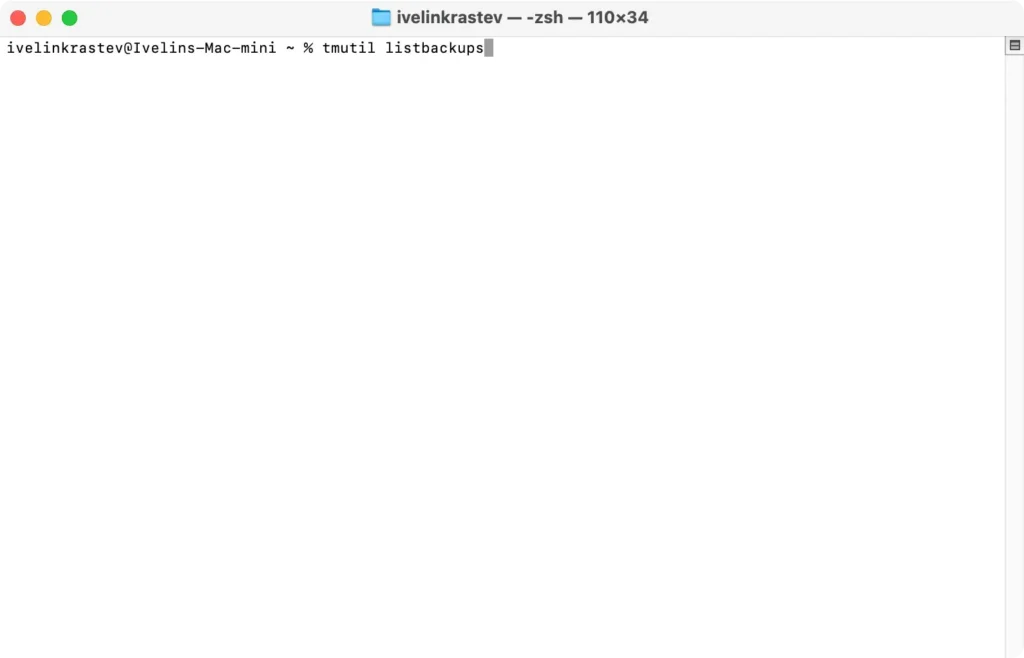
- To remove an outdated backup, type
sudo tmutil delete, followed by the backup name, and pressReturn. - Next, check for local snapshots by typing
tmutil listlocalsnapshots /and pressReturn.

- If any snapshots exist, delete them by typing
tmutil deletelocalsnapshotsfollowed by the snapshot name, and pressReturn.
This process can significantly free up space, allowing your Mac to breathe and operate more efficiently.
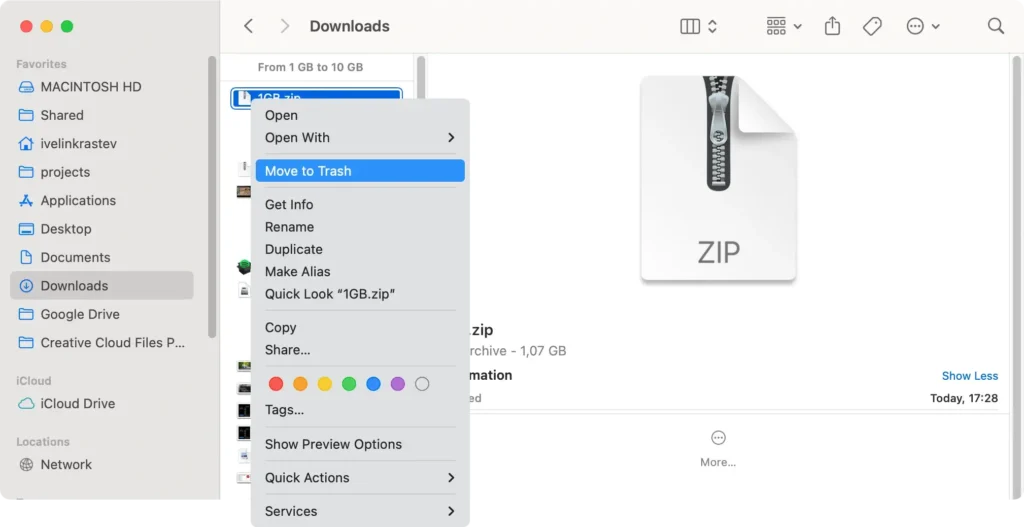
2. Tidy up your Downloads directory
Over time, people tend to download a lot of files. However, those files are often left behind in the Downloads folder after being installed or used once, which can lead to significant clutter over time.
To clean up your Downloads folder efficiently and save the most space, do the following:
- Open a new
Finderwindow and navigate to yourDownloadsfolder. - Sort the files inside by
Size, clicking on the column inFinder, so you can regain the most space by deleting the fewest files. - Manually go over the large files found in the folder and delete the ones you don’t need.
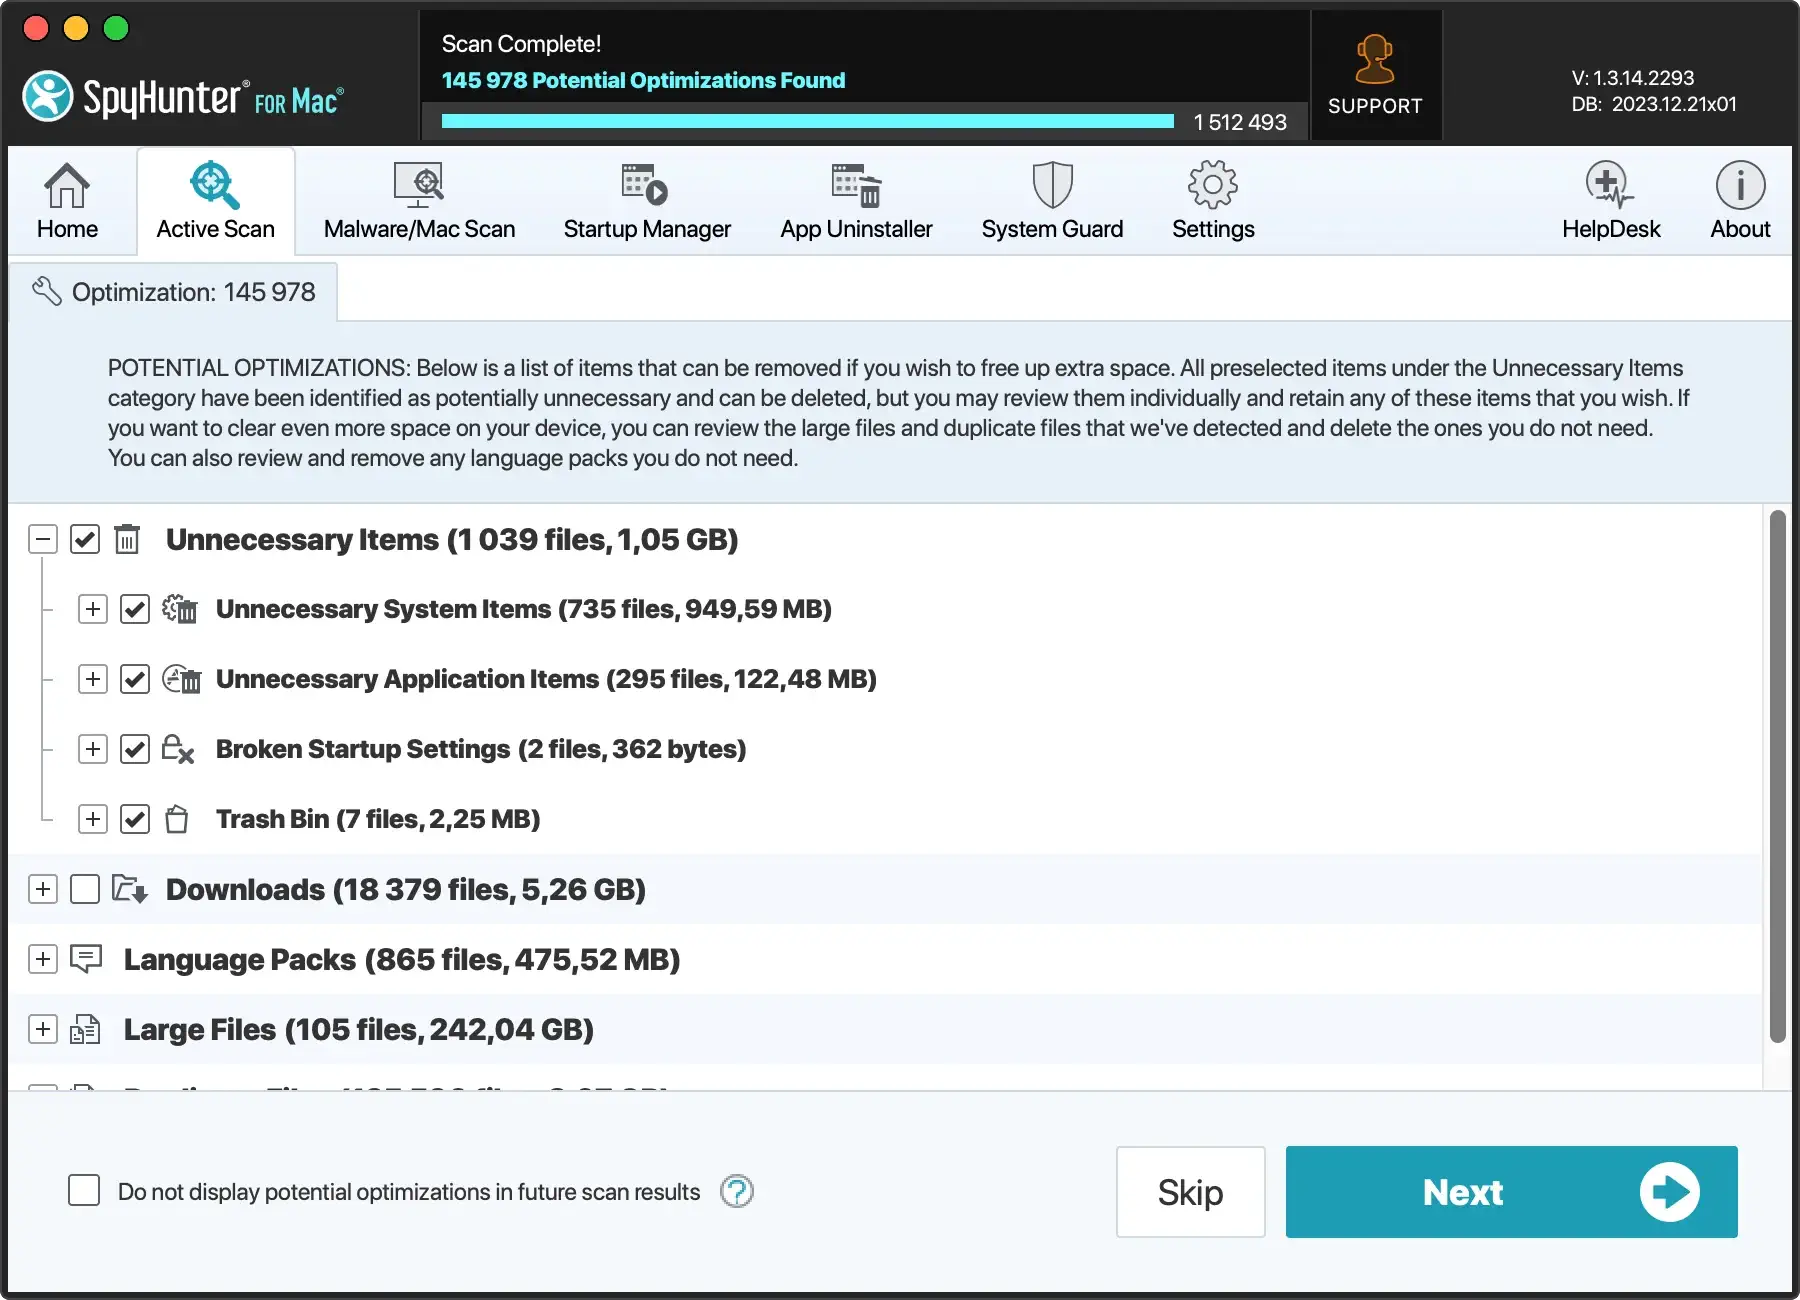
If you want to save yourself time and automatically find large files to delete, you can use SpyHunter.
Download the app here and install it. You can then launch an optimization scan from the main menu and SpyHunter will locate large files for you.

You can then select the ones you want to delete inside the app and proceed to remove them and free up valuable drive space.
3. Optimize your Mac storage settings
Your Mac comes equipped with tools designed to help manage and optimize storage. Leveraging these can make a substantial difference in your daily usage.
Here’s how to use them:
- Click on the Apple menu and select
About This Mac > More Info. - Choose
Storage, then clickManage. - Explore the suggestions like
Store in iCloudfor moving files and photos to the cloud,Optimize Storagefor removing watched movies and TV shows, andEmpty Trash Automaticallyto delete junk files from the bin regularly.
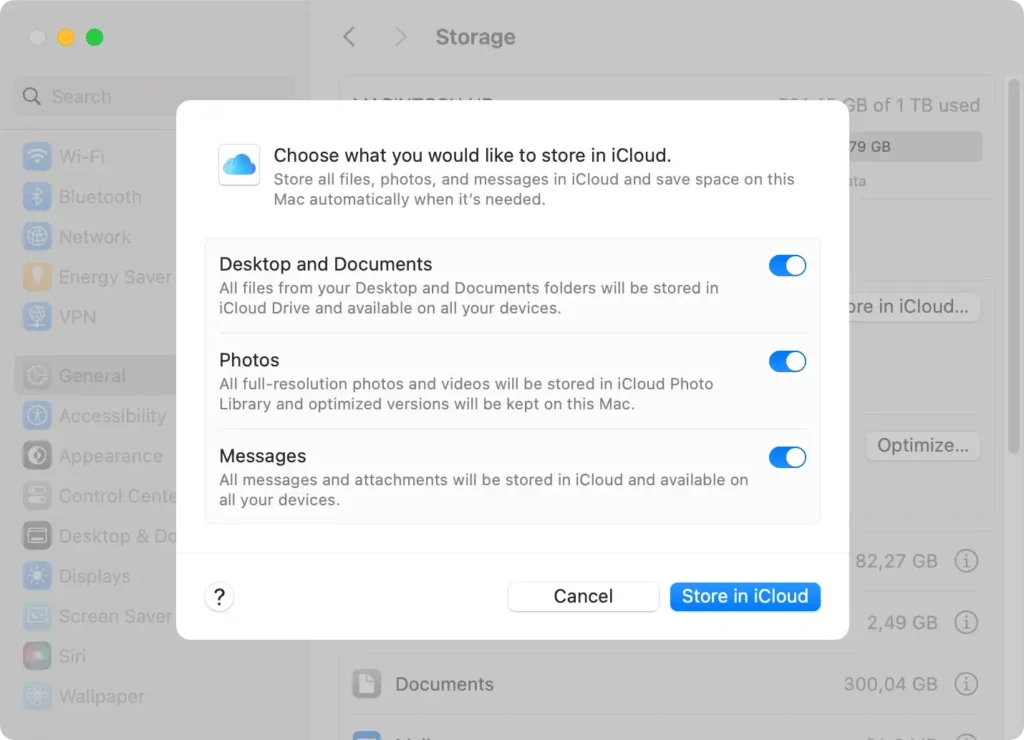
These steps help manage your storage intelligently, keeping your Mac’s performance optimized.
4. Deleting old files
Over time, we accumulate digital clutter that can take up unnecessary space. Taking a moment to review and remove old documents, downloads, and applications can refresh your system.
Start with your Downloads folder – it’s often filled with installers and zip files you no longer need.
Next, review your Documents and Desktop for files that are outdated or no longer necessary. By regularly cleaning these areas, you prevent digital clutter from impacting your Mac’s performance and storage capacity.
5. Clear system and user cache files
Cache files are temporary data stored by applications and the system to speed up processes. Over time, these files can accumulate and take up significant space.
- Open
Finderand clickGo > Go to Folder. - Enter the following paths in the dialog:
~/Library/Caches/Library/Caches
- Manually delete files inside with discretion to free up some space.

6. Remove old macOS installation files and updates
After updating macOS, the installation files might remain on your system, consuming space.
Look for files like Install macOS [version].app in the Applications folder or check /Library/Updates for leftover update files and remove them if they’re no longer needed.
Empty the Trash to permanently remove the files and save space.
7. Remove old system logs and reports
To manually delete old system log files and crash reports, do the following:
- Open
Finderand click onGo > Go to Folder. - Enter the following paths in the dialog box:
/Library/Logs~/Library/Logs
- Delete files inside and empty the
Trash.

Even though those files are typically not very big, they can accumulate over time, and deleting them can still free up some space.
8. Clean up Mail downloads and attachments
Email attachments can take up space in the System Data category of your system storage.
To clean them up, do the following:
- In
Finder, clickGo > Go to Folder. - Enter this path in the dialog:
~/Library/Mail/
- Delete unnecessary attachments or move them to an external drive to back them up.

You can also download SpyHunter and install it to clean up your Mail attachments. The application’s optimizations scanner can detect and remove large attachment files and help you quickly restore drive space.
9. Remove iOS backup files
Removing old iOS backups for additional Apple devices kept on your Mac can free up some extra space. To do this, follow these steps:
- Navigate to
System Settings > General > Storage. - Find the backups you want to remove and click
Deleteto remove them.
Make sure you keep the backup file for your current installation on your Mac.
Tips for keeping your System Data lean
Ensuring your Mac remains efficient involves keeping the system data in check.
Regular maintenance not only frees up space but also enhances the system’s performance. A proactive approach to managing files and applications can significantly reduce the accumulation of unnecessary data.
This includes uninstalling unused apps, removing duplicate files, and periodically clearing cache files.
Additionally, leveraging cloud storage for documents and media can keep your system data lean, removing the need for local storage of large files.
You can also download SpyHunter and make use of the application’s optimization scanner that will detect unnecessary items on your drives and speed up the clean-up process significantly.
Preventative measures to avoid System Data clutter
Routine checks and maintenance are vital for preventing system data from piling up.
Start with monitoring your storage usage through Apple logo > About This Mac > Storage. This visibility allows you to identify what’s taking up space and take appropriate action.
Setting a regular schedule for cleaning up your system can help manage storage more effectively.
Also, consider configuring your Mac to automatically remove trash items every 30 days and using optimization features offered in macOS to manage storage automatically.
FAQ: Managing Mac System Data effectively
Can regularly clearing system data improve my Mac’s performance?
Yes, regularly clearing system storage can significantly improve your Mac’s performance.
Over time, your Mac accumulates files and data that can consume valuable storage and resources, slowing down your system.
By routinely removing these unnecessary files, you ensure that your Mac has enough free space for smooth operation and that resources are not being wasted on maintaining or indexing unused data.
Is it safe to delete system data files?
Deleting macOS system data files is generally safe, provided you know exactly what you’re removing and its implications.
Focus on clearing cache, log files, and language files that aren’t essential for your Mac’s operation.
However, it’s critical to avoid deleting system files vital for macOS to function properly.
If unsure, use dedicated software like SpyHunter to safely identify and remove unnecessary or potentially harmful files without risking essential system data.