How To Uninstall Visual Studio On Mac (Complete Guide)
Before we dive in
Trying to uninstall an app completely? SpyHunter for Mac includes an App Uninstaller that removes unwanted apps and their leftover files in just a few clicks.
Avoid clutter and save time — download SpyHunter right here and follow the steps to clean up your system.
Visual Studio is a robust integrated development environment (IDE) that many developers cherish due to its extensive capabilities and support for multiple programming languages.
However, there may come a time when you need to uninstall Visual Studio from your Mac—whether it’s to clear up system resources, address software conflicts, or simply because you’re transitioning to a different development tool.
Uninstalling a comprehensive application like Visual Studio requires careful steps to remove all associated files to prevent potential issues.
This guide will walk you through the process, ensuring you can reclaim space and keep your system running smoothly without leaving any remnants behind.
Let’s get started!
Common reasons to uninstall Visual Studio for Mac
There are several reasons why Mac users decide to remove Visual Studio. While this coding tool is beneficial for creating mobile apps and other programs, certain circumstances necessitate its removal.
Understanding these reasons can help you make an informed decision about managing the applications on your device. Here’s a closer look at the most common ones:
- Freeing Up Storage Space: Visual Studio and its components can occupy significant disk space. Especially if you’re facing storage constraints, removing unused applications like Visual Studio can help reclaim valuable space.
- Enhancing System Performance: Some users report that Visual Studio can consume substantial system resources, such as RAM, which might lead to a slower Mac performance. Uninstalling it can potentially speed up your machine.
- Software Conflicts: Multiple development environments can sometimes cause conflicts. If you’re using alternative tools and no longer need Visual Studio, it’s a good idea to remove it to prevent possible interference with other programs.
- Temporary Use: You might have installed Visual Studio for a specific project or to learn its functionalities. Once your needs are met, uninstalling it can simplify your system and reduce the likelihood of security vulnerabilities.

Understanding these reasons is crucial, as they highlight the importance of maintaining a streamlined and efficient computer system.
Use SpyHunter to completely uninstall Visual Studio on Mac
For those seeking a thorough and hassle-free solution to remove Visual Studio from your Mac, SpyHunter offers an efficient tool that simplifies the process.
Follow these steps to ensure that not only is Visual Studio removed but also all its associated files and settings:
- Download SpyHunter from here and follow the installation instructions to ensure the app is correctly set up on your Mac.
- Open SpyHunter and go to the
App Uninstallertab. This tool is designed to scan and display all installed applications on your Mac. - Once in the
App Uninstallerinterface, initiate a scan. SpyHunter will automatically detect Visual Studio and its related files scattered across your system. - After the scan is complete, locate Visual Studio in the list of applications. Ensure all boxes are checked to select the full set of files for removal.
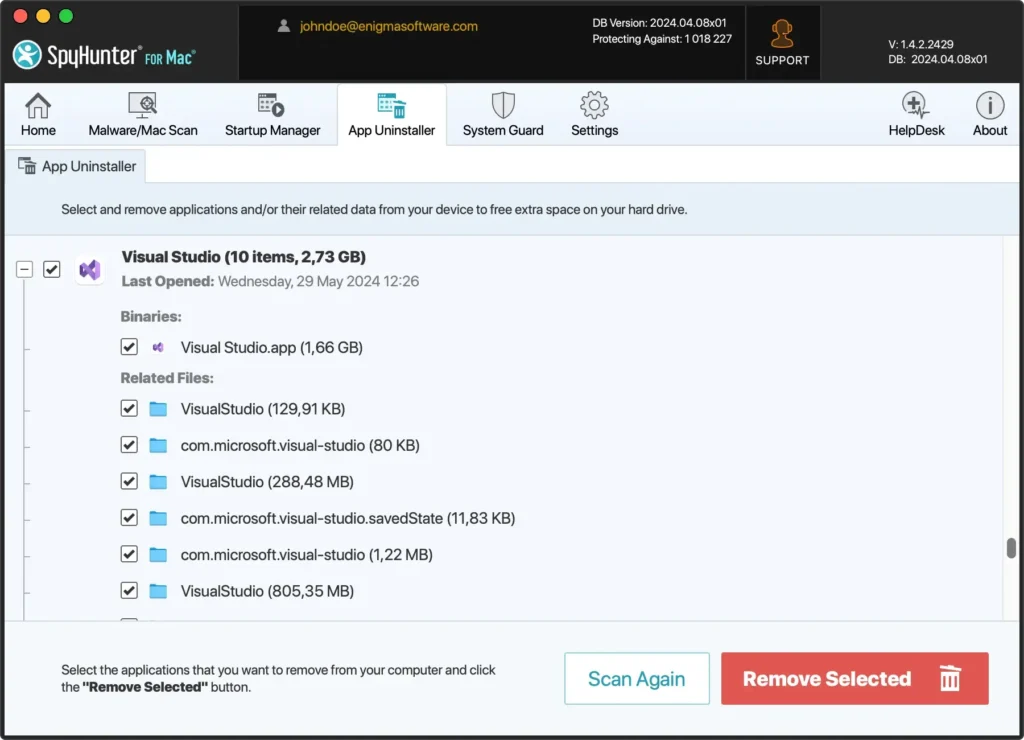
- With all Visual Studio components selected, click the
Remove Selectedbutton. SpyHunter will then remove the files, ensuring that all the files are thoroughly deleted from your system. - After uninstallation, reboot your computer to finalize the removal of Visual Studio. Restarting your Mac will help clear any remaining temporary files and update system settings.
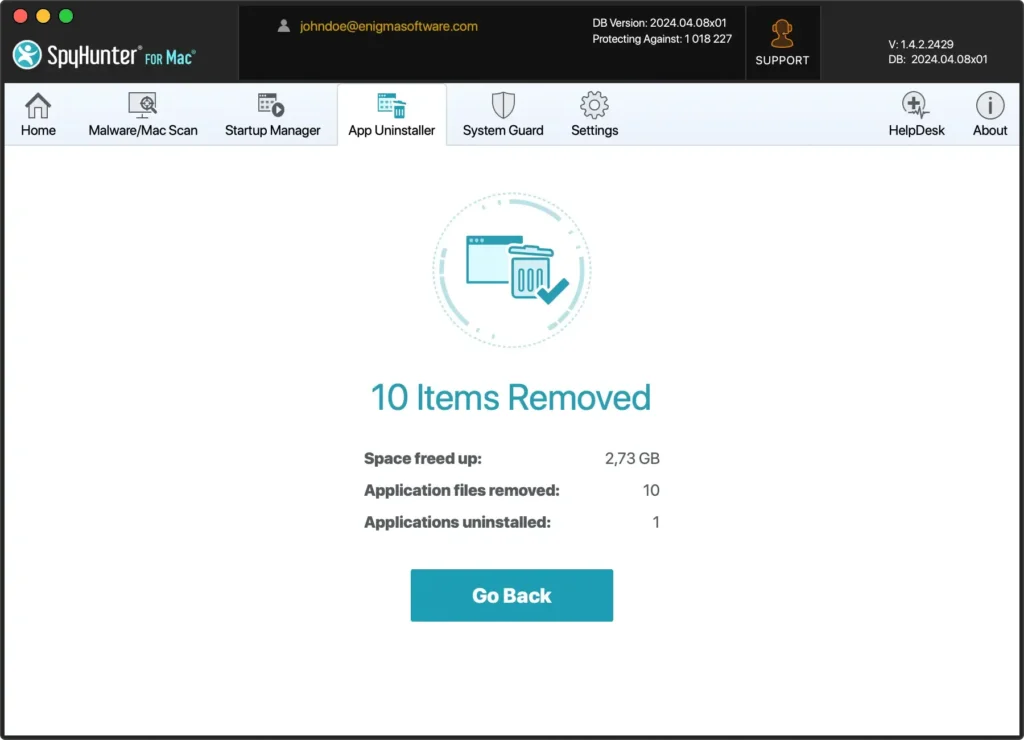
Using SpyHunter to uninstall Visual Studio for Mac streamlines the process and ensures that no leftover files remain that could clog your system or cause conflicts with other applications.
This method provides a comprehensive cleanup that manual uninstallation might miss.
How to manually uninstall Visual Studio from your Mac
Manually uninstalling Visual Studio involves several steps to ensure that all related files are completely removed from your system. Follow these instructions to thoroughly uninstall Visual Studio for Mac:
Step 1: Quit Visual Studio
Before you start the uninstallation process, ensure that Visual Studio is not running.
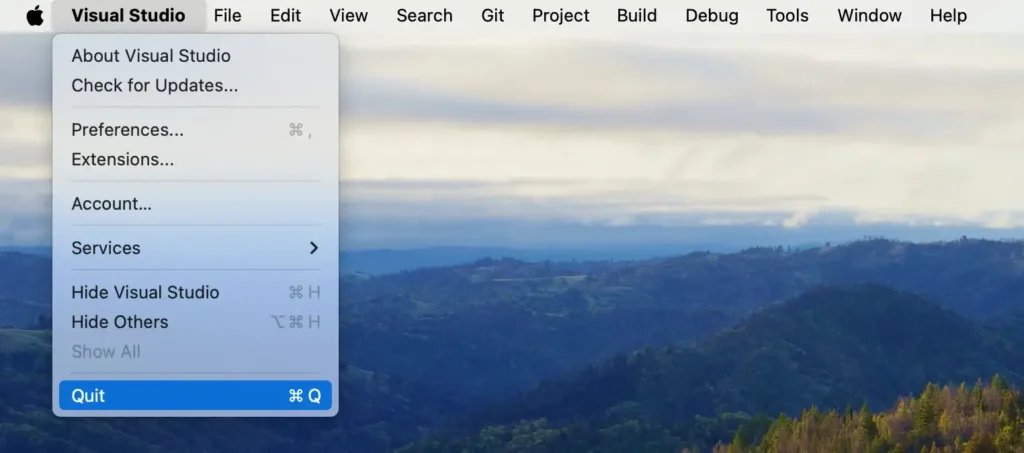
- Menu Bar Option: Click on the Visual Studio item in the menu bar at the top of your screen and select
Quitfrom the dropdown.
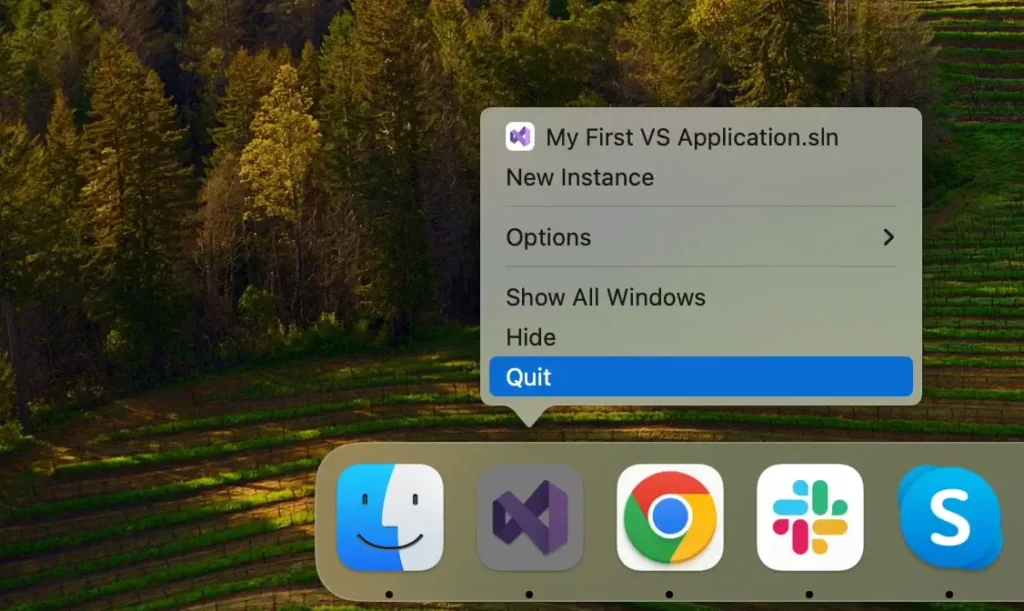
- Dock Option: Alternatively, if Visual Studio is in your Dock, right-click (or Control-click) the Visual Studio icon and choose
Quitfrom the context menu.
Force Quit via Activity Monitor: If Visual Studio is not responding, open Activity Monitor and find all processes related to Visual Studio. Then, select them and click the [X] button to force quit the application.
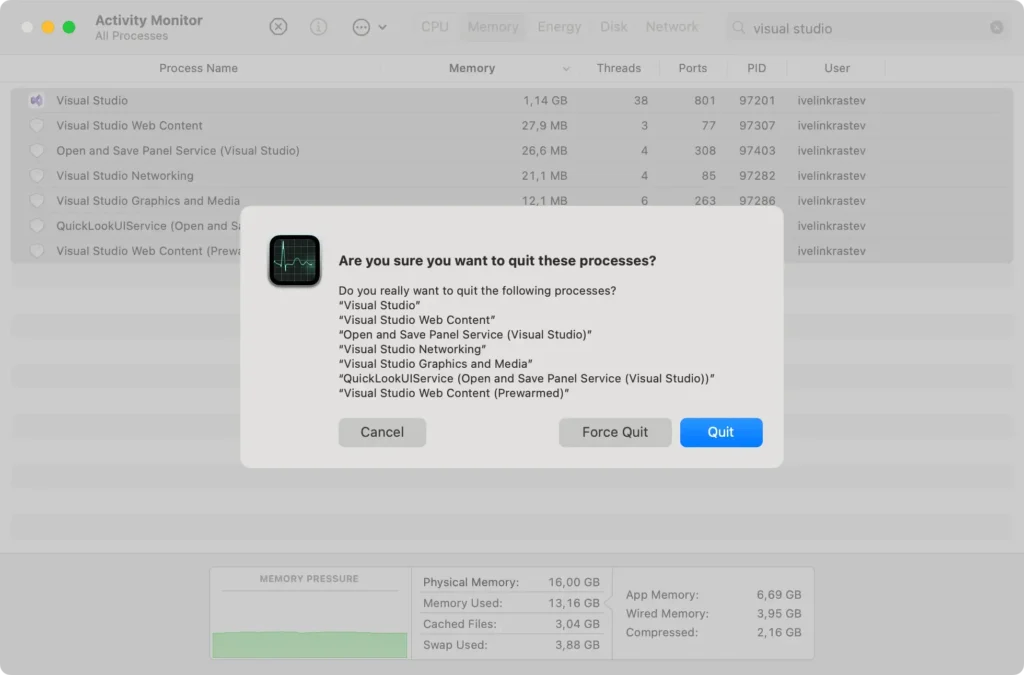
Ensuring that Visual Studio is completely closed is crucial for a smooth uninstallation process.
Step 2: Remove the Visual Studio app
To remove the main application from your Mac:
- Open a new
Finderwindow. - Navigate to the
Applicationsfolder, or selectGo > Applicationsfrom the Finder’s top menu. - Scroll through the list to locate the Visual Studio app.
- Drag the app to the Trash in your Dock. Alternatively, right-click (or Control-click) on the program icon and choose
Move to Trashfrom the dropdown menu. - Right-click on the Trash and select
Empty Trashto ensure the application is completely removed.
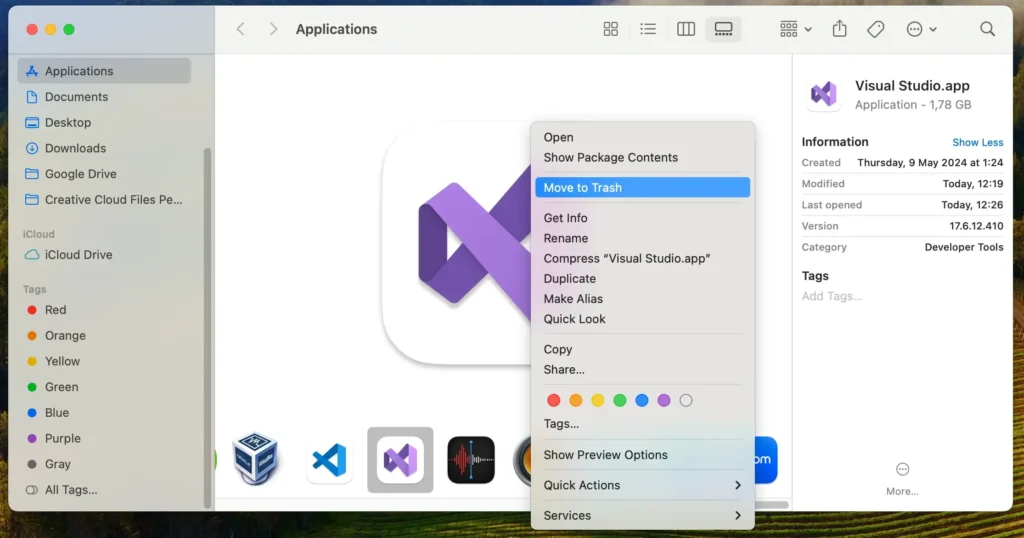
This removes the Visual Studio application from your Mac. Remember, thoroughly clearing Visual Studio from your system includes removing related files in subsequent steps.
Step 3: Delete files and folders related to Visual Studio
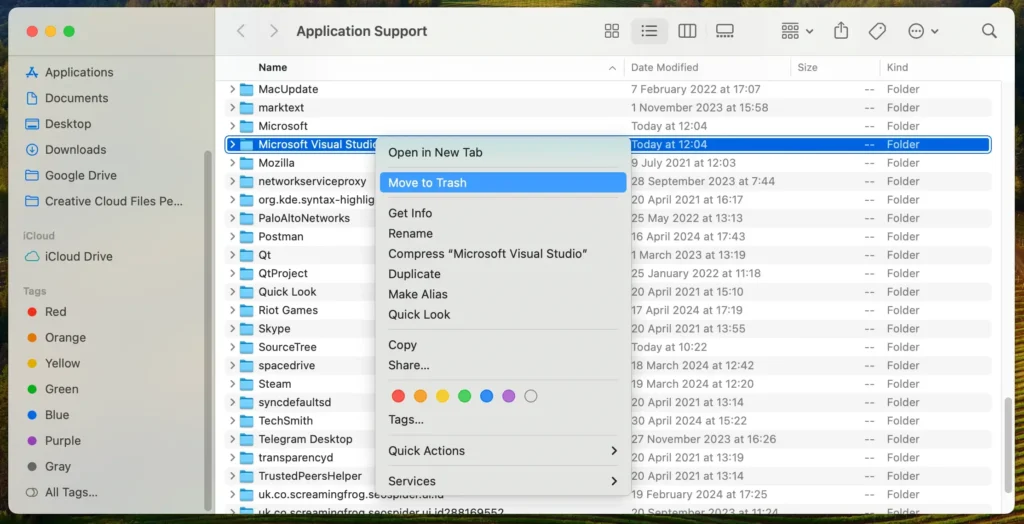
After uninstalling the Visual Studio app, the next crucial step is eliminating any remaining files and leftovers to ensure a complete cleanup. Follow these steps:
- Launch
Finderon your Mac. - In the
Findermenu at the top of the screen, click theGomenu and thenGo to Folder…or use the shortcutShift + Command (⌘) + Gto access the search bar. - One by one, enter the following paths into the search box to locate and remove Visual Studio’s associated files:
~/Library/Application Support/VisualStudio/~/Library/Preferences/com.microsoft.visualstudio.plist~/Library/Caches/com.microsoft.visualstudio/~/Library/Logs/VisualStudio/
- After moving all related files and folders to the Trash, right-click on the Trash bin and select
Empty Trashto permanently delete them.
As you can see, removing apps involves more than just deleting the application itself. If delving into the Library folder seems daunting, don’t worry; a more straightforward method is ahead.
Uninstall Visual Studio using Terminal
You can use Terminal commands to uninstall Visual Studio from your Mac for a more technical approach. This method allows you to remove all related files and directories precisely.
Follow these steps carefully:
- Open Terminal: Open the
Terminalapplication from yourApplicationsfolder, or search for it using Spotlight. - Quit All VS Processes: Ensure all Visual Studio processes are terminated to avoid interference during removal. Type the following command and press Enter:
sudo killall VisualStudio- Remove the Application: Use the following command to remove the Visual Studio application from the Applications folder:
sudo rm -rf "/Applications/Visual Studio.app"- Delete the Configuration and Support Files: Execute the following commands one by one to remove Visual Studio’s associated files:
rm -rf ~/Library/Application\ Support/VisualStudio
rm -rf ~/Library/Preferences/com.microsoft.visualstudio.plist
rm -rf ~/Library/Caches/com.microsoft.visualstudio
rm -rf ~/Library/Logs/VisualStudio
rm -rf ~/Library/Caches/VisualStudio
rm -rf ~/Library/Preferences/VisualStudio
rm -rf ~/Library/Preferences/Visual\ Studio
rm -rf ~/Library/Preferences/Xamarin/
sudo rm -rf "/Applications/Xamarin Profiler.app"- Empty the Trash: To finalize the uninstallation, empty the Trash to remove any remaining files permanently:
sudo rm -rf ~/.Trash/*- Verify Removal: After running these commands, verify that all files related to Visual Studio have been removed by searching your system:
find / -name "*VisualStudio*" 2> /dev/nullUsing Terminal to uninstall Visual Studio offers precise control over the process but requires careful execution of commands.
Ensure each step is followed accurately to avoid any potential system issues.
Alternatives to Visual Studio for Mac users
Finding the right development environment is essential for any coder or programmer.
With Visual Studio uninstalled, it’s time to explore alternatives that offer similar or better functionalities tailored to your project’s needs.
Here are a few alternatives to consider:
- Visual Studio Code: The Visual Studio Code application is a free, open-source code editor developed by Microsoft. It’s lightweight yet powerful, with built-in JavaScript, TypeScript, and Node.js support. It also has a rich extension ecosystem that allows you to add features and customize your coding environment to fit your needs.
- Atom: A free text editor that is highly customizable. It supports a lot of coding languages and has an extensive package library for additional features.
- Sublime Text: A sophisticated text editor used for code, prose, and markup. It offers vast language support and a distraction-free writing mode.
Choosing the suitable alternative depends on your specific development needs, such as language support, customization, and ease of use.
Take the time to explore and test out these options to find the best fit for your coding endeavors.
Final thoughts
Successfully uninstalling Visual Studio from your Mac ensures your system remains clean and efficient.
Whether you used SpyHunter for a comprehensive removal or followed the manual steps, completing the uninstallation process is crucial to avoid leftover files that can slow down your computer.
If you’re considering switching to another development tool, you might want to know how to completely uninstall VSCode. For detailed guidance, check out our article on how to uninstall Visual Studio Code.
Learning how to uninstall a Mac application can help you manage your system more effectively. Understanding these processes allows you to keep your device running smoothly and maintain an organized workspace.
Remember, choosing the right tools and knowing how to remove them when they are no longer needed are essential for optimal performance and security.