How To Uninstall VS Code On Mac (Ultimate Guide)
Before we dive in
Trying to uninstall an app completely? SpyHunter for Mac includes an App Uninstaller that removes unwanted apps and their leftover files in just a few clicks.
Avoid clutter and save time — download SpyHunter right here and follow the steps to clean up your system.
Visual Studio Code is a popular and versatile code editor many developers favor due to its powerful features and extensive extension library.
However, there may come a time when you need to delete VS Code from your Mac, whether to free up resources, resolve software conflicts, or switch to a different development tool.
Uninstalling VS Code thoroughly is essential to ensure no residual files are left behind, which can clutter your device and potentially cause issues.
This guide will walk you through the process step-by-step, ensuring complete and efficient removal of VSCode from your Mac.
Why uninstall VS Code from Mac?
You might remove Visual Studio Code from your Mac for various reasons. Here are the most common ones:
- Freeing up system resources by removing extensions and plugins.
- Resolving conflicts with other applications or tools.
- Switching to a different development tool.
- Cleaning up after completing specific projects.
- Troubleshooting persistent crashes or errors.

Completely uninstall VSCode using SpyHunter
SpyHunter offers an effective solution for those who seek a comprehensive and hassle-free way to remove Visual Studio Code from their Mac.
Here’s how you can use SpyHunter to ensure VSCode is entirely uninstalled:
- Download SpyHunter for free here and follow the installation prompts.
- Open SpyHunter and navigate to the
App Uninstallertab. - SpyHunter will automatically detect VSCode and the associated files distributed across your device.
- Once the scan is complete, locate the Visual Studio Code entry in the list of applications. SpyHunter will display all files related to the app.
- Select all items to ensure a full removal.
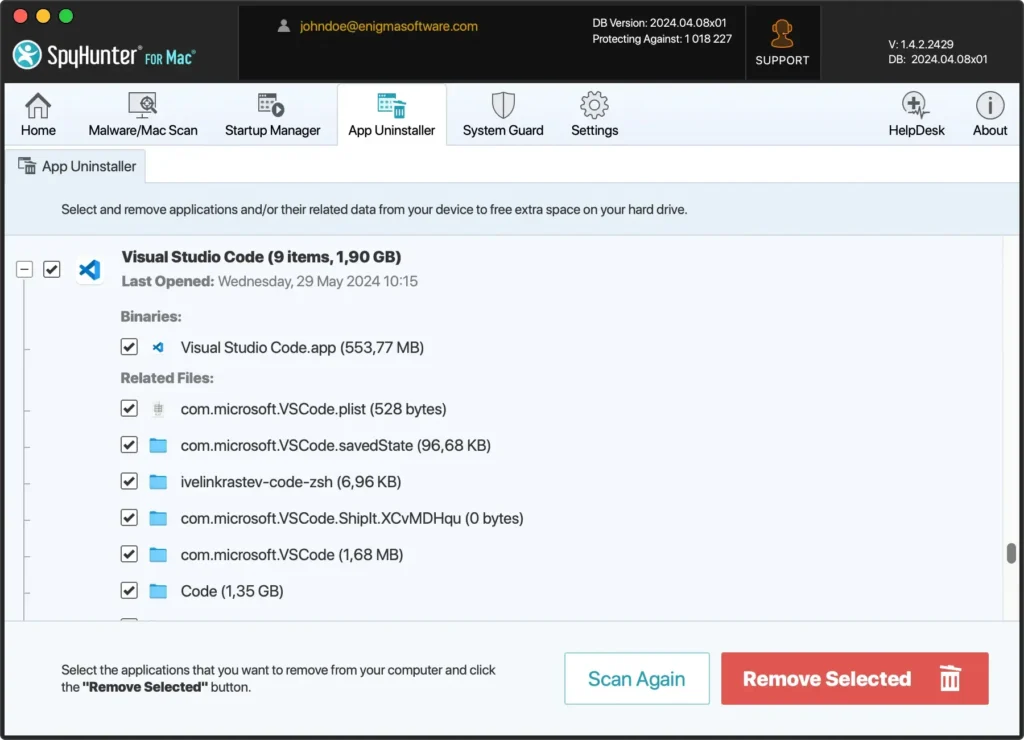
- Click on the
Remove Selectedbutton to proceed with the removal. SpyHunter will handle the deletion of Visual Studio and all its associated files, ensuring nothing is left behind. - After the uninstallation process, restart your computer to finalize the removal.
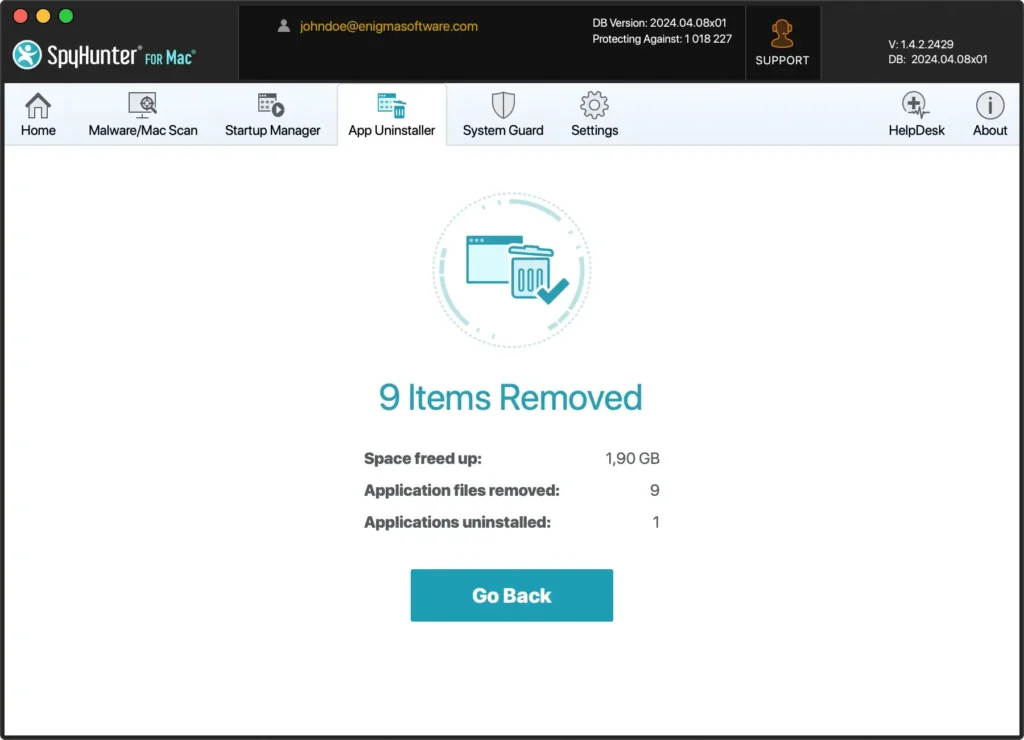
Using SpyHunter to uninstall Visual Studio Code simplifies the process and ensures no residual files are left on your Mac.
This thorough method helps maintain your Mac’s performance and avoids potential application conflicts.
Manually remove VSCode from your Mac
You can manually remove Visual Studio Code by deleting its application files and related folders. But first:
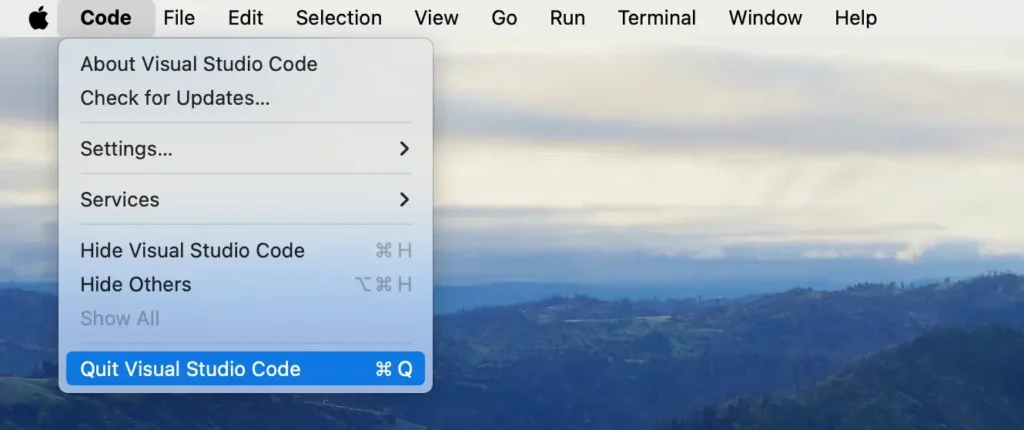
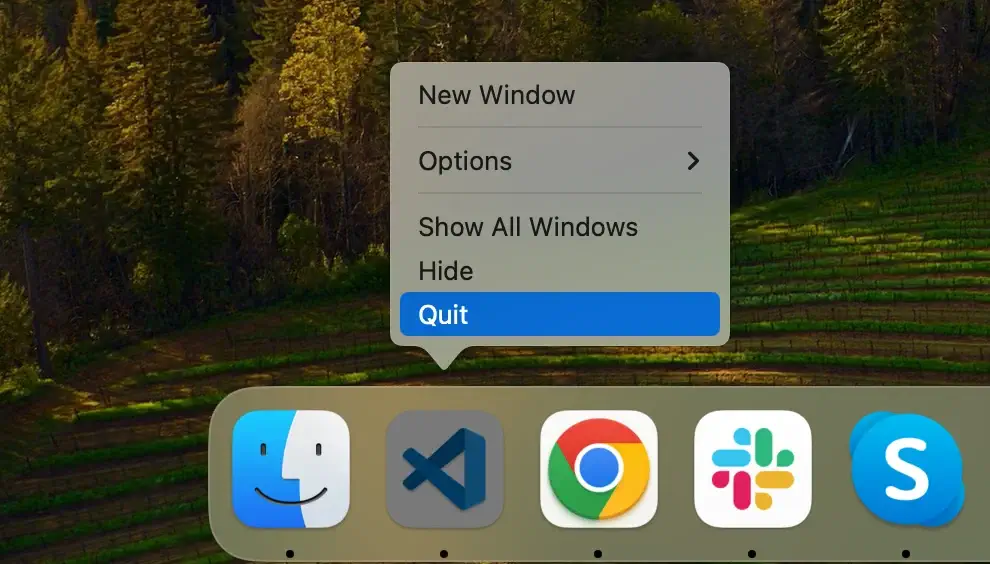
Step 1: Quit VS Code
Menu Bar Option: Click on the Code menu at the top of your screen and select Quit Visual Studio Code from the dropdown.
Dock Option: Alternatively, if the program is in your Dock, right-click (or Control-click) its icon and choose Quit from the context menu.
Force Quit via Activity Monitor: If VS Code is not responding, open Activity Monitor and search for VSCode. Select all the processes related to the app and click the [X] button to force quit the application.
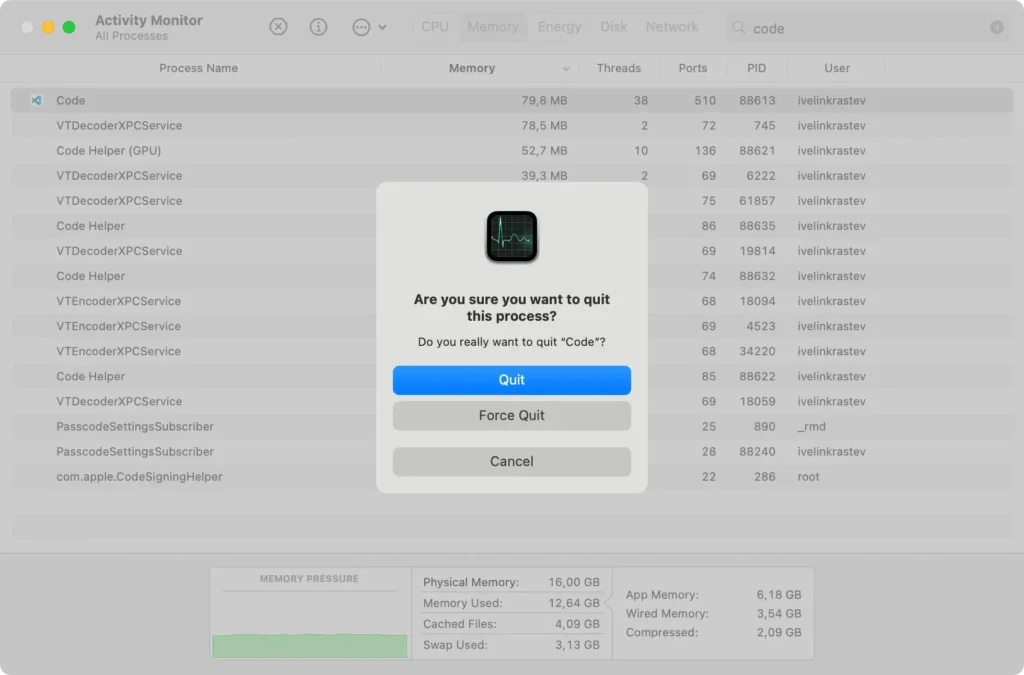
Ensuring that VSCode is wholly closed is crucial for a smooth uninstallation process.
Step 2: Remove the Visual Studio Code app
To remove the main Code application from your Mac:
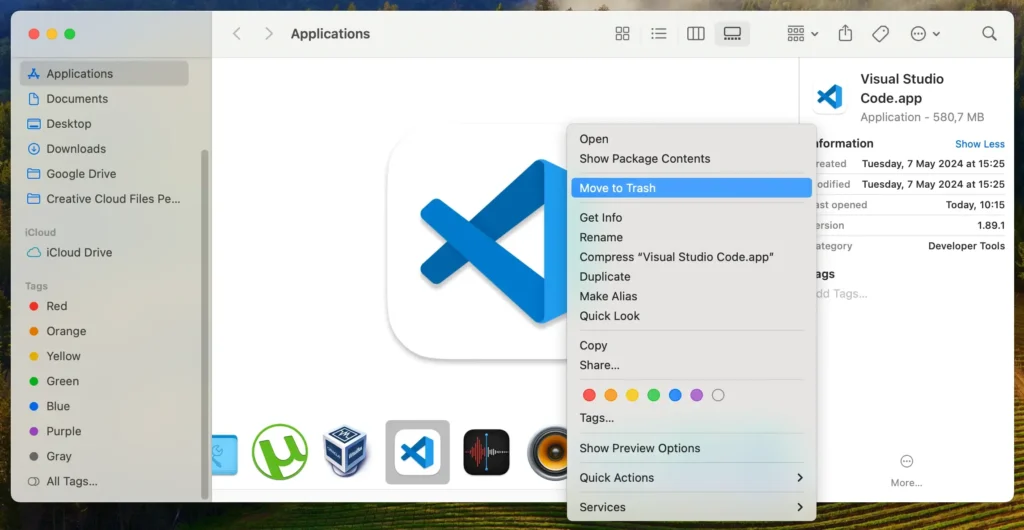
- Open a new
Finderwindow. - Navigate to the
Applicationsfolder or selectGo > Applicationsfrom the Finder’s top menu. - Scroll through the list to locate the VSCode app.
- Drag the app to the Trash in your Dock. Alternatively, right-click (or Control-click) on the program and choose
Move to Trashfrom the dropdown menu. - Empty the Trash to ensure the application is completely removed.
Step 3: Delete VSCode support folders and files
After removing the Code application, the next crucial step is eliminating any remaining files and leftovers to ensure a complete cleanup.
Follow these steps:
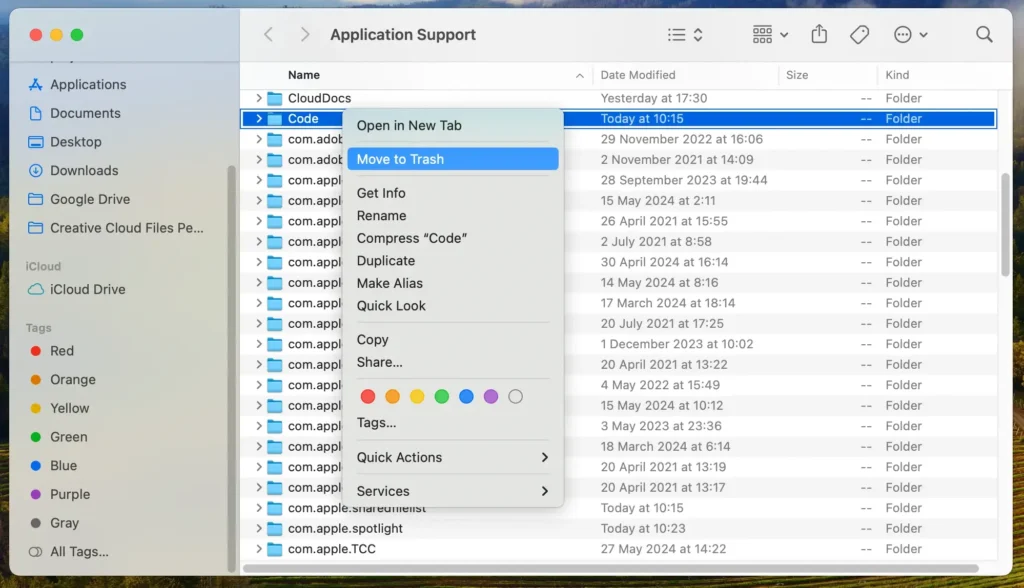
- Open
Finderon your Mac. - In the menu at the top of the screen, click the
Gomenu and thenGo to Folder…or use the shortcutShift + Command (⌘) + Gto access the search box. - One by one, enter the following paths into the search box to locate and remove VSCode’s associated files:
~/Library/Preferences/com.microsoft.VSCode.plist~/Library/Caches/com.microsoft.VSCode/~/Library/Logs/VSCode/
- Empty the Trash to delete all related data permanently.
Note: To remove all VS Code configuration files, you can delete the user data foldersCodeand~/.vscode.
Manually removing VSCode involves more than just deleting the application itself. These steps remove all related data, keeping your Mac clean and clutter-free.
Use Terminal to uninstall VS Code from Mac
Those who prefer a more technical approach can use Terminal commands to uninstall the program from your Mac.
This method allows precise control over the removal process and ensures all associated files are completely deleted.
- Open the Terminal application on your Mac.
- Ensure that all processes related to VS Code are terminated to avoid interference during removal. Type the following command and press Enter:
sudo killall "Visual Studio Code"- Use the following command to remove the Visual Studio Code application:
sudo rm -rf /Applications/Visual\ Studio\ Code.app- Execute the following commands one by one to remove VS Code-associated directories:
rm -rf ~/Library/Application\ Support/Code
rm -rf ~/Library/Preferences/com.microsoft.VSCode.plist
rm -rf ~/Library/Caches/com.microsoft.VSCode
rm -rf ~/Library/Logs/VSCode- To finalize the uninstallation process, use the following command:
sudo rm -rf ~/.Trash/*Once you have executed these commands, Visual Studio Code and its associated data will be completely uninstalled from your machine.
Note: If you installed Visual Studio Code using a package manager likeapt-get, you can easily remove it by running the commandsudo apt-get remove codein your terminal. Here,coderefers to the name of the VS Code Debian package. This command ensures the application and its associated files are uninstalled cleanly from your system.
Reinstall VSCode on your Mac
If you need to reinstall Visual Studio Code (VS Code) on your Mac after uninstallation, follow these steps to get the setup right:
- Visit the official download page provided by Microsoft. Select the Mac version to download the installer. Note that different Code packages may be available for download.
- Once the download is complete, open the file. Then, drag the Code icon to the Applications folder to install the application.
- Open Visual Studio Code and follow the initial prompts to configure the program according to your needs.
- After launching, you can install any extensions you need by navigating to the Extensions view in the sidebar.
Reinstalling Visual Studio is straightforward and allows you to customize your development environment, ensuring it meets your current needs.
Summary
Successfully uninstalling Visual Studio Code from your macOS can be accomplished in several ways, whether manually, using Terminal commands, or with the help of SpyHunter.
This article provides a comprehensive guide to thoroughly remove all associated files and configurations, keeping your computer clean and efficient. If you need to reinstall VS Code, the process is simple: download the installer from Microsoft and follow the setup instructions.
For further guidance on managing your applications, check out our articles on how to uninstall Visual Studio and how to uninstall a Mac application.