How To Screen Share On Mac: 4 Easy Ways
Before we dive in
Before we dive in, let's make sure you stay safe online. We created SpyHunter because your security matters to us.
Protect your computer today — download SpyHunter right here! Check out our top tips below to keep your computer safe and secure.
Ever needed to share your Mac computer screen, either to troubleshoot issues or collaborate on a project? Before you dive into sharing your screen, there are a few vital steps to ensure everything runs smoothly.
This post will walk you through enabling screen sharing on your Mac, optimizing your settings for a seamless experience, and protecting your data during the process.
We’ll also explore various methods to share your screen effectively, whether through built-in tools or third-party applications.
The prerequisites for Mac screen sharing
Before you dive into Mac display sharing, it’s crucial to ensure everything is set up correctly to avoid hiccups during your connection.

Ensure your network settings are optimized for sharing
For a seamless screen sharing experience, having a stable and fast internet connection is key.
Check your network settings to optimize your connectivity. This includes ensuring your Wi-Fi signal is strong or, for even better reliability, using a wired Ethernet connection, if possible.
Additionally, limit bandwidth-heavy applications running in the background, which can subtract from your connection’s quality during any screen sharing session.
Check Mac compatibility and software requirements
Ensuring your Mac meets the software requirements for screen sharing is also essential.
Your operating system should be up-to-date to avoid compatibility issues with the latest screen sharing features.
Navigate to Apple menu > About This Mac to check your current macOS version and update it if necessary. Also, verify that any third-party software used in the screen-sharing process is compatible with your Mac model and operating system version.
Ways to share your Mac’s screen
1. Using built-in features for screen sharing
Sharing your Mac display with others can be incredibly useful whether you are collaborating on projects, troubleshooting, or conducting a presentation.
MacOS offers native tools for screen sharing that are both convenient and powerful.
- Click the Apple menu at the top left corner of your screen and select
System Settings. - From the sidebar, choose
Generaland thenSharing. - If
Remote Managementis enabled, you’ll need to disable it. You cannot have bothScreen SharingandRemote Managementenabled simultaneously. - Enable screen sharing by checking the box next to it.
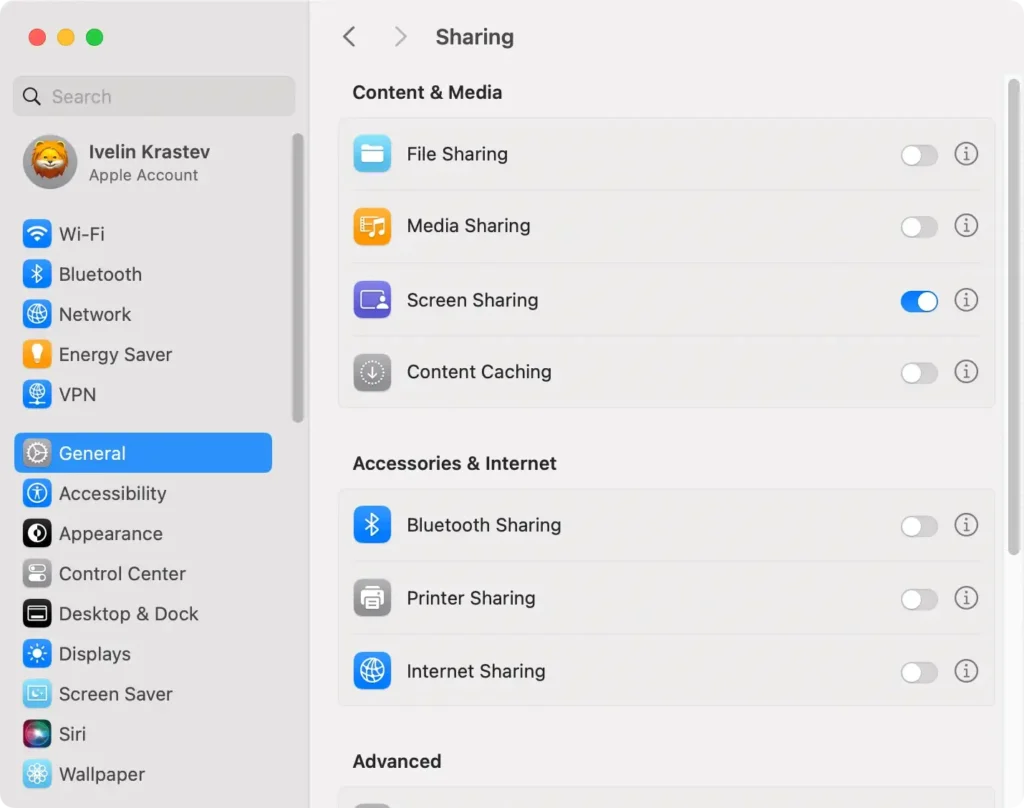
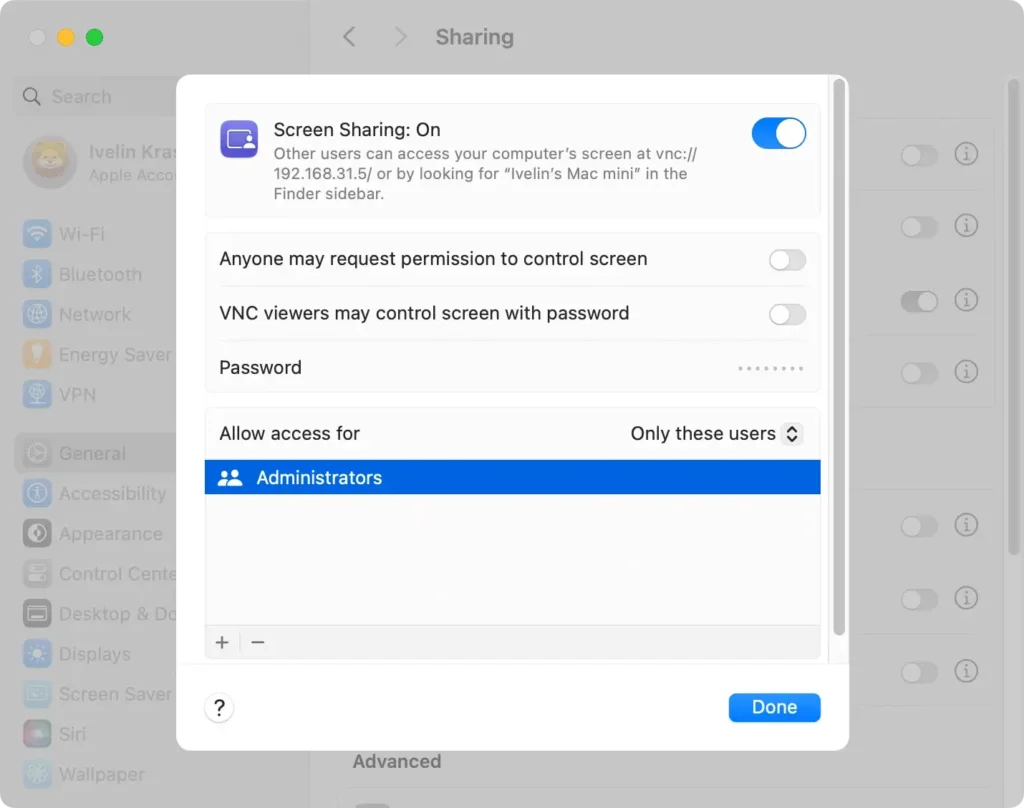
When enabling screen sharing, security is a key concern.
- Click the info icon next to the
Screen Sharingbox. - To manage who can access your Mac, click the
Allow access fordropdown menu under theScreen Sharingpreferences. - Here, you can select
All usersor limit access toOnly these users. If you opt for the latter, you can add users by clicking the plus button and selecting users from your network. You can add all the users of your Mac computer except sharing-only and guest users.
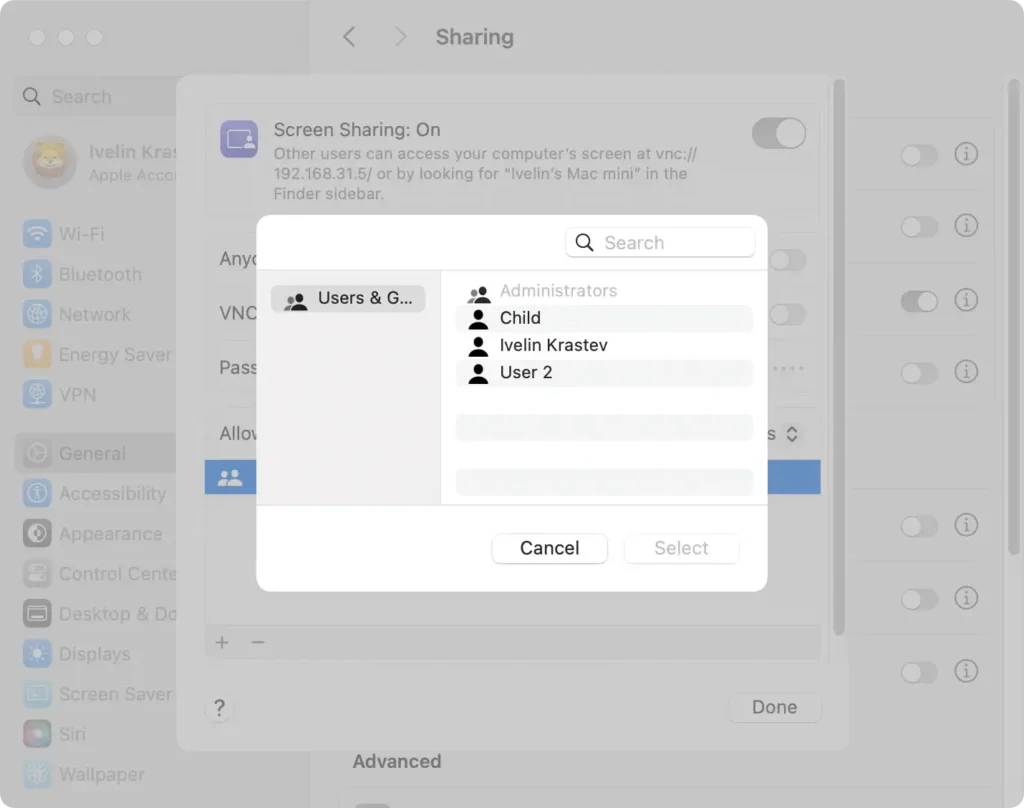
- During this setup, it is crucial to ensure you set a robust password if you enable the option for VNC viewers to control the computer’s screen with a password to prevent unauthorized access.
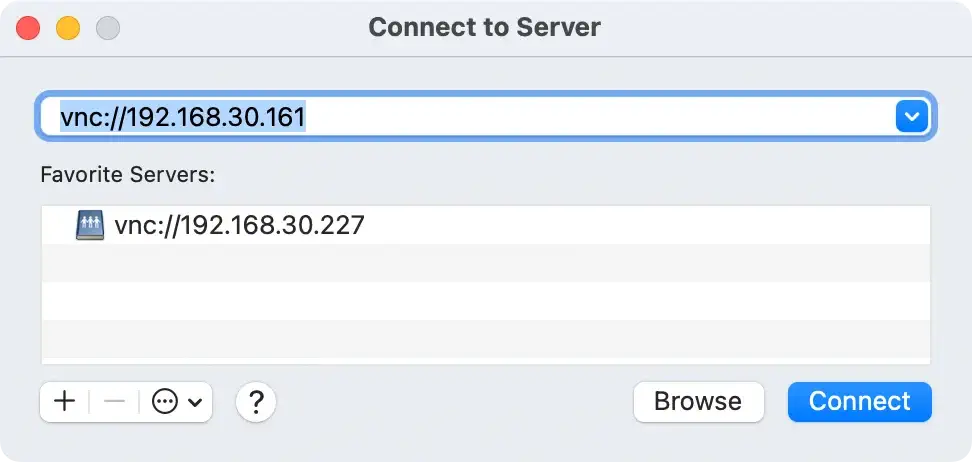
To remotely connect another Mac to your session, you will need to go to Finder > Go and select Connect to Server.
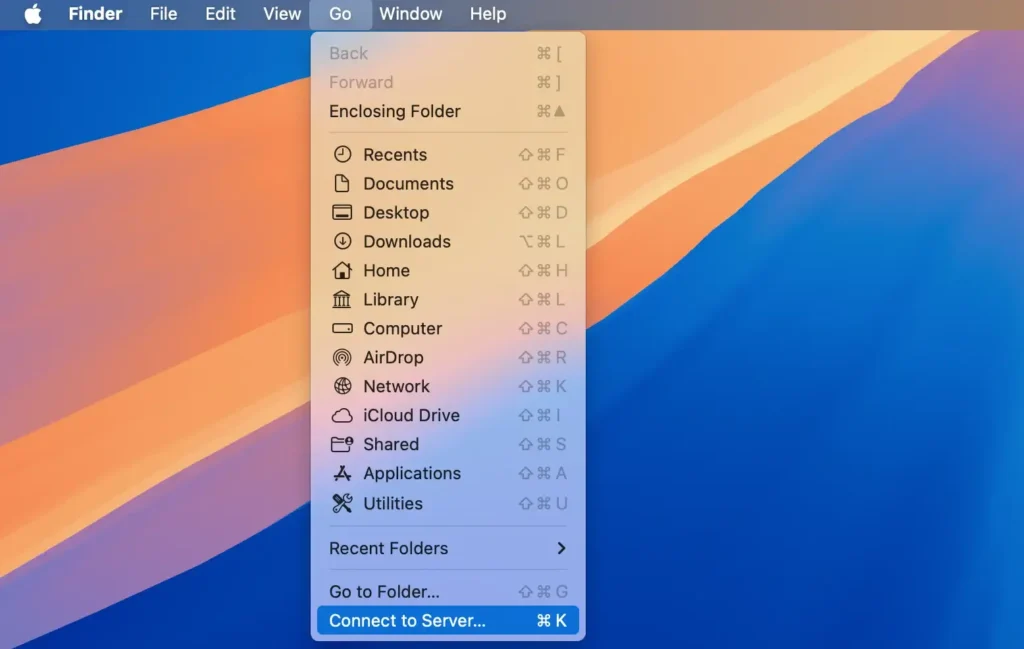
Then, enter the VNC address or select the Mac’s name from the list. If you’re both logged into the same Apple ID, the sharing will happen automatically. Otherwise, the other user will be asked to enter the username and password for the shared Mac desktop.
Upon request, enter the username and password, then proceed to log in. This simplicity makes Mac’s built-in screen sharing a straightforward choice for many users.
2. Share screen using the Facetime app
Facetime allows you to share your screen in a number of ways, but only when you are in one-to-one conversations.
Do the following to share your Mac screen while on a Facetime audio or video call:
- While on a call, open a different application you want to share.
- Click the camera button in the menu bar, and then click the icon of a screen and a person.
- Choose to share your whole screen, only a single window, or all windows from an app to begin screen sharing.
3. Use the Messages app to share your Mac’s screen
You can also share your screen while in a text message chat using the Messages app.
- Open the Messages app.
- Select the conversation with the person you wish to share your screen with.
- Click on the camera button and choose
Share My Screen.
Once selected, an invitation will be sent to the other computer. When they accept, an audio call will start automatically, allowing you to communicate while sharing your screen.
To end the session, click the screen sharing icon in the menu bar and select Stop Sharing.
4. Share your Mac’s screen using third-party apps
While the built-in MacOS screen sharing capabilities handle basic needs, third-party applications can enrich your screen sharing experience.
Here is a list of popular Mac apps that allow screen sharing you can consider. They are available on other operating systems, so you can use that functionality to share your Mac’s screen with people on different hardware platforms who are not using Mac computers:
- Zoom: Zoom delivers high-quality screen sharing, allowing users to share their entire desktop, specific applications, or a whiteboard. Zoom also includes options for remote control, letting participants control
- another user’s screen, making it ideal for tech support or collaborative tasks.
- Skype: Skype also allows users to share their screen with one click during a video chat. It also includes basic collaboration features such as file sharing and messaging.
- Slack: Slack offers screen sharing during video calls. Users can share their entire screen or a specific window. One standout feature is that multiple participants can share their screens simultaneously, and remote control capabilities enhance collaboration during meetings.
- TeamViewer: TeamViewer is designed specifically for remote access and tech support. It provides comprehensive features, including full remote control and multi-monitor support, all while ensuring high-quality screen sharing.
Use SpyHunter for extra security
A security app like SpyHunter can provide an extra level of security when screen sharing and using your Mac daily.
SpyHunter is a robust anti-malware application that includes a real-time scanner that stops threats before they can infect your Mac and a malware detection engine that can remove malware and malicious leftovers from your system to ensure an optimal and smooth screen-sharing experience.
- Download the app here and install it.
- Launch a full system scan, using SpyHunter’s main menu.
- Select any potential malware discovered from the list you will see once the scan completes.
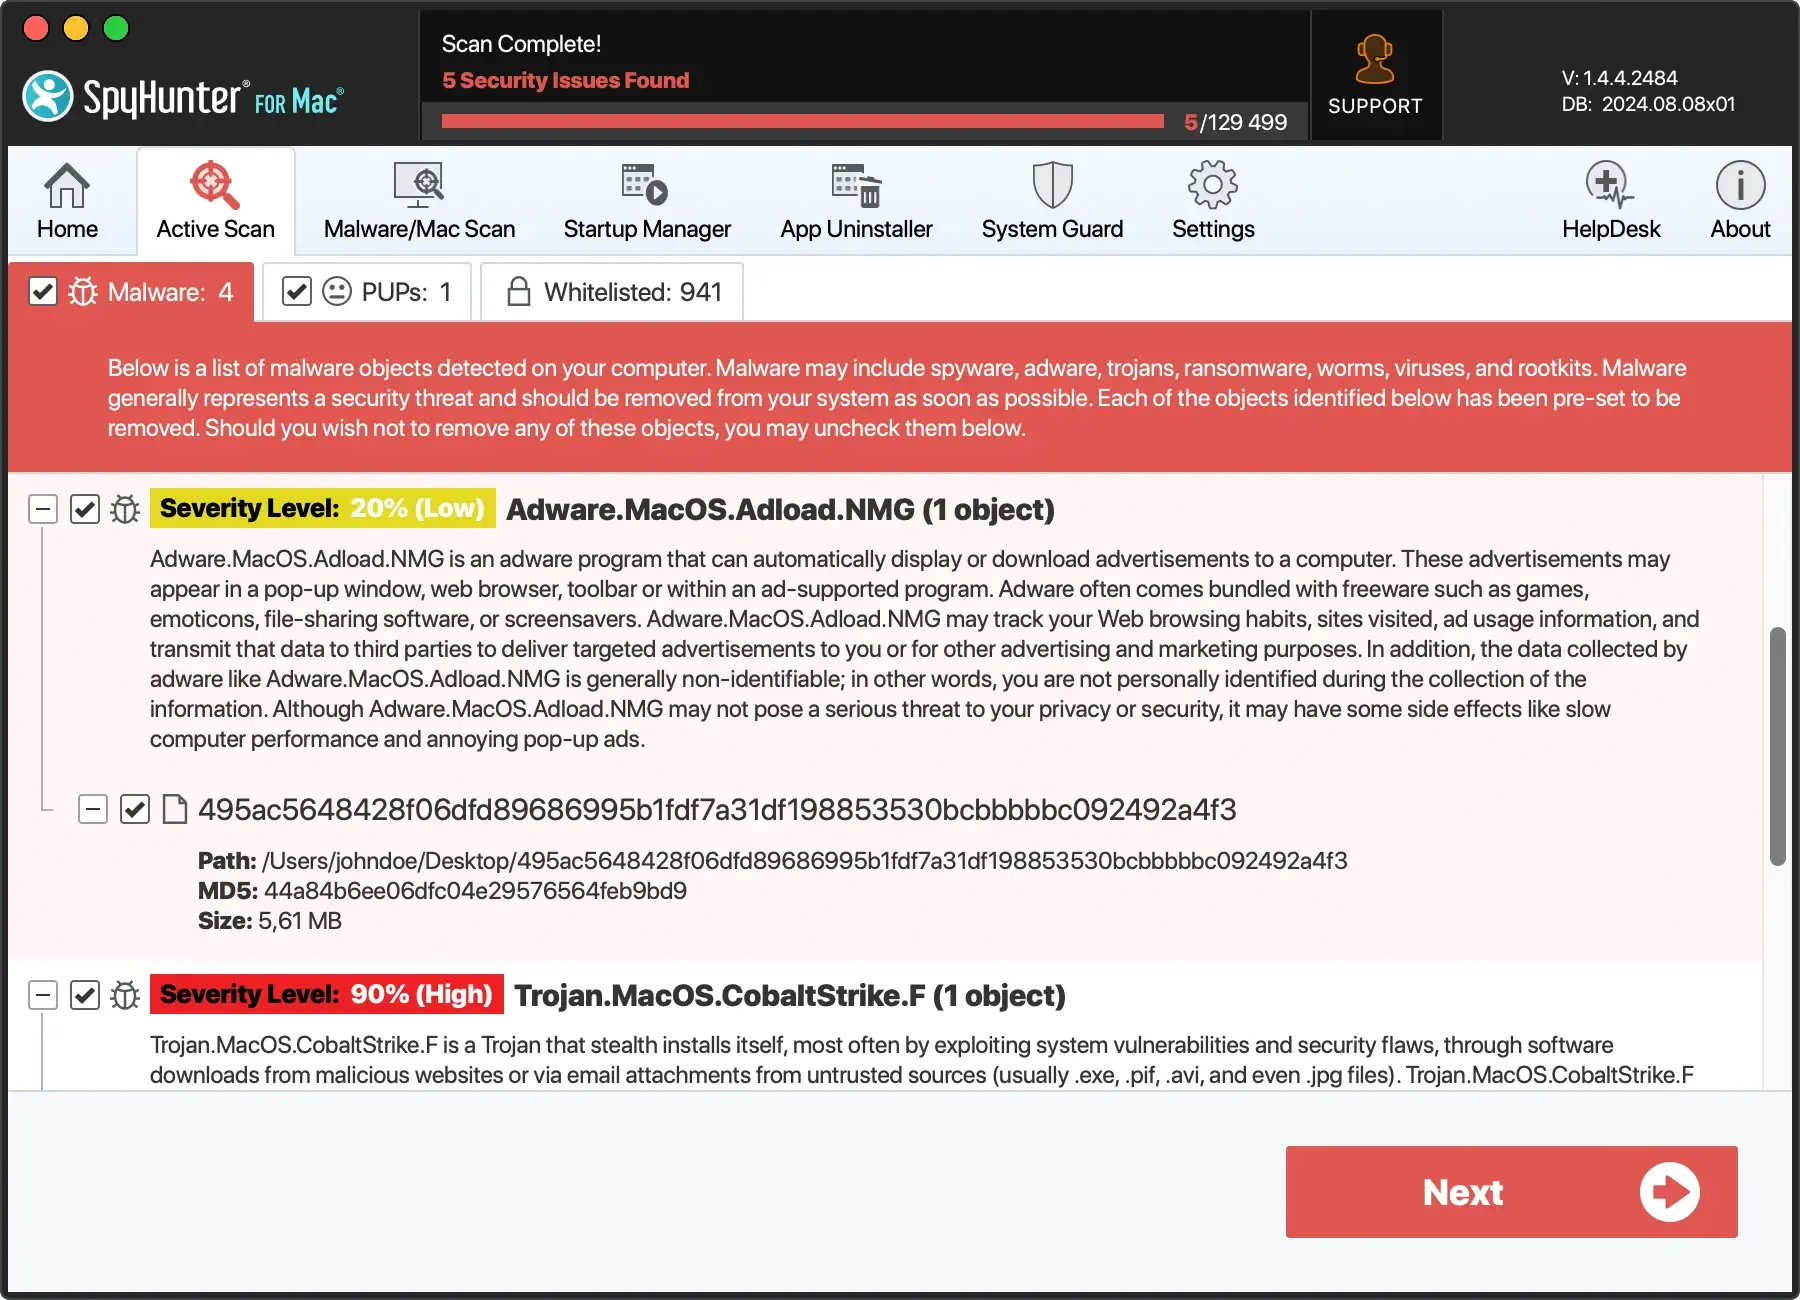
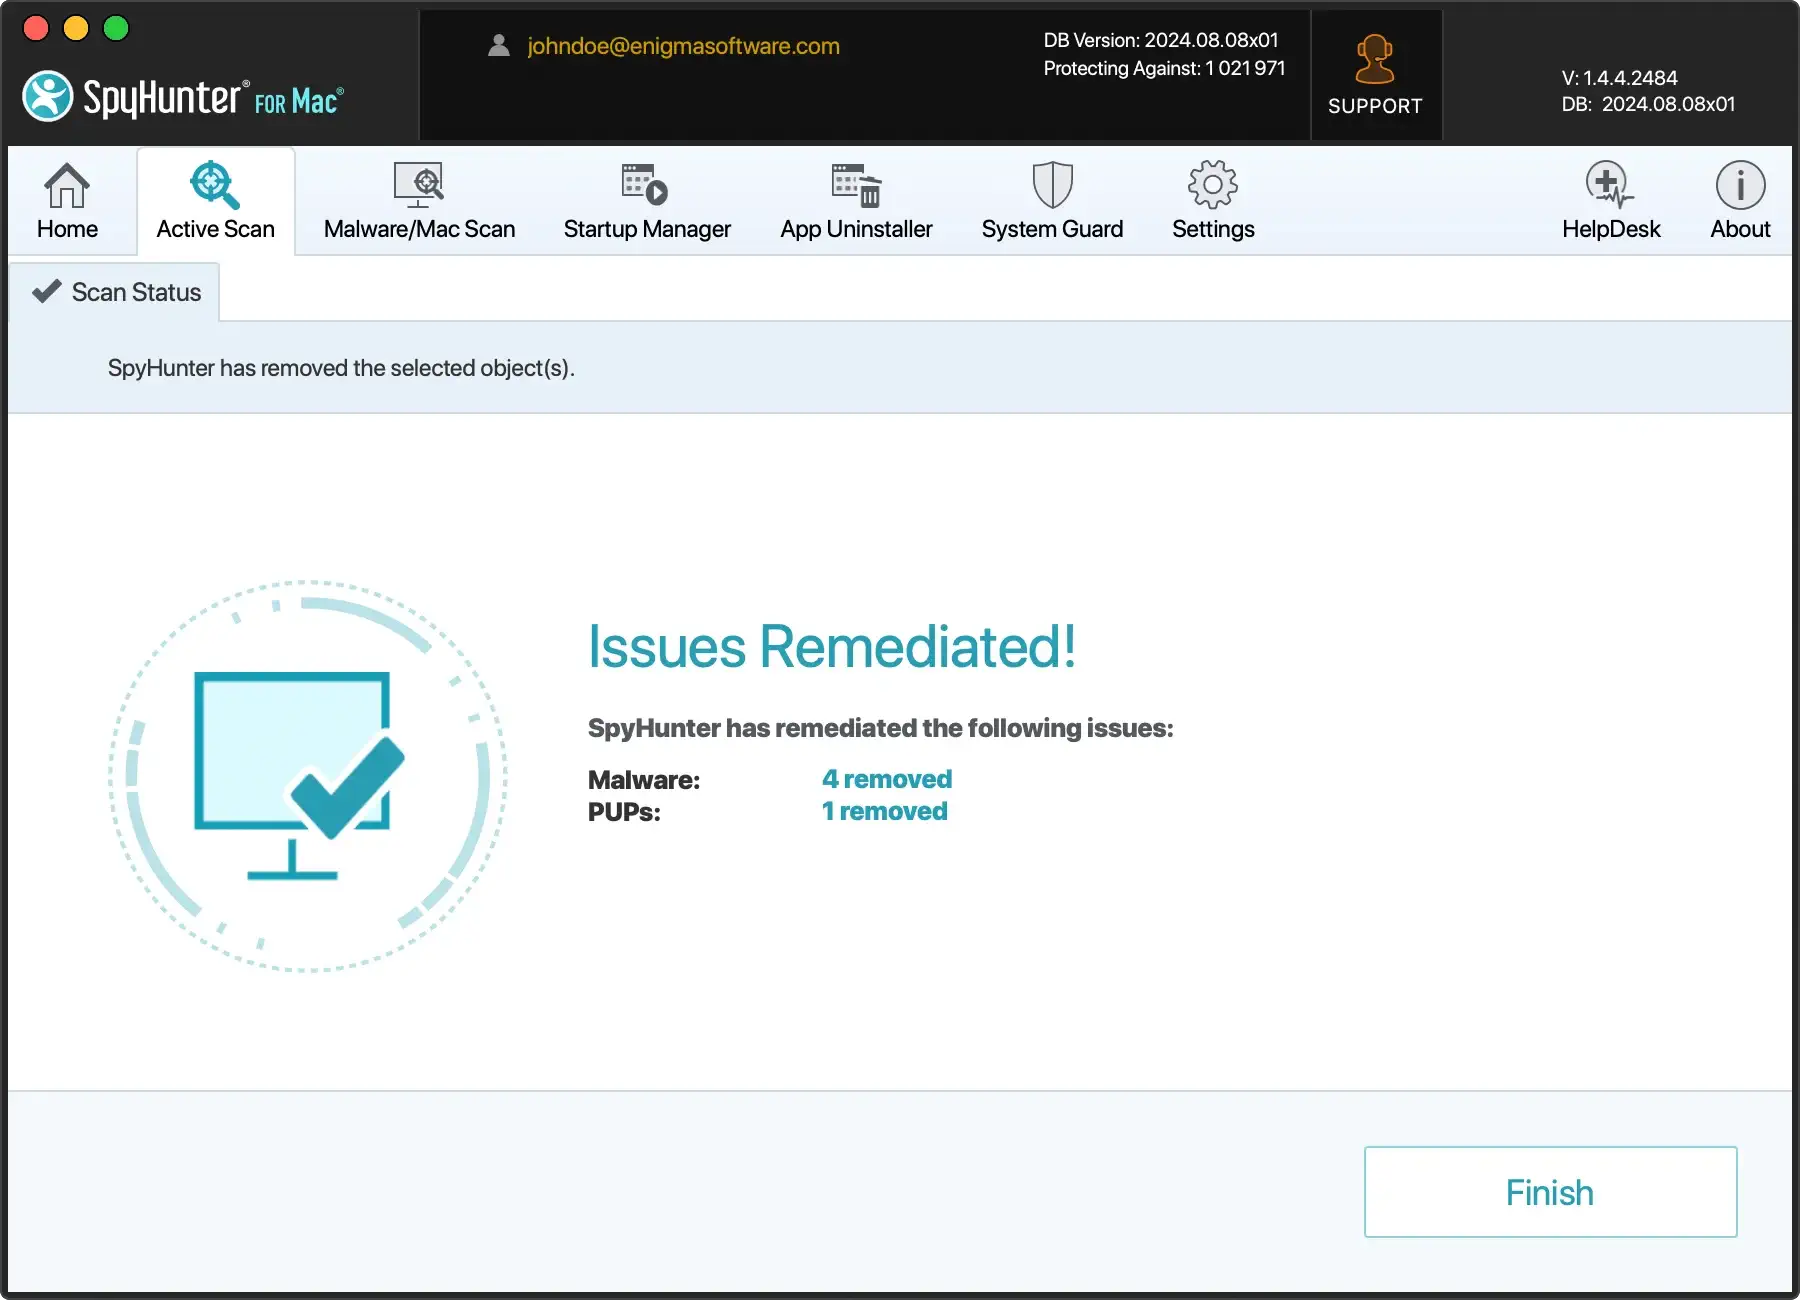
- Proceed to remove any threats found using the interface buttons and enjoy a smoother and safer user experience.
FAQs about Mac screen sharing
Can I share my display with multiple users at once?
Yes, sharing your screen with multiple users simultaneously is feasible using your Mac’s built-in capabilities or through third-party software tailored for business environments.
Here’s how to do it:
- Using macOS built-in features: If every user is on your local network, you can use the Screen Sharing app but manage multiple windows manually.
- Using third-party conferencing tools: Applications like Zoom or Microsoft Teams allow you to share your display with multiple users regardless of their location. They provide tools to manage participants and share screens effortlessly.
Always ensure participants have appropriate permissions to access the session securely.
What to do if Mac screen sharing is not working?
Several solutions can resolve issues when your Mac screen sharing isn’t functioning correctly:
- Check network connections: Ensure both the host and recipient devices are connected to the internet.
- Review permissions: On your Mac, go to
Apple menu > System Settings, clickGeneralin the sidebar, then clickSharingand ensureScreen Sharingis enabled. - Configure firewall settings: Sometimes, the firewall may block screen sharing communications. Adjust these settings in
System Settings > Network > Firewall. - Restart devices: Occasionally, a simple restart of the devices involved can resolve connectivity issues.
If the problem persists, consulting Apple Support or visiting the Apple Support website can provide further assistance.
For optimization and security, tools like SpyHunter can be beneficial. They ensure no malicious software interferes with your Mac’s operations, including display sharing functionalities.