Change Security Preferences on Mac (System Settings Guide)
Before we dive in
Before we dive in, let's make sure you stay safe online. We created SpyHunter because your security matters to us.
Protect your computer today — download SpyHunter right here! Check out our top tips below to keep your computer safe and secure.
Understanding and managing security settings on your Mac can help protect your data, personal information, and online privacy.
In this guide, we’ll cover all the essential steps to change security preferences on your Mac, including managing app permissions, enabling advanced security features, and configuring vital settings in optimal protection.
Let’s explore how to keep your device safe and secure.
How to change security preferences on Mac for unidentified app developers
By default, your Mac restricts applications from unidentified developers to prevent potential threats. You can control which apps can run:
- Open
System Settings(orSystem Preferenceson older macOS Versions) - Go to
Privacy & Security. - Under the
Securitysection, findAllow applications downloaded fromand selectApp StoreorApp Store and identified developers.
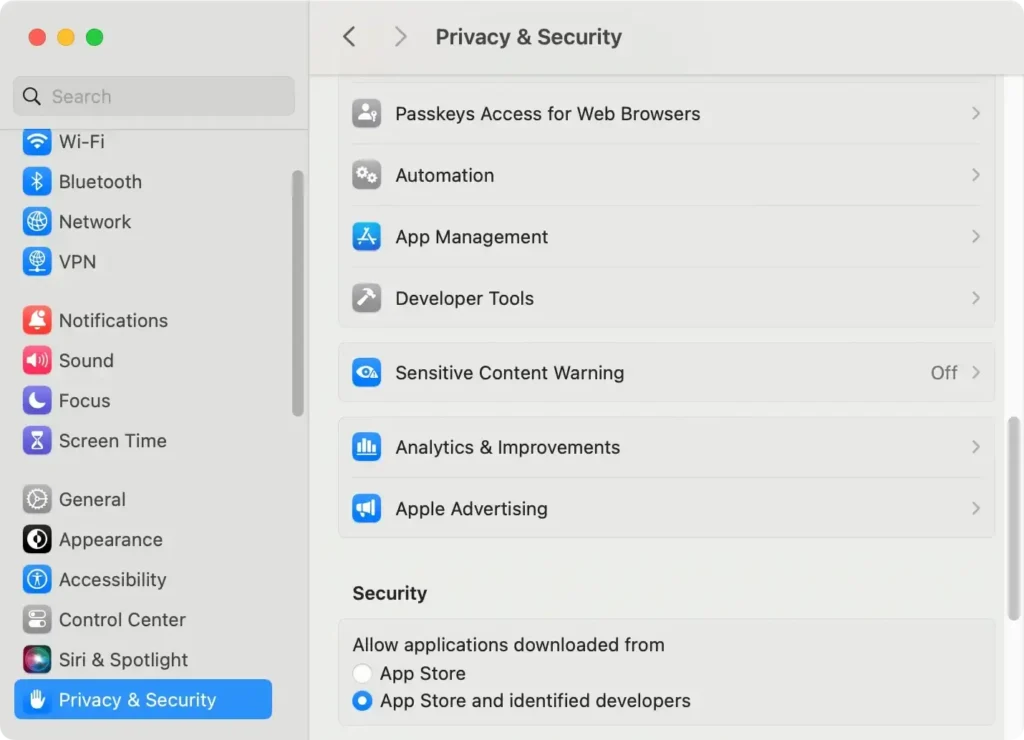
Choosing only apps from identified app developers or the Mac App Store minimizes the risk of malware on your device.
Prevent apps from accessing your location, contacts, photos, calendar, and reminders
To protect your sensitive data from unauthorized access, macOS provides easy-to-use preferences for managing which apps can access your personal information, including location, contacts, photos, calendar, and reminders.
Here’s a step-by-step guide to adjusting these permissions:
- Open
System Settings. - In the sidebar, select
Privacy & Security. - Select the category you want to modify, such as
Location Services,Contacts,Photos,Calendar, andReminders.- Location Services: Uncheck the box next to
Enable Location Servicesto turn off location tracking entirely. Alternatively, scroll through the list of apps and uncheck boxes next to individual apps to restrict their location access. You can also clickDetailsunderSystem Servicesto view and control which system features use your location. - Contacts, Calendar, and Photos: For each category, you’ll see a list of apps that have requested access to your data. Uncheck the box next to any app to remove its access.
- Location Services: Uncheck the box next to

By limiting app access to sensitive data, you safeguard your privacy and help prevent unauthorized use of your location, contacts, and calendar data.
Adjusting these settings allows you to keep personal information private and control who can access it.
Note: Some apps may ask for access to data categories when you install them. It's a good practice to periodically review these settings to ensure only trusted apps have access.
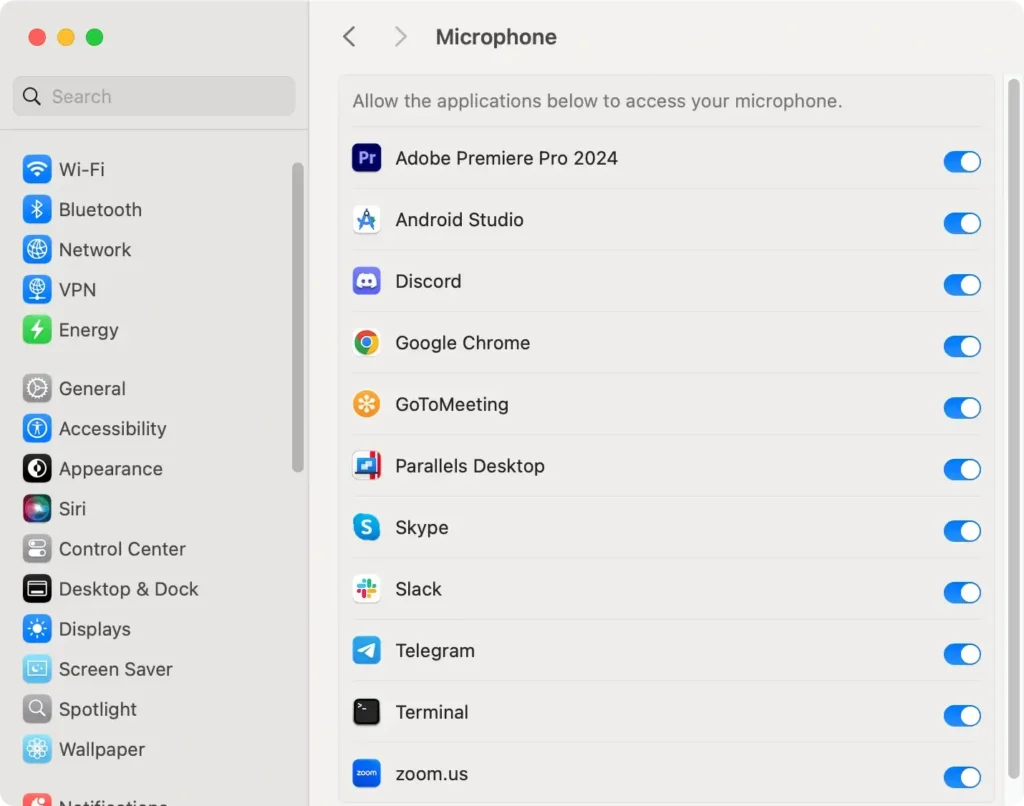
Prevent apps from accessing your camera or microphone
Controlling which apps can access your camera and microphone is essential for maintaining your privacy on a Mac.
By adjusting these permissions, you can ensure that only trusted apps have access to your device’s audio and video features.
Here’s how to manage these settings:
- Open
System Settings(System Preferenceson older macOS versions). - Go to
Privacy & Security. - Locate
CameraorMicrophone. Click on the one you wish to adjust. - You’ll see a list of apps that have requested access to your camera or microphone. Toggle each app’s permission on or off based on your preferences.
- On allows the app to access the feature.
- Off restricts the app’s access.
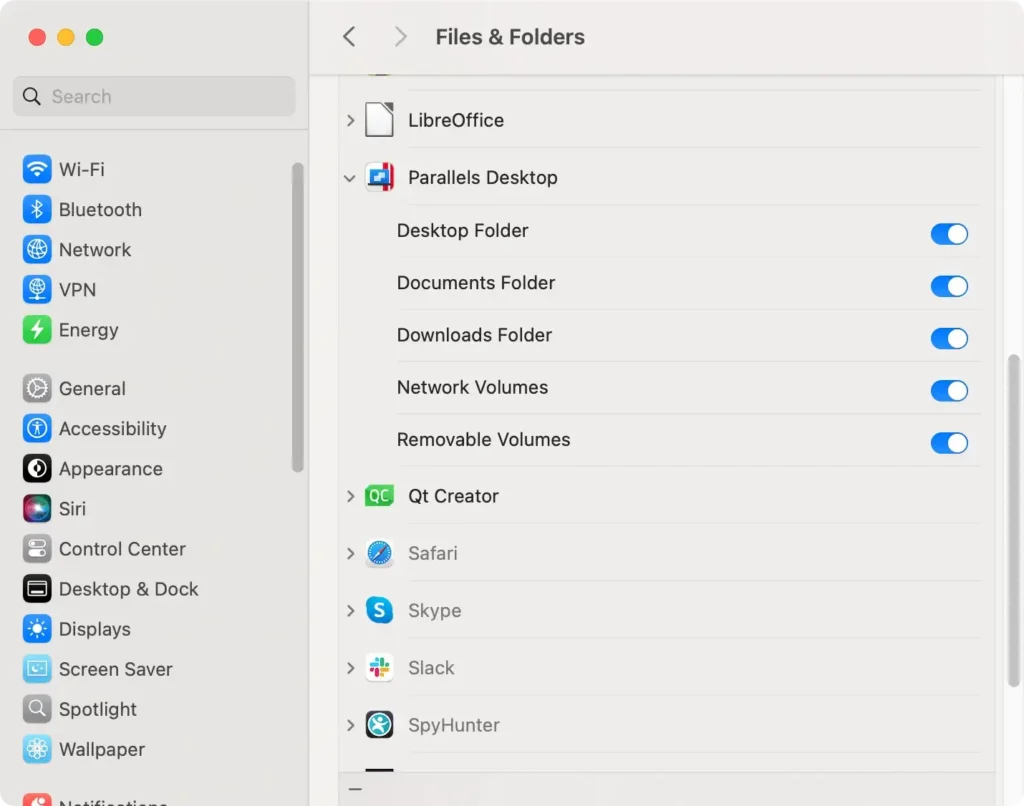
Stop apps from accessing your Desktop and Documents folders
By default, macOS requires apps to request permission before accessing your Desktop and Documents folders.
You can easily manage these permissions and prevent apps from accessing these folders if needed. Here’s how:
- Navigate to
System Settings > Privacy & Security. - Scroll down to find
Files and Folders. Click on it to view a list of apps that have requested access to your Desktop, Documents, or other folders. - Find the app you want to restrict and uncheck the box next to a folder to remove access.
Data protection preferences on Mac
Turn on FileVault for full-disk encryption
Encrypting your data with FileVault ensures that unauthorized users cannot access your files. To enable FileVault:
- Go to
System Settings(System Preferences) - Click
Privacy & Security. - Click
Turn On FileVaultto encrypt your files. - Create a recovery key to unlock your startup disk if you forget your login password.
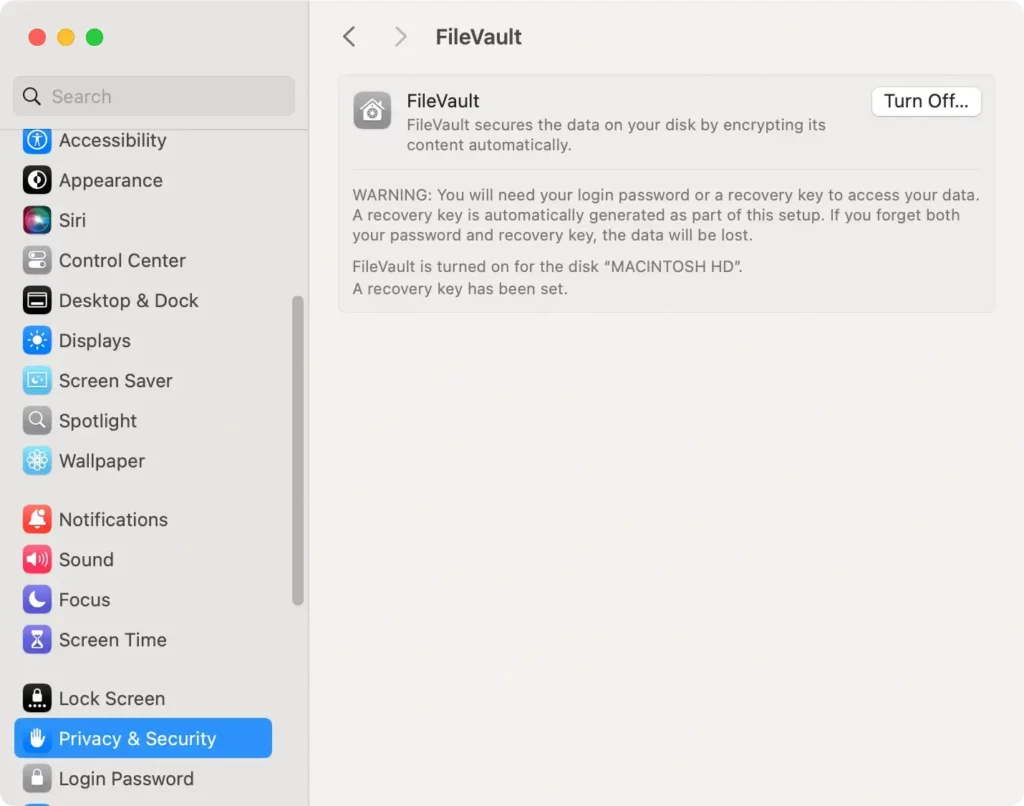
Store the recovery key in a secure location. With FileVault activated, you have encrypted data that is secure.
Turn on Firewall for network protection
Enable the firewall to block incoming connections and protect your Mac from external threats:
- Open
System Settings > Network > Firewalltab. - Click
Turn On Firewall. - To restrict connections further, select
Firewall Optionsand allow only specific apps.
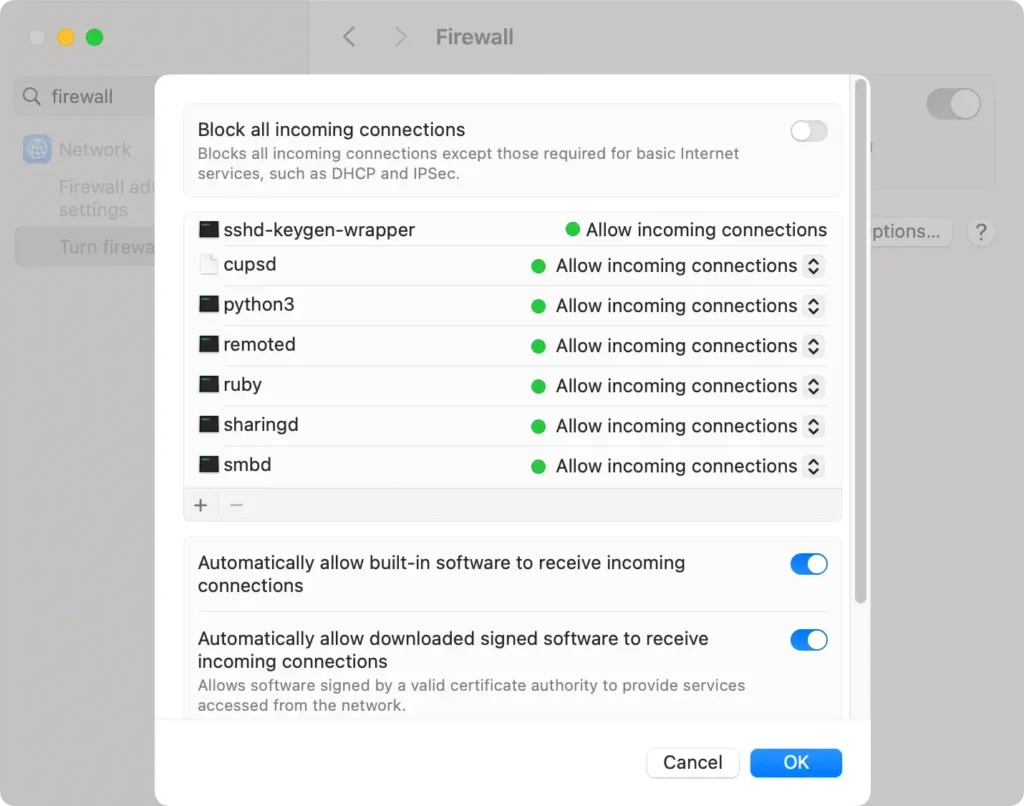
With the firewall activated, incoming connections are limited to enhance security, making it harder for unapproved apps to connect to your device.
Adjust Lock Screen settings
Customizing your Mac’s lock screen preferences can improve security by requiring a password after periods of inactivity and helping to protect your data. Follow these steps to manage lock screen settings on your Mac:
- Go to the Apple menu in the upper-left corner of your screen and select
System Settings. - Choose
Lock Screenfrom the sidebar. - Under
Start screen saver when inactive, select a time limit that suits your security needs. For example, setting it to 10 minutes will initiate the screen saver after 10 minutes of inactivity. - Next, locate
Turn display off when inactiveand choose an interval. A 10-minute setting is recommended to both conserve energy and protect your Mac when it’s idle. - To ensure that your Mac prompts for a password when it wakes, select
Require password after screen saver begins or display is turned offand choose a short interval (e.g., 5 minutes). This adds a layer of protection to your device. It will automatically log out after a brief period of inactivity.
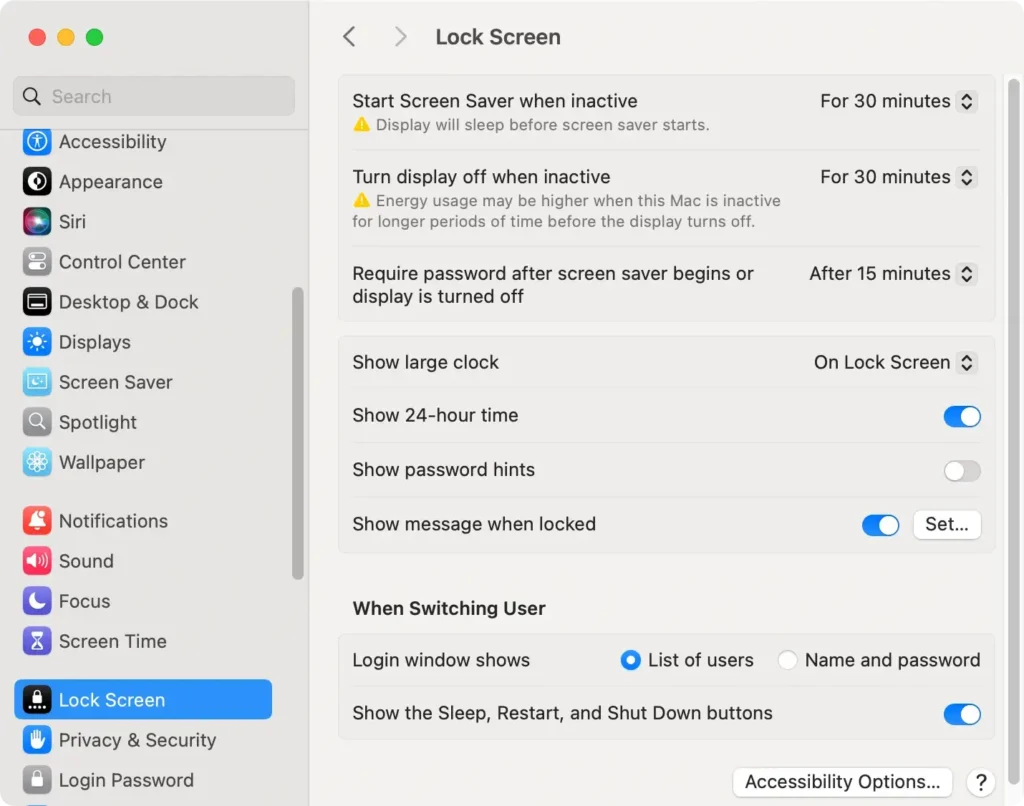
By customizing these settings, you can ensure that your Mac remains protected during idle times, reducing the risk of unauthorized access while saving battery power when not in use.
Require administrator password for system changes
Setting your Mac computer to require an administrator password for significant changes can help protect against unauthorized access and prevent malware from making system-wide modifications.
To enable this setting:
- Click the Apple menu and select
System Settings. - Click
Privacy & Securityfrom the sidebar. - Scroll down to find the advanced settings button.
- Check the box next to
Require an administrator password to access system-wide settings. - Click
Doneto save your preferences.
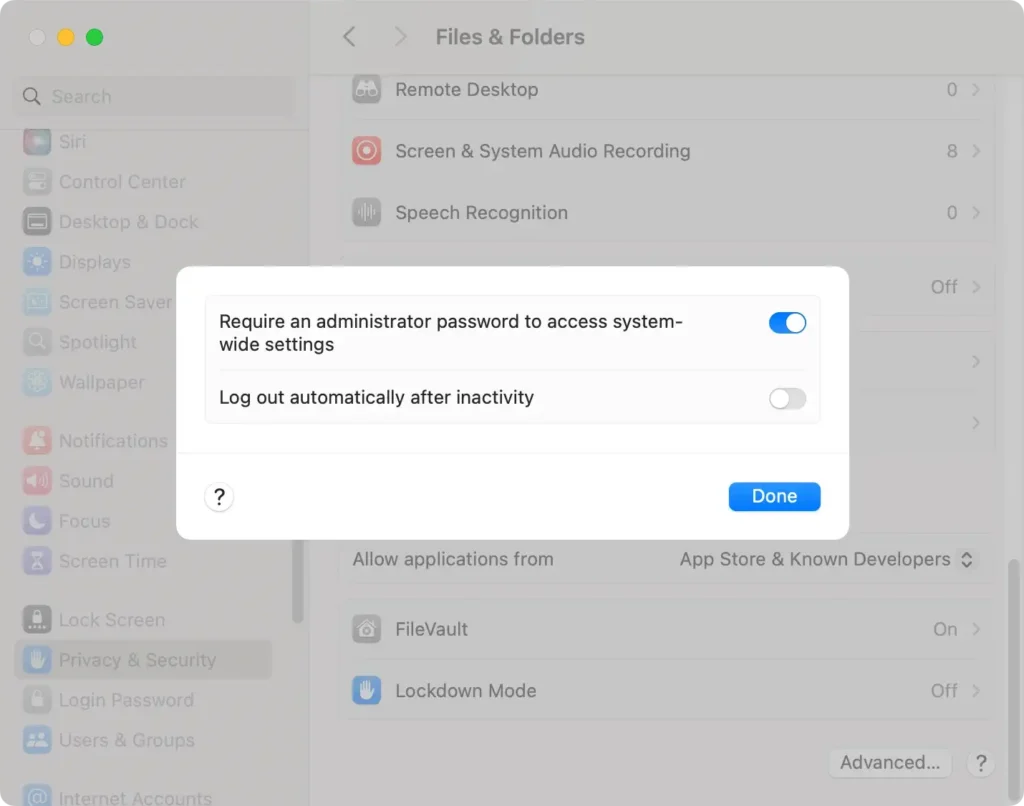
With this option enabled, you ensure that major changes on your Mac require an administrative password, strengthening overall security and preventing unauthorized modifications.
Best practices for maximum security
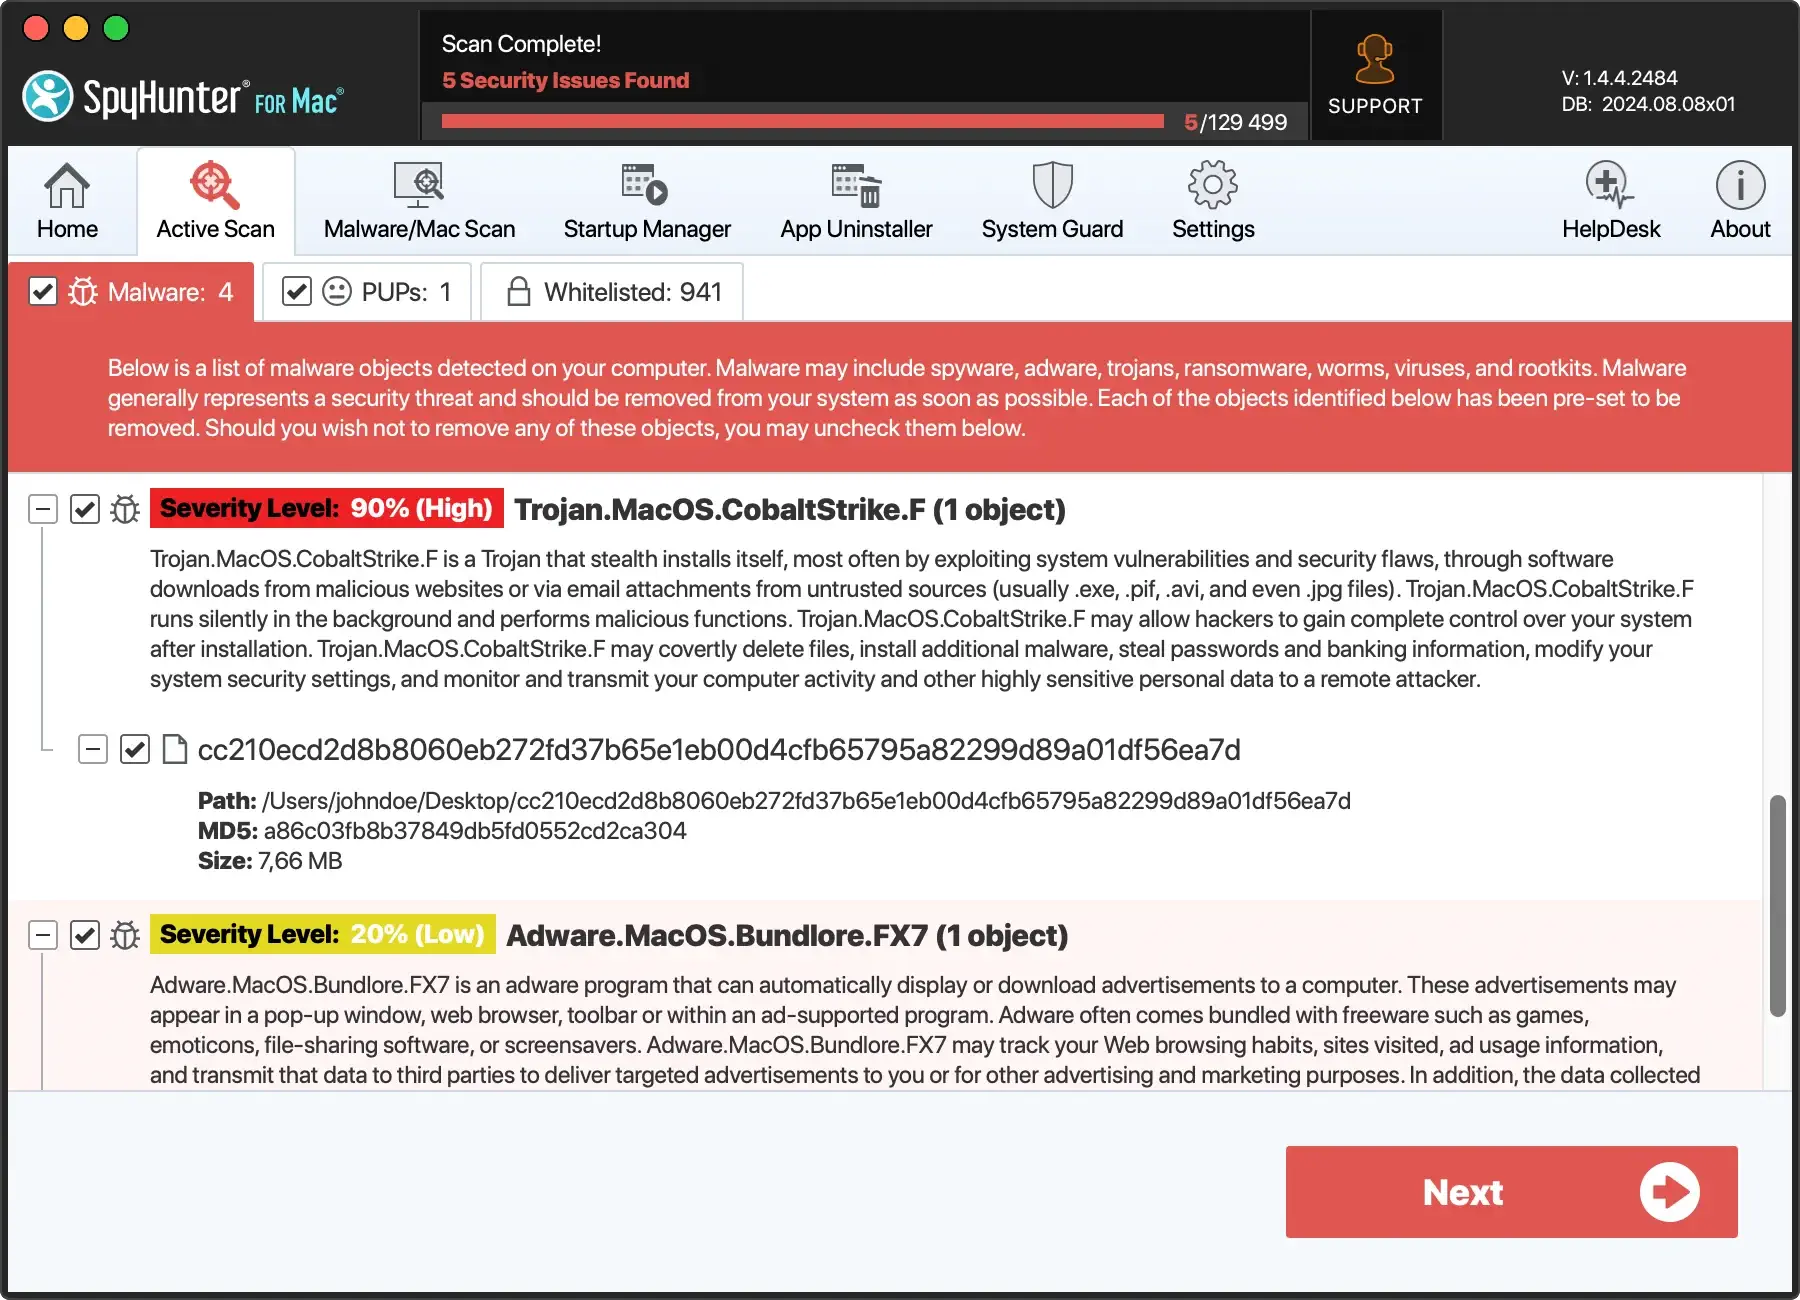
Use SpyHunter for enhanced protection
Adding SpyHunter for Mac to your security toolkit provides an extra layer of defense against malware, browser hijackers, and unwanted programs.
SpyHunter scans for potential threats in real-time, making it an effective solution for keeping your Mac safe from malicious software.
To get started:
- Download SpyHunter and follow the installation instructions.
- Open SpyHunter and select
Scan Nowto run a comprehensive scan. - Review any detected threats.
- Quarantine or remove unwanted files, ensuring your Mac stays secure.
Turn on automatic updates
Auto updates ensure your Mac computer receives the latest security patches and software enhancements, helping protect both your device and personal data.
To enable auto-updates:
- Navigate to
System Settings. - Click
General > Software Update. - Click the
iicon next toAutomatic Updates. - Check the boxes next to:
Download new updates when availableto download updates without prompting.Install macOS updatesto automatically install macOS updates.Install app updates from the App Storeto keep Apple App Store apps up to date.Install Security Responses and system filesfor critical security updates.
- Click
Doneto save your preferences.
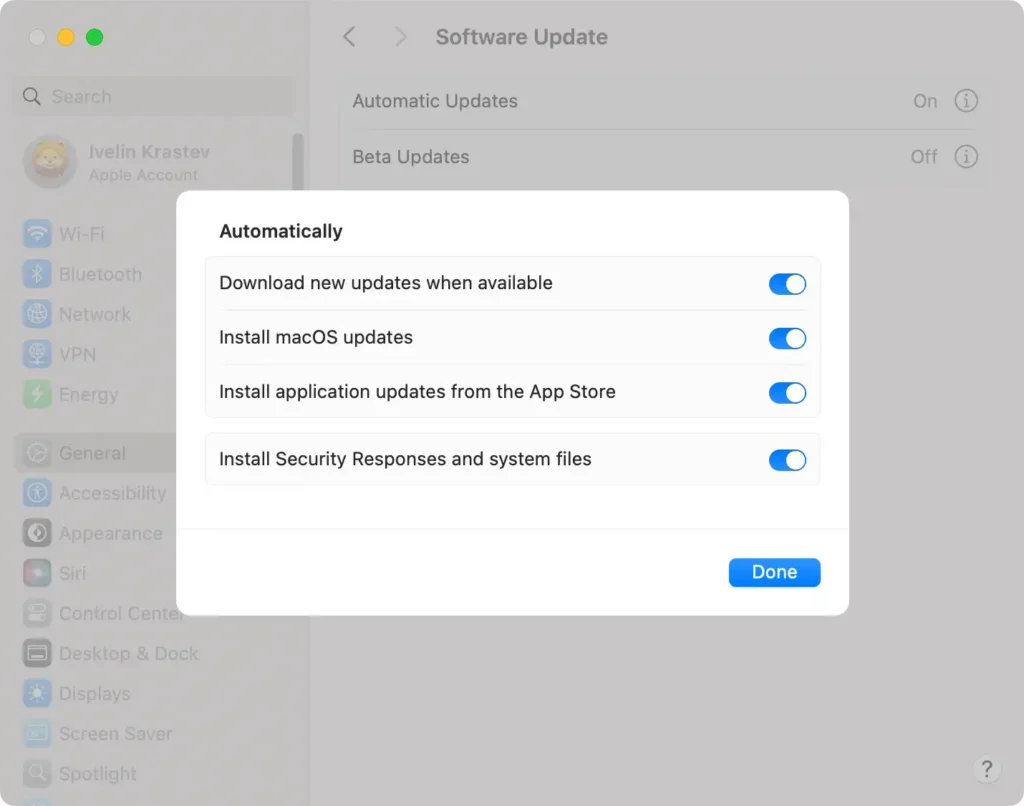
With automatic updates turned on, your Mac computer stays protected with the latest security and performance improvements.
Set up Time Machine backups
Regular backups are essential for protecting your data. Time Machine, macOS’s built-in backup feature, can create backup copies of your files on a physical drive, ensuring you can restore essential data if needed.
To enable Time Machine:
- Go to
System Settings > Time Machine. - Select
Add Backup Disk, then choose an external drive. - Time Machine will automatically begin periodic backups, securing your data against accidental loss.
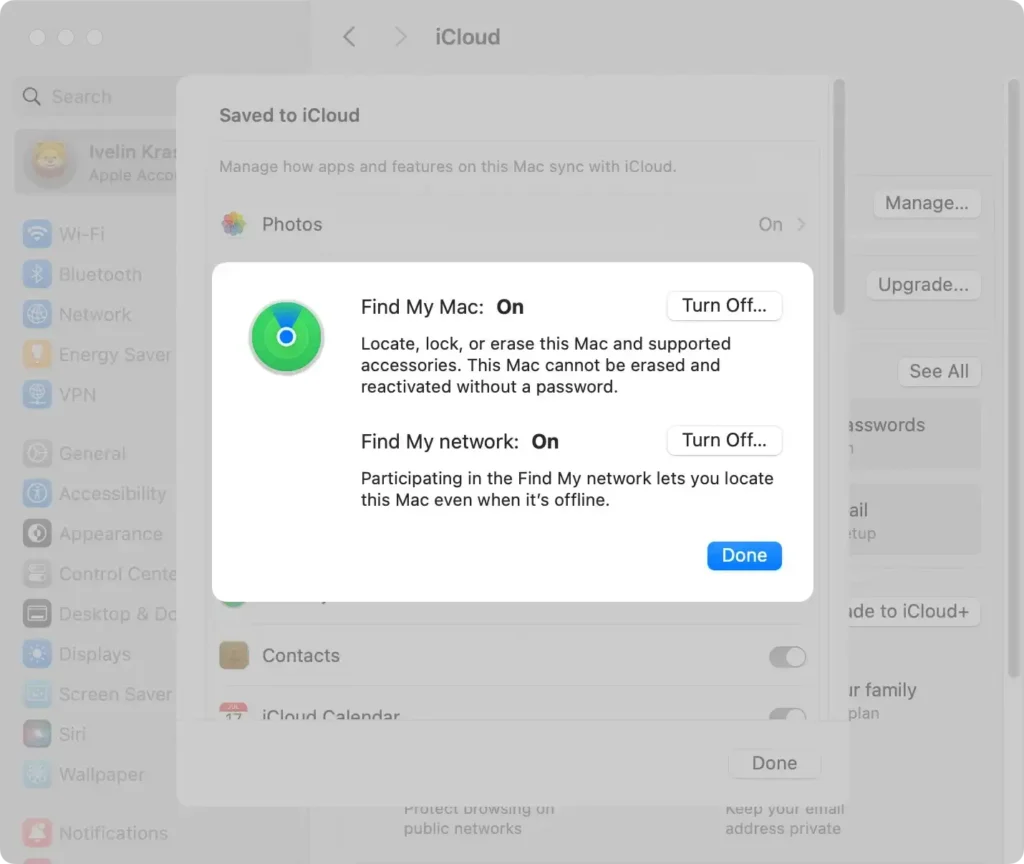
Turn on Find My Mac
If your Mac is ever lost or stolen, Find My Mac helps you locate and protect it. This feature allows you to track your device, lock it remotely, or even erase data to prevent unauthorized access.
To enable Find My Mac:
- Go to
System Settings > Apple IDand select iCloud. - Enable
Find My Macand ensureFind My networkis also on to improve tracking accuracy. - Use the
Find Myapp on another Apple device or log into your iCloud account to locate your Mac if it goes missing.
Enable Lockdown Mode
Lockdown Mode is an advanced security feature that restricts certain device functionalities to provide an extra layer of protection against cyber threats.
It’s beneficial if you believe you’re at risk of targeted attacks. By limiting features that may be vulnerable to exploitation, you can receive maximum defense.
To turn on lockdown:
- Open
System Settingsfrom the Apple menu. - Go to
Privacy & Securityand scroll to theLockdown Modesection. - Click
Turn Onand follow the on-screen instructions to confirm.
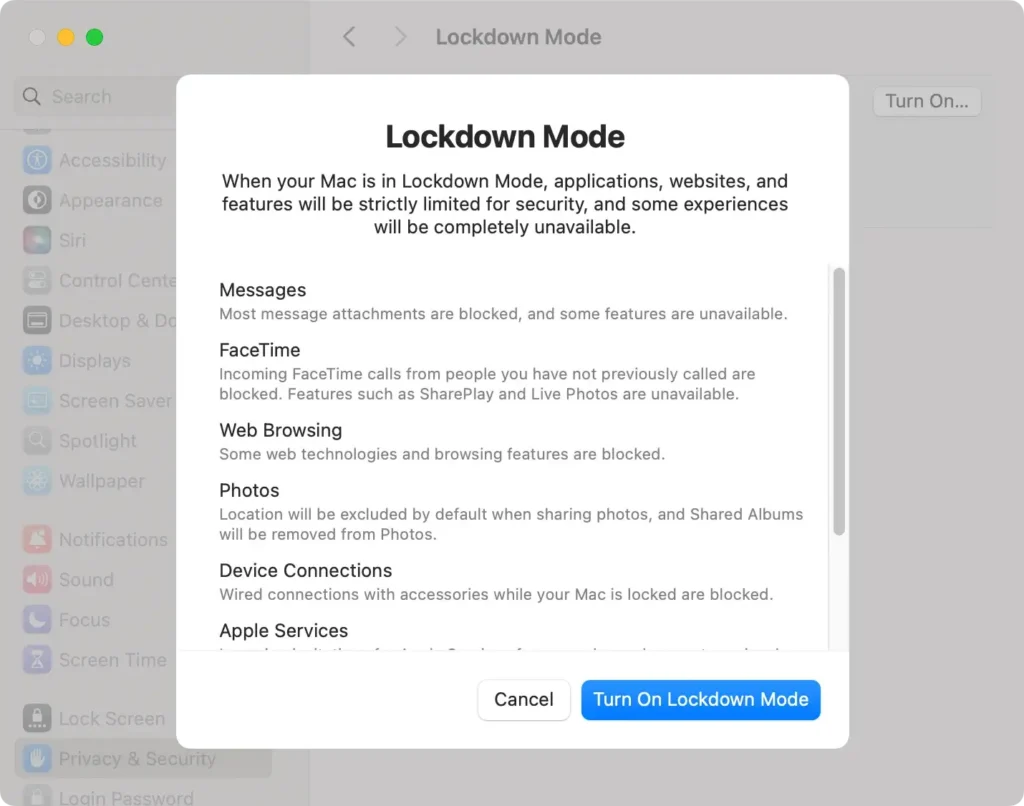
Your Mac will restrict certain apps, websites, and communications features to enhance security.
Create a strong login password
A secure login password is essential for protecting your computer. Set a good password using numbers, letters, and symbols. To set a new password:
- Go to
System Settings > Users & Groups. - Click the
iicon next to your user account. - Next to
Password, clickChangeand follow the instructions.
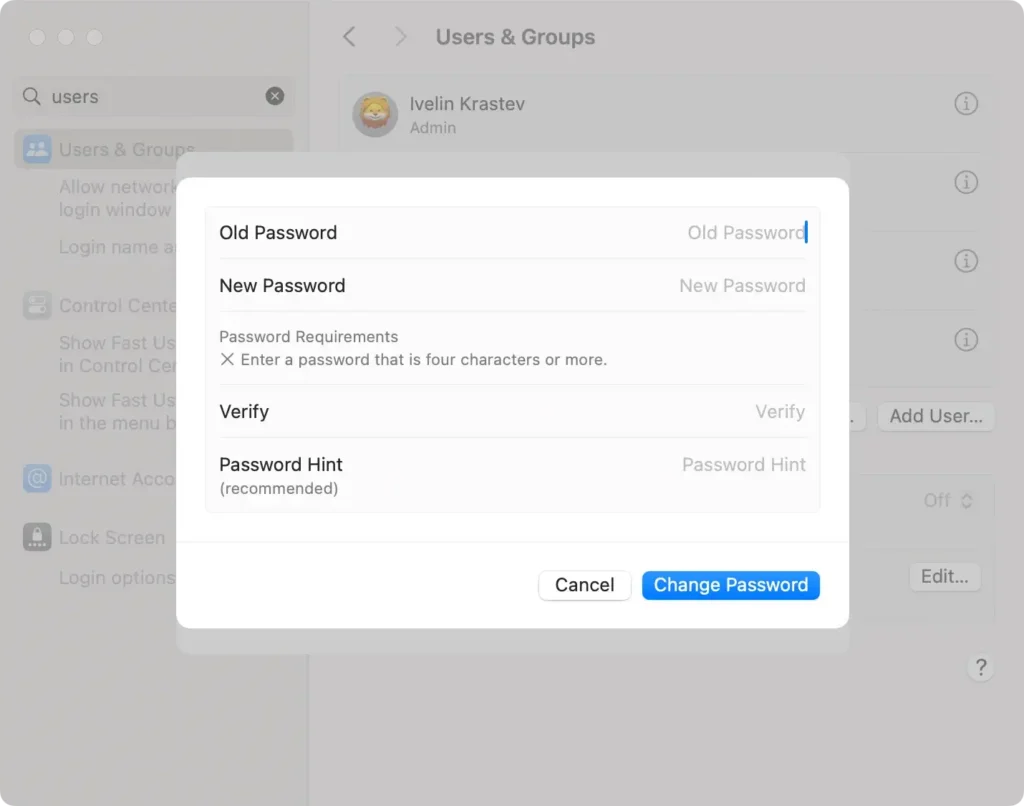
Tip: We strongly recommend not to set a password hint. If you still want to set a hint, think of one that only you would know.
For more tips and detailed recommendations on securely managing your Apple devices, visit the Apple Support page.