How To Completely Uninstall Snagit on Mac (Easy Steps)
Before we dive in
Trying to uninstall an app completely? SpyHunter for Mac includes an App Uninstaller that removes unwanted apps and their leftover files in just a few clicks.
Avoid clutter and save time — download SpyHunter right here and follow the steps to clean up your system.
Are you looking to uninstall Snagit from your Mac? Whether clearing space, encountering software issues, or exploring alternative screen capture tools, removing Snagit efficiently ensures your system remains optimized and clutter-free.
This removal guide will walk you through the steps to remove Snagit and all associated files from your Mac, helping you maintain a clean and organized workspace.
Let’s get started on simplifying your desktop environment by removing this application.
Reasons to uninstall Snagit from your Mac
There are several reasons why you might consider uninstalling Snagit from your Mac:
- Freeing Up System Resources: Snagit, while helpful, can occupy a considerable amount of disk storage and system resources. Removing Snagit could be beneficial if you aim to optimize your Mac’s performance or need to clear up storage.
- Redundancy: Many of the functionalities offered by Snagit, such as screenshot capturing and recording, are now natively supported on macOS. If you use these built-in features more frequently, keeping Snagit might no longer be necessary.
- Cost Efficiency: Discontinuing Snagit can be cost-effective. This is particularly relevant if you consider free or less expensive alternatives that meet your needs.
- Technical Issues: Occasionally, programs like Snagit may encounter compatibility issues with updates to the macOS or show recurring operational bugs. If these problems persist despite updates and troubleshooting, uninstalling may resolve them.
- Extensive Permission Requirements: Snagit requires extensive permissions, including access to screen recording, microphone recording, and other system preferences. Some users might find these permissions excessive or concerning, prompting them to seek simpler or more privacy-conscious tools.
- Switching to a Different Tool: You might have found an alternative tool that fits better with your workflow or offers additional functionalities that Snagit lacks. Transitioning to a new tool can sometimes necessitate the removal of the old one to avoid confusion and overlap in the tools used.

Understanding these reasons can help you make a well-informed decision about keeping Snagit on your Mac or removing it to streamline your applications and device performance.
Completely uninstall Snagit on Mac using SpyHunter
To thoroughly uninstall Snagit from your Mac and ensure that no leftover files clutter your system, consider using SpyHunter’s App Uninstaller feature.
This tool offers an effective method to delete applications. Here’s how to use SpyHunter to uninstall Snagit:
- Download SpyHunter for free here and install it following the provided instructions.
- Open SpyHunter once installed. Navigate to the
App Uninstallertab to initiate an automatic scan for all installed applications, including Snagit and their associated files. - Look for Snagit in the list of applications displayed post-scan. Ensure all related files are selected to guarantee a comprehensive cleanup.
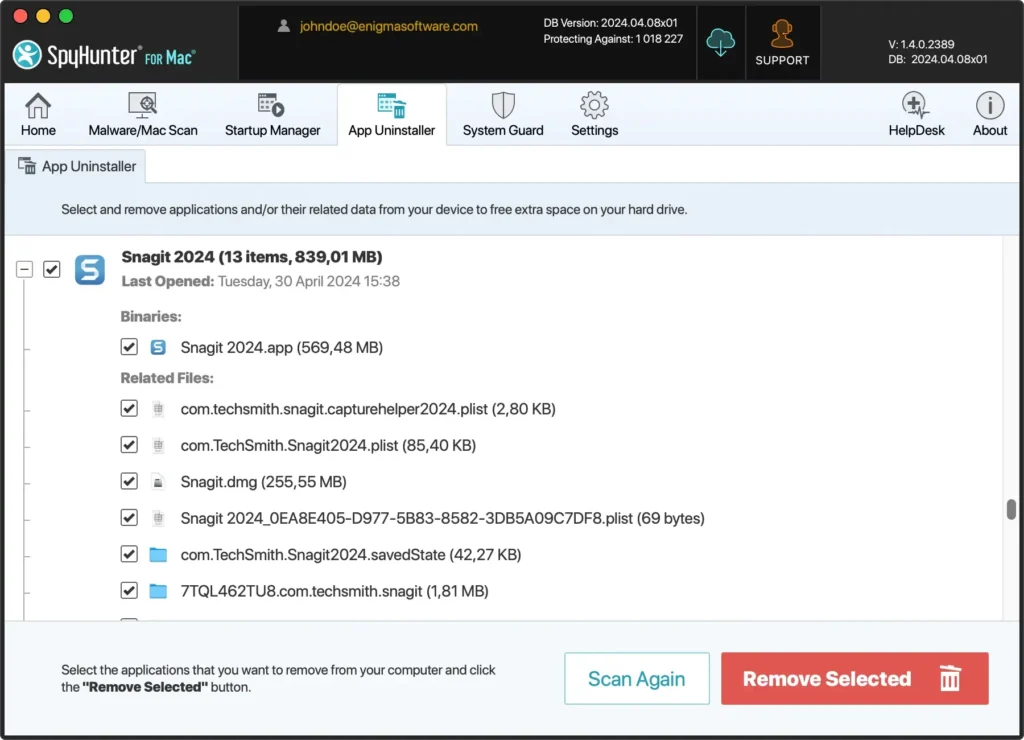
- Confirm your selection and proceed with the uninstallation. SpyHunter will then remove Snagit and all its related files from your Mac computer, freeing up space and removing potential redundancies.
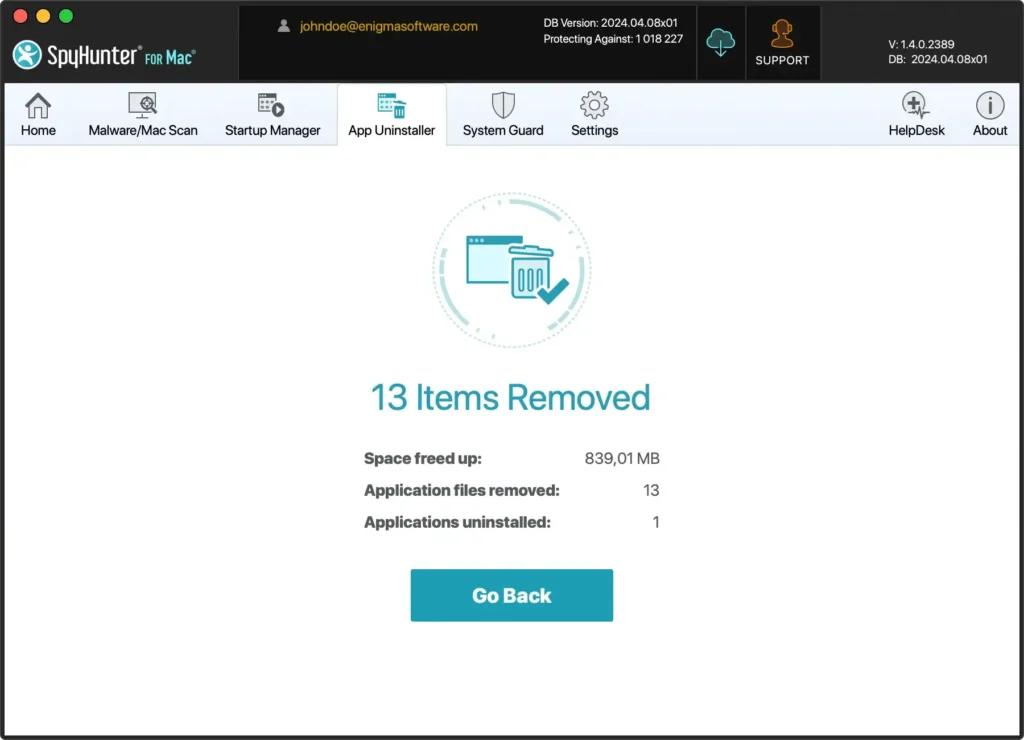
Using SpyHunter’s App Uninstaller simplifies the process and ensures that Snagit is completely removed from your system, including all underlying files that could remain hidden or forgotten.
This is crucial for maintaining a clean and optimized system, especially when preparing to switch to new software or update your existing tools.
Manually uninstall Snagit from your Mac
To manually uninstall Snagit from your Mac computer, follow this comprehensive guide that ensures you delete both the application and any support files to avoid any residual clutter or system slowdown.
This manual process is straightforward and involves several steps to ensure complete removal.
Step 1: Quit Snagit
Before proceeding with the uninstallation, it is essential to ensure Snagit is not running.
Active apps might prevent the removal of all associated files.
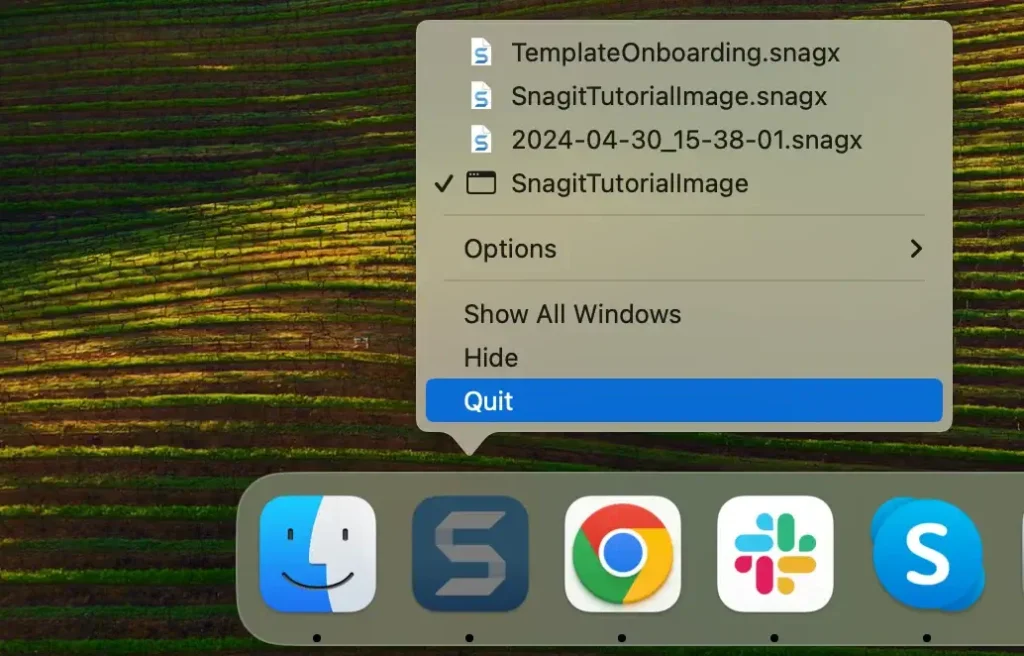
- Right-click on the Snagit icon in the Dock.
- Select
Quitfrom the context menu to close the program.
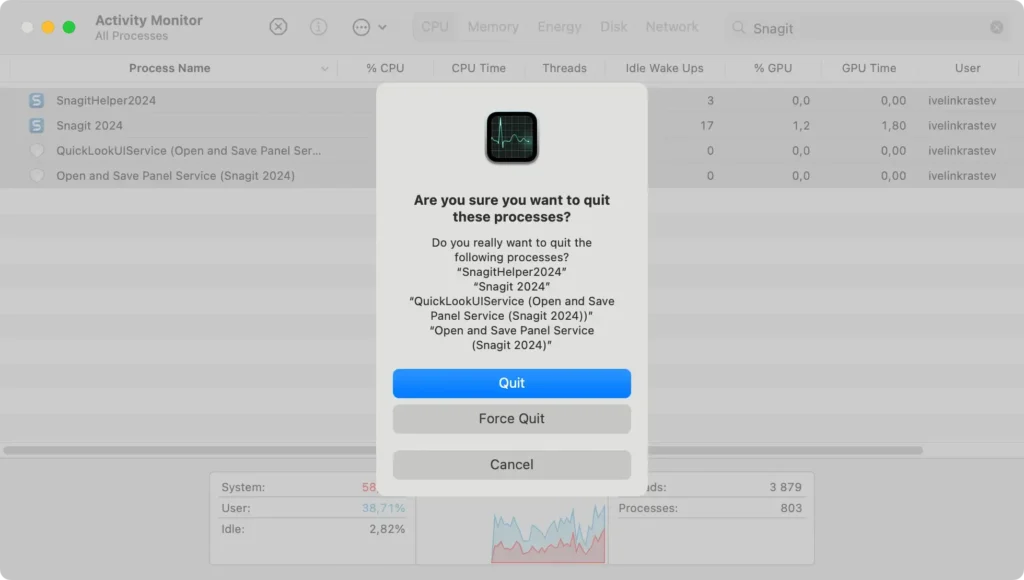
If Snagit does not quit normally or is unresponsive, you may need to force quit it.
To do that, open Activity Monitor from Applications > Utilities and search for any Snagit processes. Select the pinpointed processes and select the [X] at the top of the window to force quit Snagit.
Step 2: Uninstall Snagit
Once you have ensured Snagit is not running, the next step is deleting the application from your system.
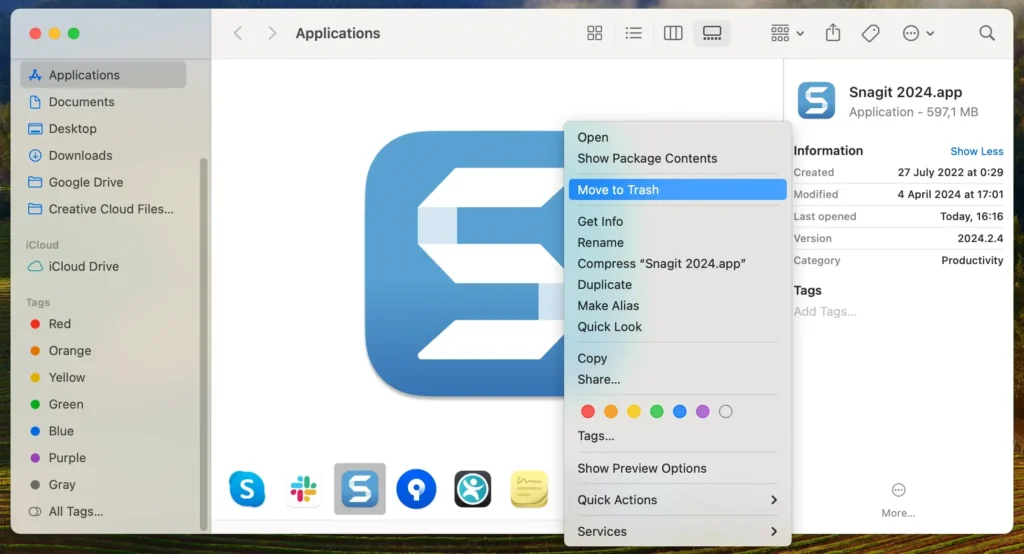
- Open a new Finder window and navigate to the
Applicationsfolder. - Scroll through your applications or use the search field at the top right of the Finder to locate Snagit.
- Drag the Snagit icon to the Bin, or right-click on the icon and select
Move to Trashfrom the context menu. - Empty the Trash folder to delete the program from your Mac completely.
Step 3: Remove files and folders related to Snagit
Even after deleting the Snagit app, some associated service files, caches, and other miscellaneous contents may still reside on your Mac. Removing service and support files is essential to thoroughly clean up the application’s footprint on your system.
Such files can take up space and might cause issues if not removed.
- Open a Finder window, click
Goin the top menu bar, and selectGo to Folderfrom the dropdown. - Type in each of the following paths and press
Enterafter each:~/Library/Application Support/TechSmith/Snagit/~/Library/Preferences/com.techsmith.snagit.plist~/Library/Caches/com.TechSmith.Snagit/~/Library/Group Containers/com.techsmith.snagit/
- If you find any folders or files related to Snagit, move them to the Bin.
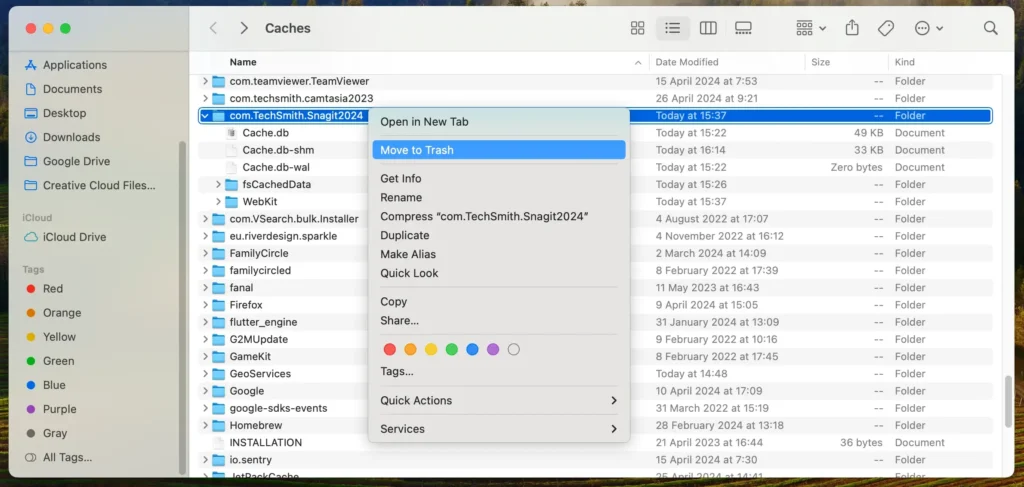
- Right-click the Trash icon in your Dock and select
Empty Trashto remove them permanently. - Consider removing the system audio component installed by Snagit, if applicable, as part of the cleanup process.
- Check your
System Preferencesfor any Snagit-related settings that need to be reset or removed.
By following these steps, you have manually uninstalled Snagit from your Mac, which helps to keep your system clean and running efficiently.
Removing unused applications and their support files is crucial for maintaining optimal computer performance.
Reinstall Snagit on your Mac device
If you’ve previously removed Snagit but need it back for its robust screen-capturing capabilities, reinstalling it is straightforward.
This can be particularly useful if you need to capture high-quality images or videos for tutorials or presentations.
Here’s how to reinstall Snagit on your Mac:
- Download the Installer: Visit the TechSmith official website and download the latest version of Snagit for Mac.
- Install Snagit: Open the downloaded file. Follow the instructions to complete the installation. You may need to enter your Mac’s password to authorize the installation.
- Reinstall System Audio Component (if required): Snagit may prompt you to install extra components, such as the system audio component, essential for recording system audio during screen captures. Follow the prompts from Snagit to install these components correctly. Installation of system audio components might require additional permissions or installation of third-party software like Rogue Amoeba software, depending on your macOS version and security settings.
- Launch and Update: Open the TechSmith product from your Applications folder once installed. Check for updates after installation to assure you have the latest features and patches.
Final thoughts
Congratulations, you have successfully uninstalled Snagit from your Mac!
This removal guide aims to provide clear instructions for removing the program and any associated service files to help maintain a clean and optimized workspace.
Whether you find the need to free up system resources, address compatibility issues, or declutter your desktop, removing Snagit and similar applications can contribute significantly to your system’s performance.
As you continue to manage your Mac’s library of apps, whether reinstalling previously removed apps or exploring new ones, staying informed and organized will help you maintain a robust and efficient system.
This tutorial hopefully provided helpful insights into managing your Mac’s applications effectively.