How To View Hidden Files On Mac: 4 Ways To Do It
Before we dive in
Before we dive in, let's make sure you stay safe online. We created SpyHunter because your security matters to us.
Protect your computer today — download SpyHunter right here! Check out our top tips below to keep your computer safe and secure.
Have you ever needed to dig a little deeper into your Mac to troubleshoot an issue or recover a misplaced file?
Hidden files on your Mac, which are usually tucked away to prevent accidental modifications, can sometimes hold the key to solving such puzzles.
In this article, I will guide you through the process of viewing hidden files on your Mac using built-in tools.
Whether you’re a seasoned user or new to macOS, understanding how to safely access these hidden files is crucial for maintaining system stability and security.
Ready to become a pro at handling hidden files? Let’s get started:
Why might files and folders be hidden on your Mac?
Understanding why macOS hides certain files and folders can help you decide when and how to access them.
Here are the reasons:
- Protecting System Integrity: Keeping system and configuration files invisible prevents users from accidentally removing or modifying them, which could damage the operating system.
- Enhancing Security: Hiding sensitive files adds an extra layer of protection against unauthorized access, safeguarding personal information and security settings.
- Application Support: Many apps store essential data in hidden folders like the
Libraryfolder. These hidden files are crucial for app functionality but aren’t needed for everyday use. - Simplifying User Experience: Hiding system structures allows the average Mac user to navigate their files and folders more efficiently without being overwhelmed by the technical stuff.
- Custom User Preferences: Users may choose to hide files manually to keep personal data private or to declutter their workspace.
Knowing these reasons can help you appreciate the importance of hidden system files and decide when to view them on your Mac. However, always be cautious to avoid impacting your system’s performance or security.
How to show hidden files on Mac via Finder?
If you need to reveal hidden files on your Mac without using Terminal or third-party tools, you can easily do so directly through Finder. Here’s how:
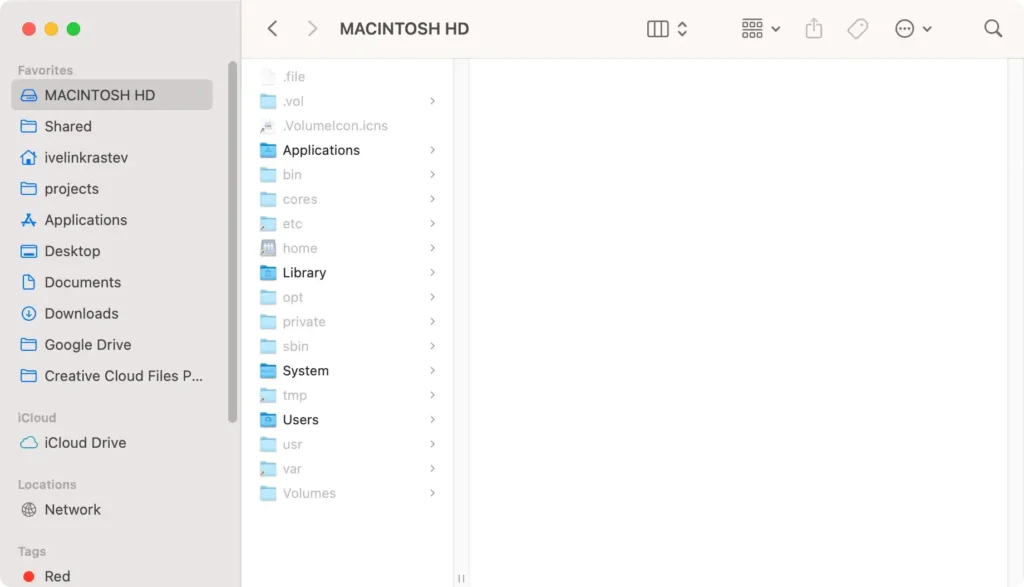
- Click on the
Findericon in your Dock to launch a newFinderwindow. - Go to the
Macintosh HDfolder in theFindersidebar. - Hold
Command (⌘) + Shift (⇧) + Dot (.)simultaneously. - Hidden files and folders will now appear semi-transparent in the
Finderwindow. - To hide the hidden files and folders again, simply repeat step 3.
This method is quick and straightforward, enabling Mac users to access hidden files without altering system settings or using the Terminal.
How to show hidden files using keyboard shortcuts?
A convenient way to show hidden files on your Mac is by using a simple keyboard shortcut that works within Finder:
- Open
Finderby clicking on theFindericon in your Dock. - While in
Finder, pressCommand (⌘) + Shift (⇧) + Dot (.). - All the hidden files and folders will become visible, appearing slightly grayed out compared to regular files.
- You can use the same command from the keyboard to toggle the visibility off.

This keyboard shortcut is effective across various directories, making it easy to access hidden files and folders as needed.
How to view hidden folders and files using Terminal?
If you are comfortable with the command line, the Terminal app offers a powerful way to reveal hidden files and folders on Mac:
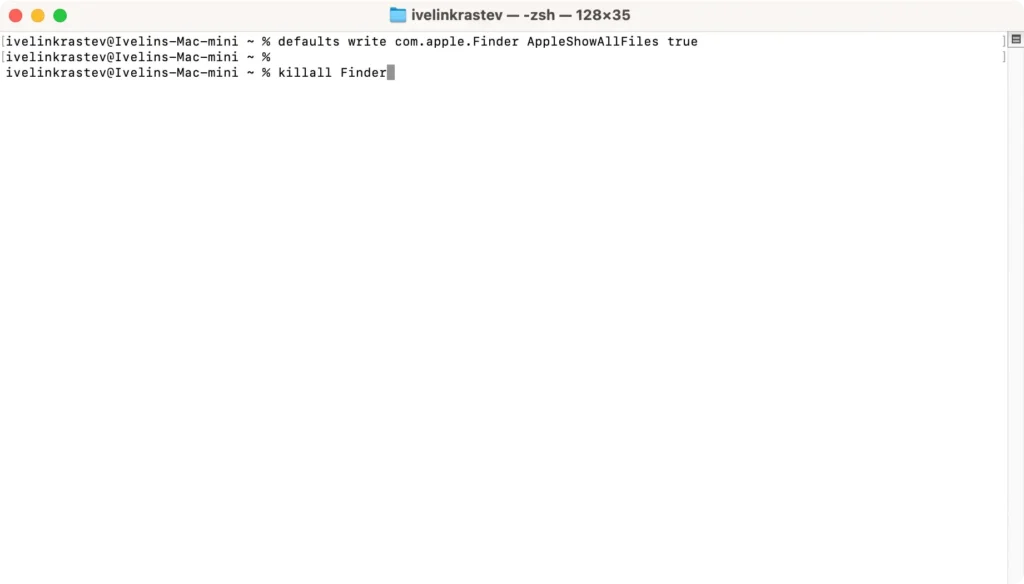
- Open
Terminallocated inApplications > Utilities. Alternatively, useSpotlightby pressingCommand (⌘) + Space, typeTerminalin the text box, and pressEnter. - To show hidden files, type or paste the following Terminal command and press
Enter:defaults write com.apple.Finder AppleShowAllFiles true - Type the command
killall Finderand pressReturnto relaunchFinderand apply the changes:
- Open a
Finderwindow to see that hidden files are displayed. - In order to hide the files again, repeat the steps above, but change the command in step 2 to:
defaults write com.apple.Finder AppleShowAllFiles false - Then restart Finder with
killall Finder

Using the defaults write command modifies Finder’s preferences to show hidden files. The killall Finder command restarts Finder to apply the new settings.
In addition to the basic commands that can show hidden files, you should be aware of a couple more useful commands:
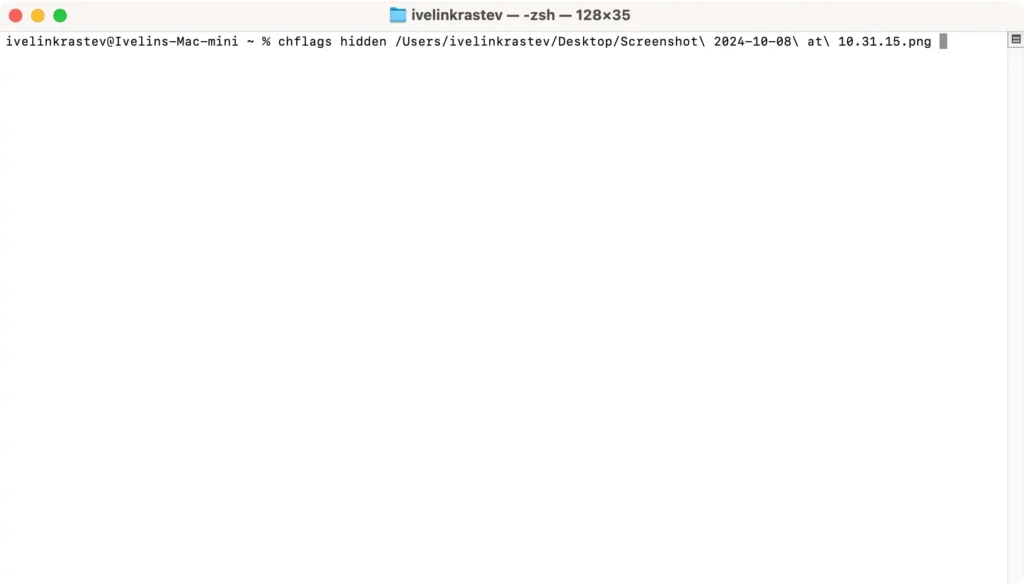
chflags hidden: This command can hide files without altering the visibility of other hidden files. To use this:- Type
chflags hidden[Press Space] - Drag the file you want to hide into the Terminal window to autofill its path
- Press
Enter
- Type
- If you ever need to reverse the hidden status of specific files:
- Use
chflags nohidden [file path] - Replace
[file path]with the path of the file you wish to make visible again - Press
Enter
- Use

By mastering these commands, you can ensure your data remains organized and only visible when necessary.
How to find and show the Library folder?
The Library folders contain essential system files, application support data, and user settings. Apple hides these folders by default to prevent accidental changes.
Here’s how you can access ~/Library:
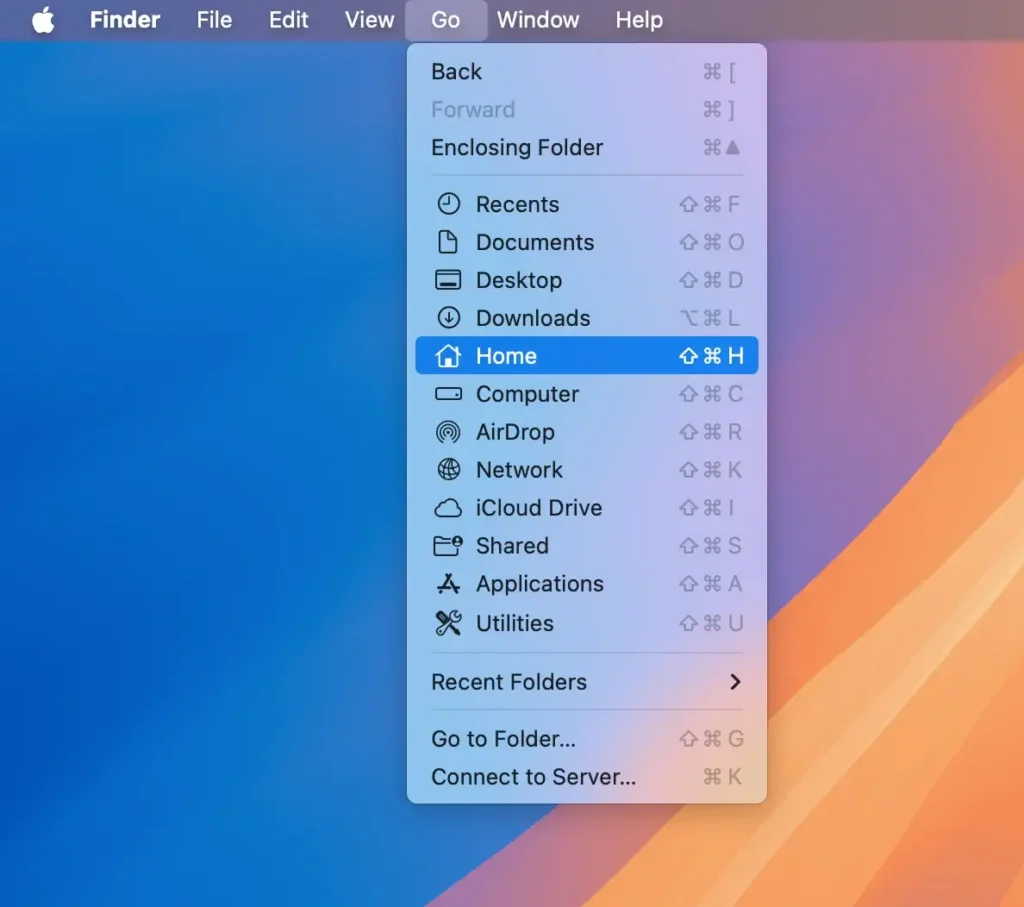
Method 1: Access the hidden ~/Library folder via Finder’s Go menu
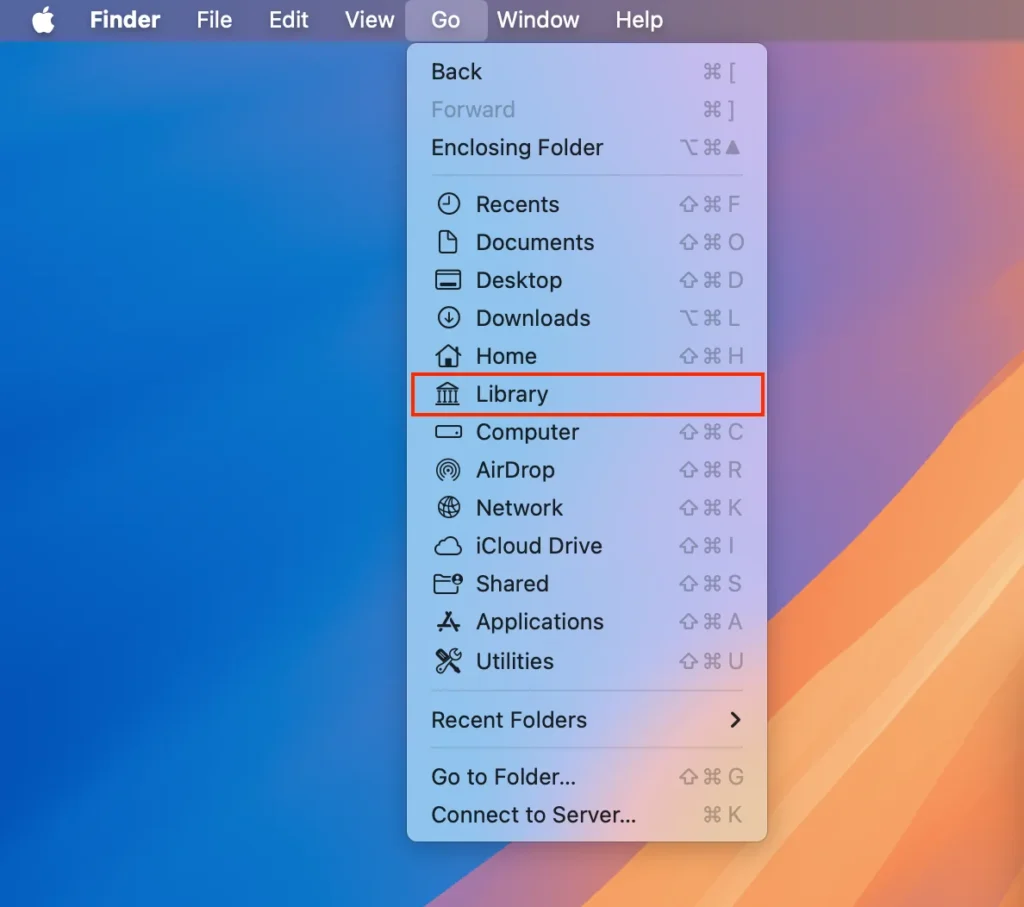
- Open
Finderby clicking on theFindericon in your Dock. - In the menu bar at the top of the screen, click on
Go. - Hold down the
Option (⌥)key. TheLibraryfolder will appear in the dropdown menu. - Click on
Libraryto access the hidden folder.
Method 2: Permanently show the Library folder
- Start by opening
Finderfrom your Dock. - In
Finder, click onGo > Homeor pressShift (⇧) + Command (⌘) + H.
- Click on
Viewin the menu bar and selectShow View Options, or pressCommand (⌘) + J.
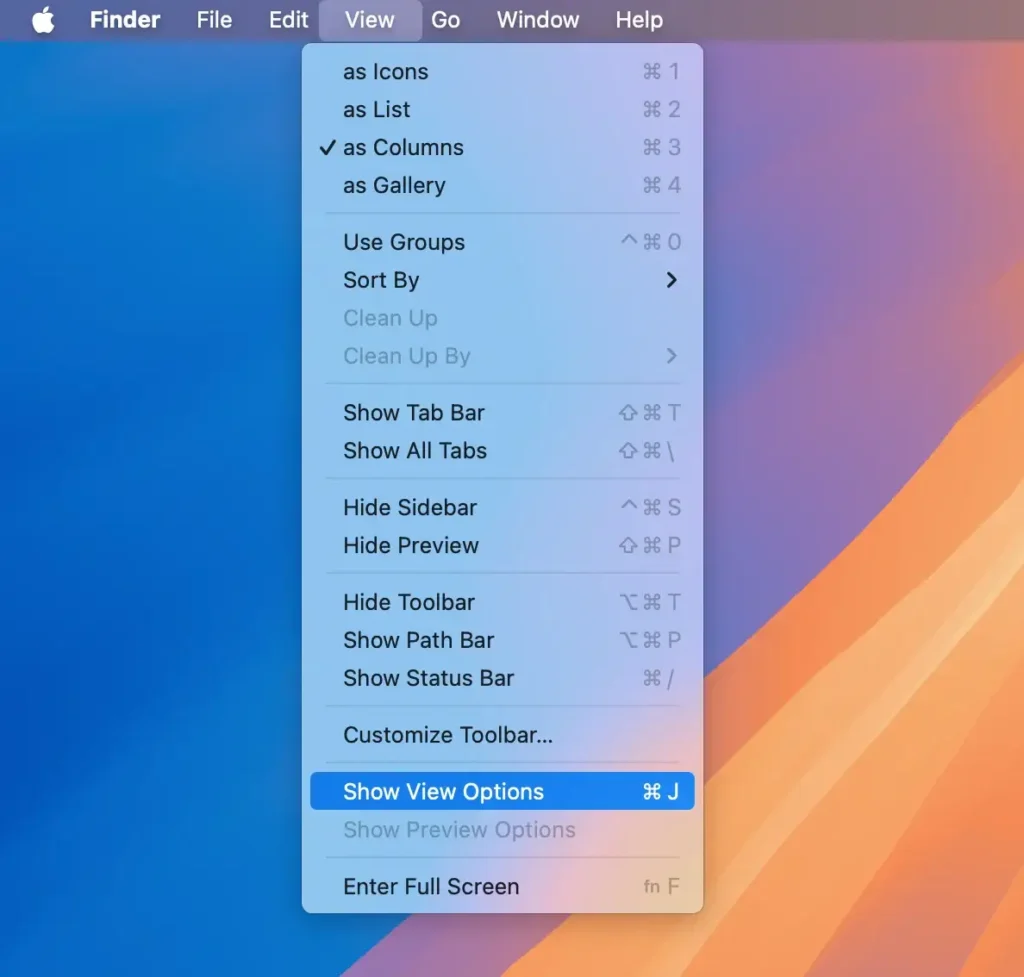
- In the
View Optionswindow, check the box next toShow Library Folder.

The Library folder will now be permanently visible in your Home directory, making it easier to access important files and other hidden data.
Tips to keep your Mac organized and secure
Keeping your Mac organized and secure enhances its performance and protects your personal information from potential threats.
Regularly cleaning up system junk and organizing your data can significantly help in maintaining your Mac’s health.
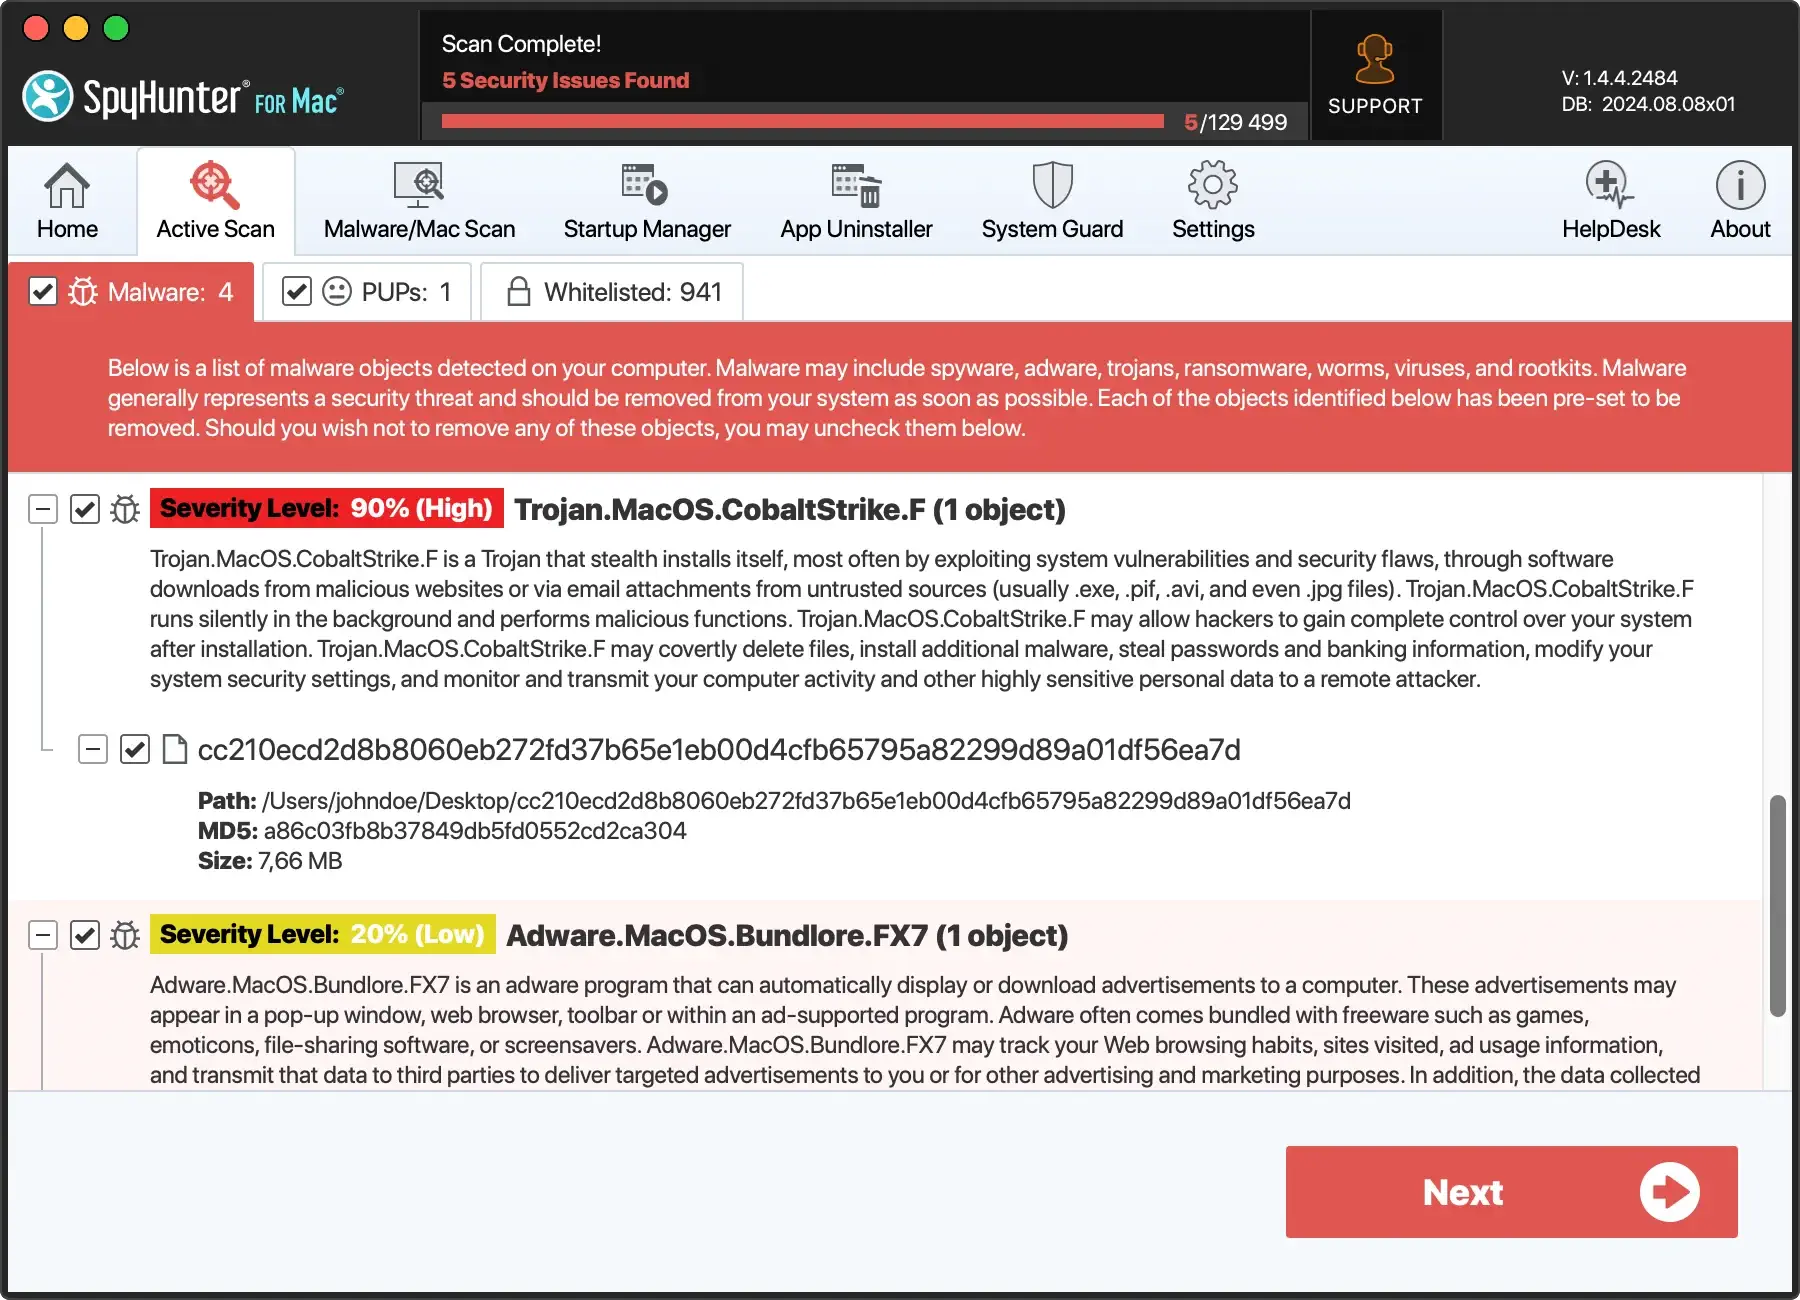
Furthermore, robust cybersecurity measures are crucial. Software like SpyHunter, which provides comprehensive malware removal and privacy protection, helps maintain your Mac’s security integrity.
- Download SpyHunter now and follow the on-screen instructions to install it.
- Configure SpyHunter to perform regular scans, ensuring your system is continually monitored for threats.
- Regularly update SpyHunter to ensure that it is equipped with the latest malware definitions.
By including these steps in your routine, you can maintain optimal performance, free disk space, and keep your sensitive information secure.
FAQs
Is showing hidden files on my Mac safe?
While it is generally safe to view hidden files, modifying or deleting them can be risky.
Hidden files and folders often contain essential system files and configuration data crucial for your operating system’s stability.
Accidentally deleting or altering these files may lead to system errors or data loss. Proceed with caution and back up important data before making changes.
Are there third-party file managers that can show hidden files?
Yes, several third-party file managers and utilities can help you manage hidden files more conveniently.
Such tools may offer advanced features for handling files and folders on your Mac. Keep in mind that third-party file managers may come with additional costs.
Bottom line
Understanding how to view hidden files on a Mac empowers you to take complete control of your operating system.
Knowing how to find a hidden file is a valuable skill for any Mac user, whether troubleshooting issues, customizing settings, or accessing specific data.
Remember that hidden files are concealed for a reason—they often contain sensitive information.
Always proceed with caution when modifying or deleting these files and folders to avoid unintended consequences.
Utilize the methods that best suit your comfort level, whether it’s through Finder, keyboard shortcuts, or the Terminal app.
By following the steps outlined in this guide, you can safely manage hidden content on your Mac, ensuring a smooth and efficient computing experience while keeping your files and folders organized and secure.