How To Empty Trash On Mac (Easy Guide)

Before we dive in

Before we dive in, let's make sure you stay safe online. We created SpyHunter because your security matters to us.

Protect your computer today — download SpyHunter right here! Check out our top tips below to keep your computer safe and secure.

Download SpyHunter

Ever struggled with a Trash bin on your Mac that just won’t empty? Wondered why deleting files seems more complicated than saving them?

Whether it’s a routine cleanup of files you don’t need anymore, or messages claiming files are still in use or locked files stubbornly refusing to delete, this article dives into the common troubles Mac users face when trying to empty their Trash bin and provides practical, easy-to-follow solutions to resolve these issues.

From unlocking files to utilizing powerful Terminal commands, we’ll guide you through the steps to regain control over your digital junk and keep your Mac tidy and efficient.

How to normally empty the Trash on your Mac

Most Mac users will already know how to do the basic operation of emptying the Trash on their system, but we will include this common method for new users or people switching over from a Windows computer.

how to empty trash on mac

If you simply need to free up storage space and do a basic “delete Trash” cleanup, do the following:

  1. Locate the Trash icon on your Dock.
  2. Right-click the Trash.
  3. Select Empty Trash from the menu that comes up.
  4. Confirm your action in the pop-up.

How to set your Mac to empty the Trash automatically

Your Mac also includes a setting that allows you to make the system automatically clean the Trash folder using a pre-set time period.

Follow the steps below to turn it on:

  1. Open a Finder window and click Finder > Settings in the top menu.
  2. Click on the Advanced tab in the settings window that comes up.
  3. Check the Remove items from the Trash after 30 days option.
empty trash automatically finder settings

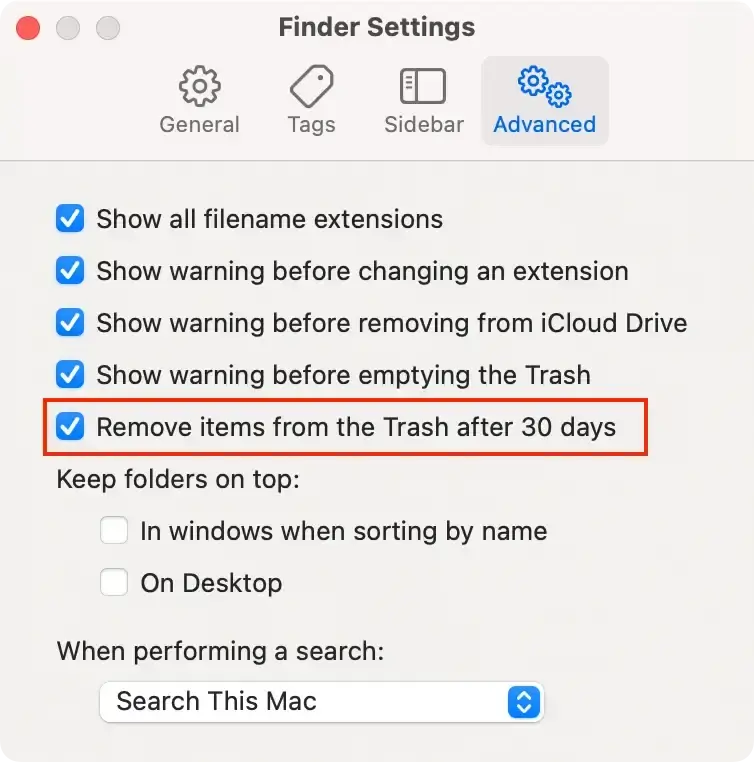
This will enable your Mac to automatically clean your Trash every month, so you don’t have to worry about managing it manually.

How to empty the Trash folder using SpyHunter

SpyHunter is primarily an anti-malware tool that serves to protect your system from various types of malicious and potentially unwanted software.

However, in addition to this, the tool includes several Mac maintenance and optimization features, including emptying the Trash.

  1. Download the app here and complete the visual instructions on your screen to install it.
  2. Launch SpyHunter from your dock and select to run a scan from the main menu.
  3. In the scan tab, select Custom Scan and then Unnecessary Items.
spyhunter for mac unnecessary files scan
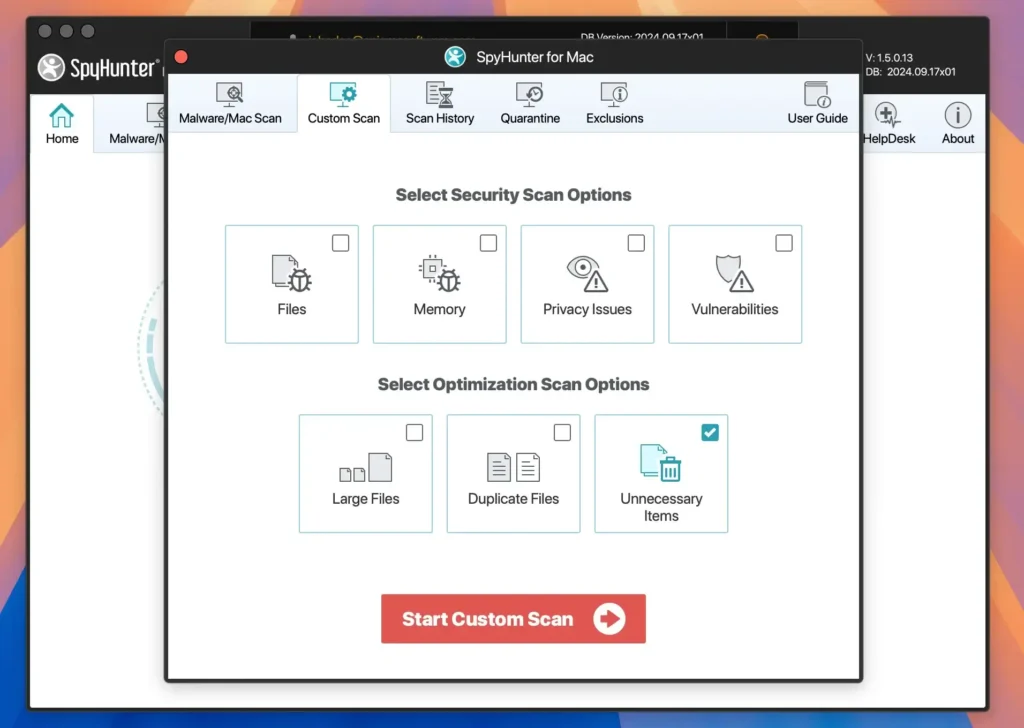
  1. Wait for the scan to finish, then select the items you want from the Trash Bin category and proceed to remove trash files.
empty trash on mac automatically with spyhunter

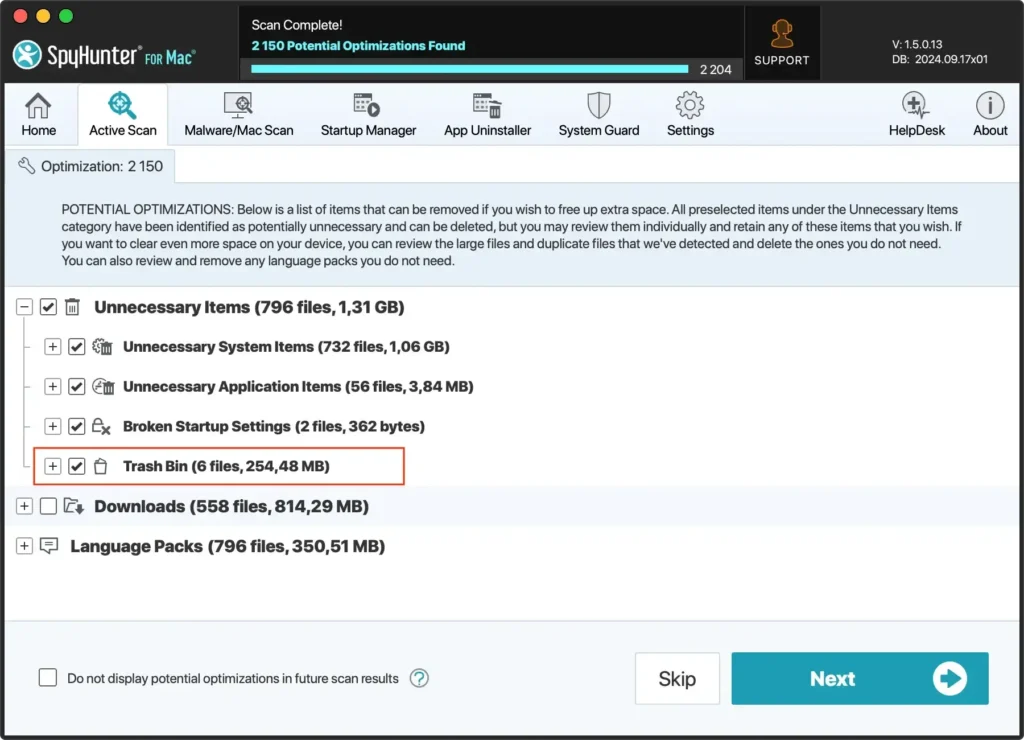
In addition to helping clean your Trash and get rid of duplicate or large files you no longer need, SpyHunter includes a powerful anti-malware scanner and a real-time protection module that will keep your system safe in the long run.

What can prevent your Mac from emptying the Trash?

Several issues can prevent your Mac from emptying the Trash, each with a specific solution.

One common reason is that files in the Trash are still in use by applications. Closing any open applications that might be using the files can resolve this issue.

Another potential issue is the permissions associated with the files. Sometimes, your system doesn’t have the necessary permissions to delete certain files, which can usually be adjusted in the file properties.

Additionally, files that are locked may also prevent you from emptying the Trash.

You can unlock these files by selecting them one by one and choosing Get Info. Uncheck the Locked checkbox.

Also, be aware of System Integrity Protection (SIP) that may protect files if they’re part of system data or applications.

Disabling SIP temporarily can help in such cases, but should be handled with care to avoid subjecting the system to potential risks.

Step-by-step guide to force emptying the Trash on your Mac

When your Mac’s Trash folder won’t empty the usual way, you may need to use special methods to get rid of stubborn files. Whether these files are locked or in use, several approaches can help you clean out your Trash bin thoroughly.

Use the Option key shortcut

If you’ve tried to empty your Trash normally and found files remain, using the Option key can force the process. This method is simple:

  1. Find the Trash icon in your Dock.
  2. Hold down the Option key.
  3. While holding the key, right-click the Trash icon and select Empty Trash.
  4. A confirmation dialogue will appear; confirm to permanently delete the files.

This method overrides any locks on files positioned in your Trash, allowing for a clean sweep.

Use Terminal commands

For those comfortable with macOS’s Terminal, a command can be employed to force deletion:

  1. Open Terminal from Applications > Utilities.
  2. Type the command sudo rm -rf ~/.Trash/* and press Space.
  3. Open your Trash, drag any stubborn files into the Terminal window, linking them to the command.
  4. Hit Return, enter your administrator password when prompted, and press Return again.

This command forcibly removes the files from your Trash folder, bypassing regular checks that might otherwise stop you when trying to delete files.

Reboot in Safe Mode to clear Trash

If files in the Trash are being used by background processes, rebooting your Mac in Safe Mode might help:

  1. Restart your Mac and immediately press and hold the Shift key as it boots up.
  2. Release the Shift key when you see the login window. Now, your Mac is in Safe Mode.
  3. Once in Safe Mode, attempt to empty the Trash as you would normally.
  4. Restart the computer again, this time allowing it to start normally.

In Safe Mode, macOS loads only essential kernel extensions and disables most startup items and login items; this often allows the Trash to be emptied if a background service was using files from it.

Troubleshooting persistent trash issues on Mac

If you find that your Mac’s Trash folder won’t empty despite trying conventional methods, there are several troubleshooting steps you can take.

Persistent Trash issues often arise from file permissions problems or interference from active applications.

Begin troubleshooting by closing all active applications, as these can often hold files in use that you’re trying to delete. If the issue persists, restart your Mac to clear any temporary files or processes that could be causing the problem.

Check and repair disk permissions

Invalid or damaged disk permissions can result in various macOS issues, including troubles with emptying Trash. macOS has built-in tools that can help you verify and repair disk permissions.

  1. Open Terminal from the Applications > Utilities folder.
  2. In Terminal, enter sudo diskutil verifyPermissions / and press Return. You may need to enter your administrator password.
  3. After the scan, use sudo diskutil repairPermissions / to fix any issues found.

This method ensures your Mac’s file system is set up correctly, potentially resolving any issues with emptying the Trash.

Why does my Mac say the Trash is full when it’s not?

Sometimes, your Mac might incorrectly display that the Trash folder is full due to a glitch or a temporary file that isn’t properly displaying.

This can happen particularly after you have deleted a large number of files or when a file is stuck due to system errors.

To resolve this, first try restarting your Mac to refresh the system processes that monitor Trash status.

If the issue persists, use Terminal to execute a command that can force a re-calculation of the Trash’s size.

Open Terminal and type sudo rm -rf ~/.Trash/* and then hit Return. You’ll need to enter your admin password. This command clears out the Trash folder and should reset any incorrect full status messages.

Share this post on your favorite social media
Keep Your Mac Fast and Secure
Optimize your Mac and stay malware-free with SpyHunter

For a better understanding of our policies, please review our Free Trial Offer below, EULA, and Privacy/Cookie Policy.

SpyHunter Free Trial: Important Terms & Conditions

The SpyHunter Trial version includes, for one device, a one-time 7-day Trial period for SpyHunter 5 Pro (Windows) or SpyHunter for Mac, offering comprehensive malware detection and removal functionality, high-performance guards to actively protect your system from malware threats, and access to our technical support team via the SpyHunter HelpDesk. You will not be charged upfront during the Trial period, although a credit card is required to activate the Trial. (Prepaid credit cards, debit cards, and gift cards are not accepted under this offer.) The requirement for your payment method is to help ensure continuous, uninterrupted security protection during your transition from a Trial to a paid subscription should you decide to purchase. Your payment method will not be charged a payment amount upfront during the Trial, although authorization requests may be sent to your financial institution to verify that your payment method is valid (such authorization submissions are not requests for charges or fees by EnigmaSoft but, depending upon your payment method and/or your financial institution, may reflect on your account availability). You can cancel your Trial by contacting EnigmaSoft’s payment processor (identified in your confirmation email) or EnigmaSoft directly no later than two business days before the 7-day Trial period expires to avoid a charge coming due and being processed immediately after your Trial expires. If you decide to cancel during your Trial, you will immediately lose access to SpyHunter. If, for any reason, you believe a charge was processed that you did not wish to make (which could occur based on system administration, for example), you may also cancel and receive a full refund for the charge any time within 30 days of the date of the purchase charge. See FAQs.

At the end of the Trial, you will be billed upfront immediately at the price and for the subscription period as set forth in the offering materials and registration/purchase page terms (which are incorporated herein by reference; pricing may vary by country per purchase page details) if you have not timely canceled. Pricing typically starts at $72 for 3 months (SpyHunter Pro Windows) and $42 for 3 months (SpyHunter for Mac). Your purchased subscription will be automatically renewed in accordance with the registration/purchase page terms, which provide for automatic renewals at the then applicable standard subscription fee in effect at the time of your original purchase and for the same subscription time period, provided you’re a continuous, uninterrupted subscription user. Please see the purchase page for details. Trial subject to these Terms, your agreement to EULA/TOS, Privacy/Cookie Policy, and Discount Terms. If you wish to uninstall SpyHunter, learn how.

For payment on the automatic renewal of your subscription, an email reminder will be sent to the email address you provided when you registered before your next payment date. At the onset of your trial, you will receive an activation code that is limited to use for only one Trial and for only one device per account. Your subscription will automatically renew at the price and for the subscription period in accordance with the offering materials and registration/purchase page terms (which are incorporated herein by reference; pricing may vary by country per purchase page details), provided that you are a continuous, uninterrupted subscription user. For paid subscription users, if you cancel, you will continue to have access to your product(s) until the end of your paid subscription period. If you wish to receive a refund for your then current subscription period, you must cancel and apply for a refund within 30 days of your most recent purchase, and you will immediately stop receiving full functionality when your refund is processed.

For CALIFORNIA CONSUMERS, please see the notice provisions:
NOTICE TO CALIFORNIA CONSUMERS: Per the California Automatic Renewal Law, you may cancel a subscription as follows:

  1. Go to www.enigmasoftware.com and click the "Login" button at the top right corner.
  2. Log in with your username and password.
  3. In the navigation menu, go to "Order/Licenses." Next to your order/license, a button is available to cancel your subscription if applicable. Note: If you have multiple orders/products, you will need to cancel them on an individual basis.

Should you have any questions or problems, you can contact our EnigmaSoft support team by phone at +1 (888) 360-0646 (USA Toll-Free) / +353 76 680 3523 (Ireland/International) or by email at support@enigmasoftware.com.
How do you cancel a SpyHunter Trial? If your SpyHunter Trial was registered via MyCommerce, you can cancel the trial via MyCommerce by logging into the MyAccount section of MyCommerce (see your confirmation email for further details). You can also contact MyCommerce by phone or email to cancel. To contact MyCommerce via phone, you can call +1-800-406-4966 (USA Toll-Free) or +1-952-646-5022 (24x7x356). You can contact MyCommerce by e-mail at ordersupport@mycommerce.com. You can easily identify if your trial was registered via MyCommerce by checking the confirmation emails that were sent to you upon registration. Alternatively, all users may also contact EnigmaSoft Limited directly. Users can contact our technical support team by emailing support@enigmasoftware.com, opening a ticket in the SpyHunter HelpDesk, or calling +1 (888) 360-0646 (USA) / +353 76 680 3523 (Ireland/International). You can access the SpyHunter HelpDesk from SpyHunter's main screen. To open a support ticket, click on the "HelpDesk" icon. In the window that appears, click the "New Ticket" tab. Fill out the form and click the "Submit" button. If you are unsure of what "Problem Type" to select, please choose the "General Questions" option. Our support agents will promptly process your request and respond to you.

———

SpyHunter Purchase Details
You also have the choice of subscribing to SpyHunter immediately for full functionality, including malware removal and access to our support department via our HelpDesk, typically starting at $42 for 3 months (SpyHunter Basic Windows) and $42 for 3 months (SpyHunter for Mac) in accordance with the offering materials and registration/purchase page terms (which are incorporated herein by reference; pricing may vary by country per purchase page details). Your subscription will automatically renew at the then applicable standard subscription fee in effect at the time of your original purchase subscription and for the same subscription time period, provided you’re a continuous, uninterrupted subscription user and for which you will receive a notice of upcoming charges before the expiration of your subscription. Purchase of SpyHunter is subject to the terms and conditions on the purchase page, EULA/TOS, Privacy/Cookie Policy and Discount Terms.

———

General Terms
Any purchase for SpyHunter under a discounted price is valid for the offered discounted subscription term. After that, the then applicable standard pricing will apply for automatic renewals and/or future purchases. Pricing is subject to change, although we will notify you in advance of price changes.
All SpyHunter versions are subject to your agreeing to our EULA/TOS, Privacy/Cookie Policy, and Discount Terms. Please also see our FAQs and Threat Assessment Criteria. If you wish to uninstall SpyHunter, learn how.