How To Uninstall Photoshop On Mac (Complete Guide)
Before we dive in
Trying to uninstall an app completely? SpyHunter for Mac includes an App Uninstaller that removes unwanted apps and their leftover files in just a few clicks.
Avoid clutter and save time — download SpyHunter right here and follow the steps to clean up your system.
Looking to uninstall Adobe Photoshop from your Mac? Whether you’re clearing up space, experiencing technical issues, or transitioning to a different photo editing software, this guide will walk you through the process step-by-step.
Approaching the uninstall of similar hefty apps of this kind requires the right approach that will ensure no residual files are left on your Mac.
Common reasons to uninstall Photoshop on Mac
The reasons informing the decision to uninstall Photoshop range from needing to free up space on your computer, transitioning to alternative software that better meets your needs, or no longer finding the need for Photoshop’s tools for their projects.
- Cost Concerns: The continuous subscription model of Adobe’s Creative Cloud can become a significant expense. Some users prefer a one-time purchase of software, making alternatives more attractive.
- Space Optimization: Photoshop is known for its large file size. Users needing extra space may choose to uninstall it.
- Switching to Alternatives: With the availability of numerous other photo editing applications offering similar functionalities at a lesser cost or for free, users might opt for these alternatives.
- Usability and Complexity: Photoshop’s comprehensive feature set, designed for professional use, can be overwhelming for beginners or those with modest editing needs. This complexity drives some users towards simpler, more user-friendly options.
Whether it’s due to financial considerations, seeking a more straightforward editing tool, or simply to reclaim disk space, a full installation of the software and its additional files will ensure your Mac performs well and drive space is reclaimed.
Completely uninstall Photoshop on Mac using SpyHunter
To uninstall Photoshop from your system completely and without issue, you can rely on SpyHunter and its App Uninstaller to automate and simplify the process.
Here is a concise step-by-step guide on using SpyHunter to completely uninstall Photoshop:
- Download SpyHunter and follow the on-screen instructions to install it.
- Open SpyHunter and navigate to the
App Uninstallertab. This will initiate an automated process that lists all the apps installed on your Mac along with their associated directories and files. - Scroll through the list to find Photoshop. Select it and ensure that all items under
Related Filesare also selected.
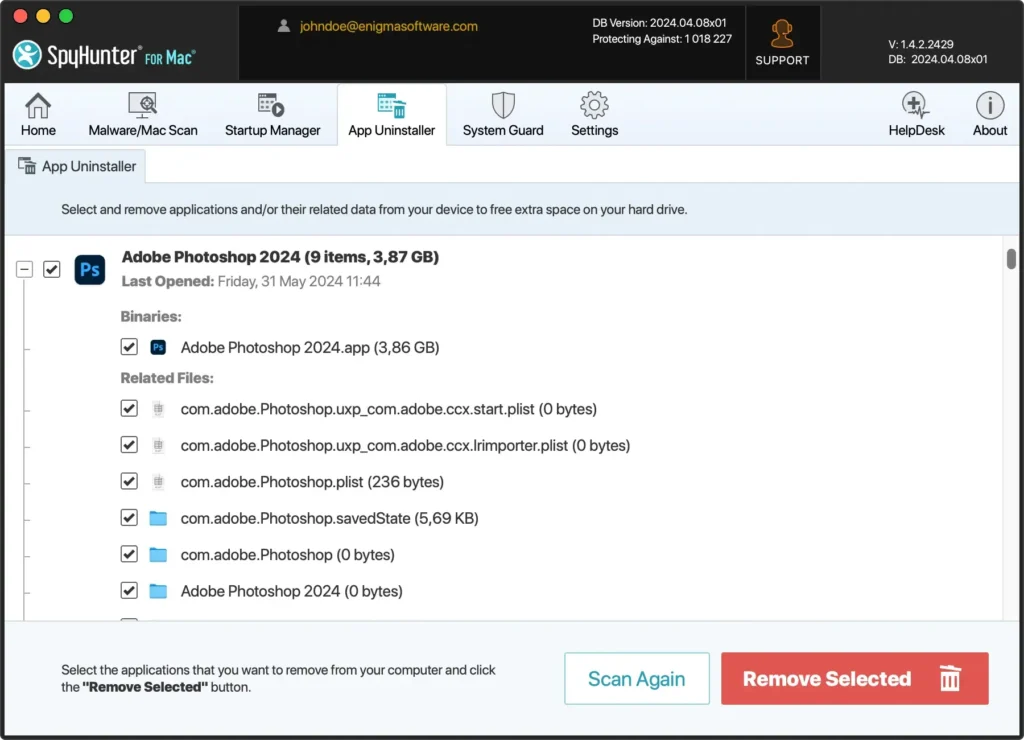
- Complete the uninstall process by clicking the
Remove Selectedbutton in the bottom right corner of the window. - After SpyHunter has successfully removed Photoshop and all associated files, restart your Mac to complete the uninstall process.
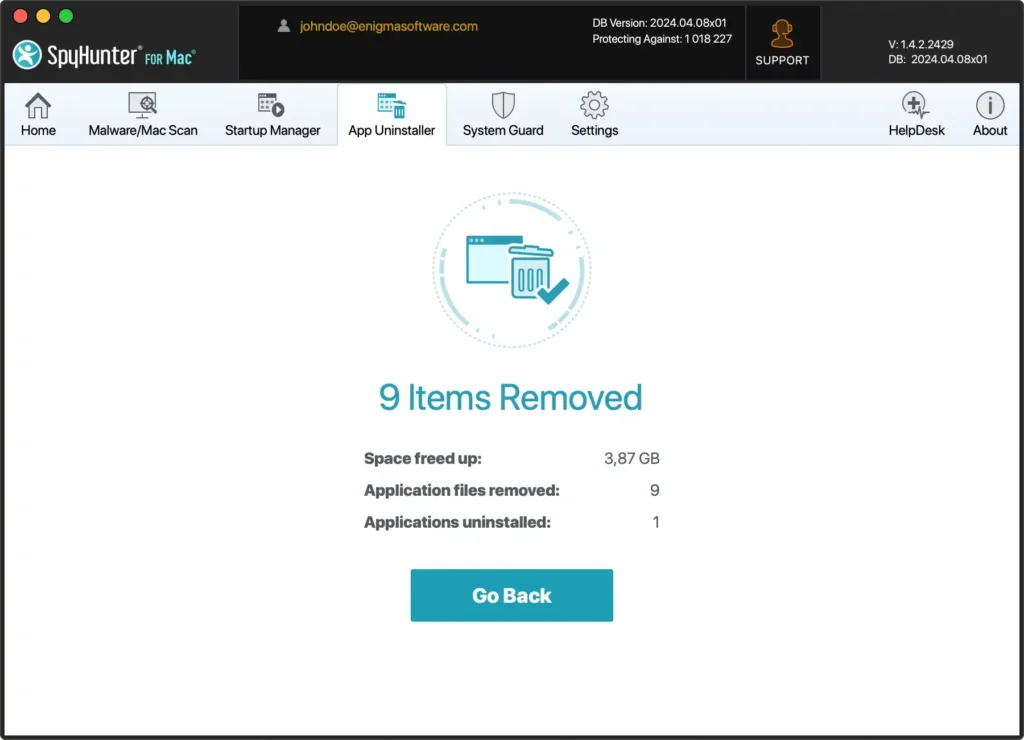
SpyHunter’s App Uninstaller can save you time by automating the removal process and managing all leftover files automatically. This eliminates the need for manually locating those directories and files, allowing you to focus on other tasks.
Step-by-step guide to manually uninstall Photoshop from Mac
Removing Adobe Photoshop from your Mac may seem straightforward, but ensuring a clean uninstallation that leaves no leftover files requires a bit more attention.
Step 1: Quit Photoshop
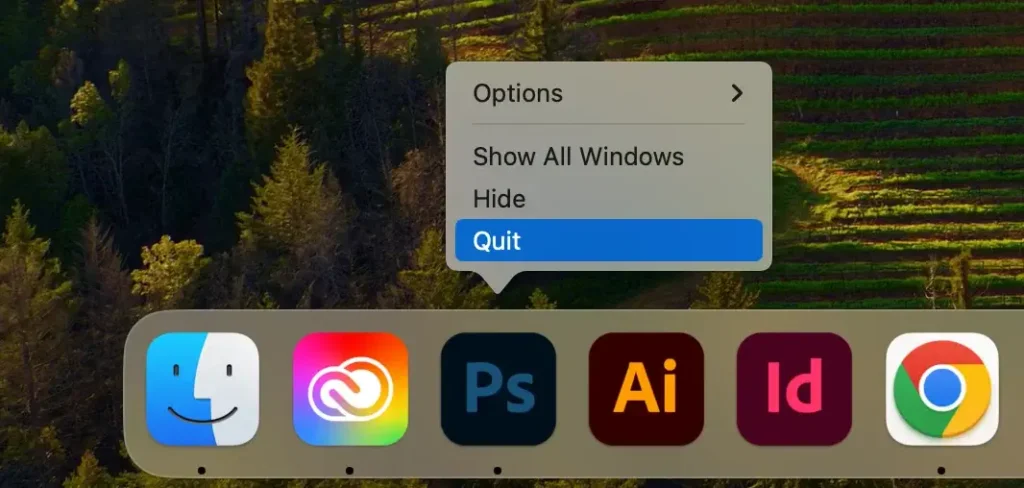
Ensure Photoshop is not running in the background before uninstalling it. You can close the application several different ways.
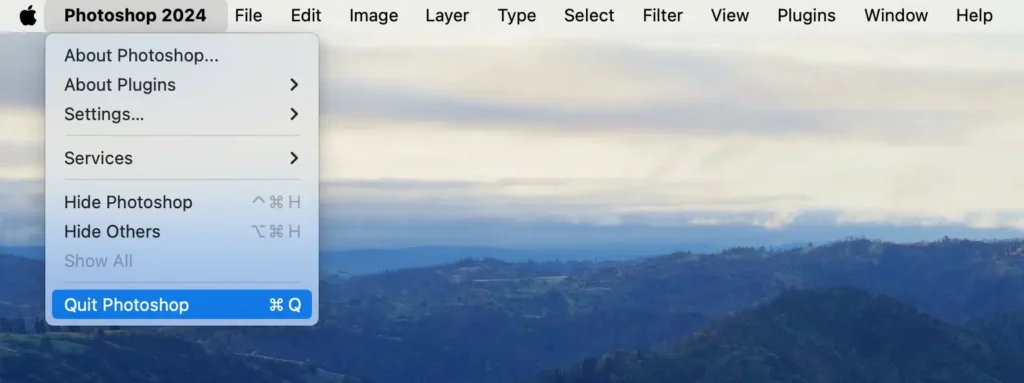
Right-click the Photoshop icon in your Dock and select Quit from the menu.
Alternatively, click Photoshop in your Mac’s top menu and choose Quit Photoshop from the dropdown menu.
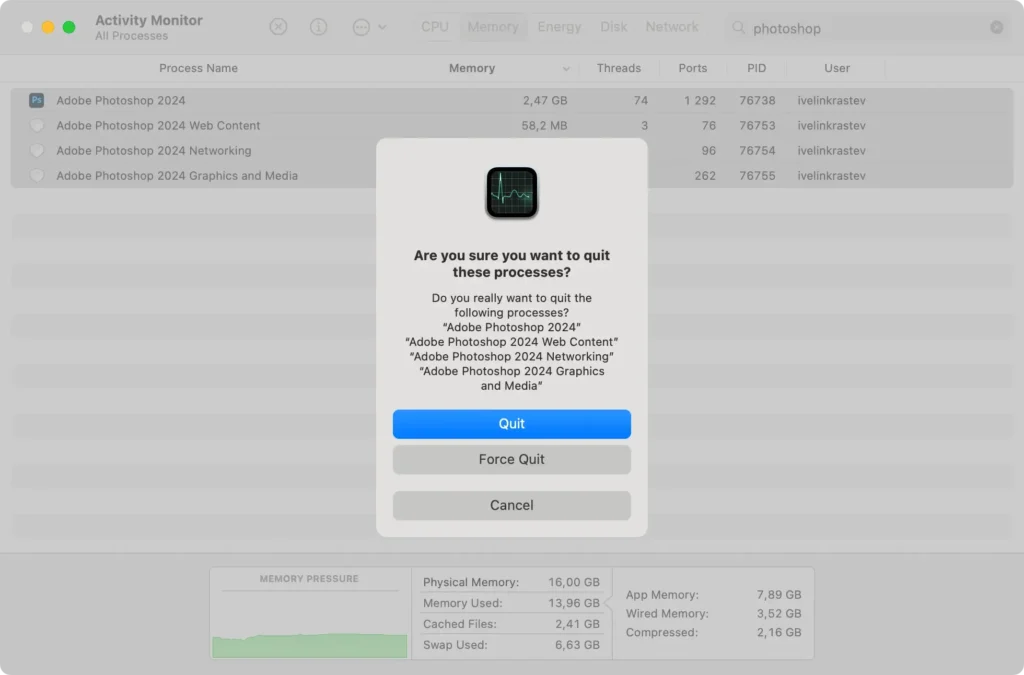
If Photoshop is not responding or the previous two methods don’t work properly, open Activity Monitor from the Utilities section in Finder.
Search for any processes containing the word “Photoshop” in the Activity Monitor window. Select these processes and click the [X] button above to close them. In the confirmation dialog, click Force Quit to finalize.
Step 2: Delete Photoshop from the Applications folder
Next, remove Photoshop from your Applications folder. Use Finder to navigate to the Applications folder and locate Photoshop.
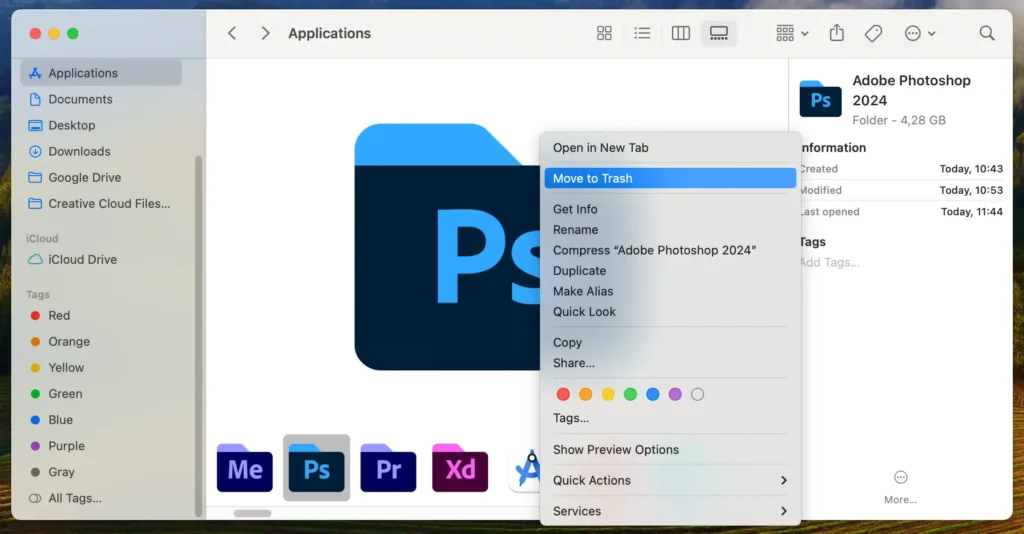
Drag the Photoshop icon to the Trash, or right-click the icon and select Move to Trash from the pop-up menu. Both actions achieve the same result. Then, empty your Trash to remove the application.
Step 3: Remove leftover files related to Photoshop
After deleting the application, you should remove its supporting files to prevent clutter on your drive.
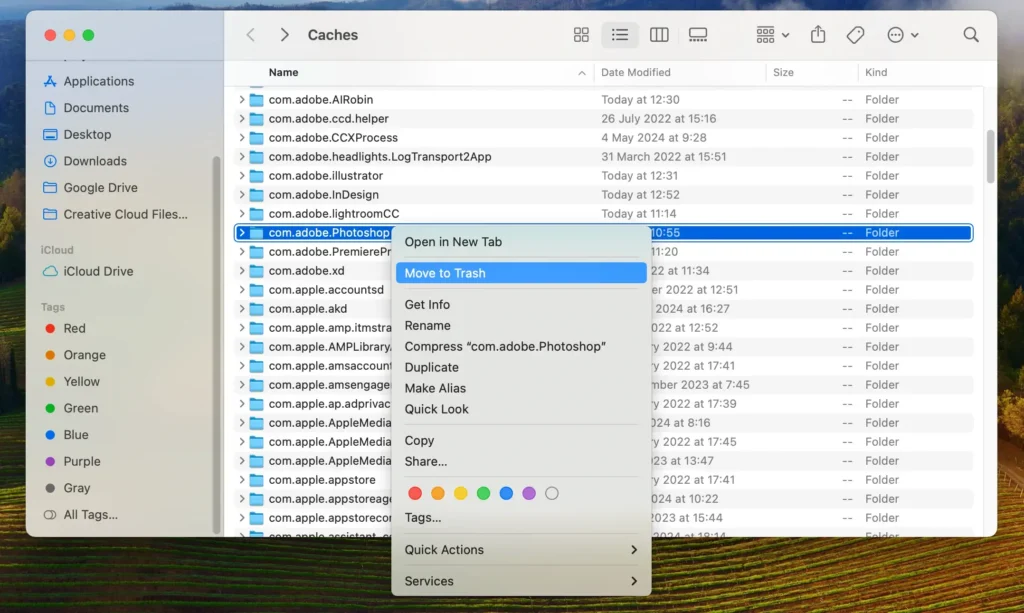
- Press
Command + Shift + Gor clickGo > Go to Folderfrom the menu bar. - Type in
~/Library/in the search bar and pressReturnto access theLibraryfolder, where most support files are stored. - Look for and delete folders and files related to Photoshop in the following paths:
~/Library/Application Support~/Library/LaunchAgents~/Library/LaunchDaemons~/Library/Preferences~/Library/PrivilegedHelperTools
- For all files and folders you find, right-click and select
Move to Trash. - Empty your
Trashto permanently delete them and complete the uninstallation process.
During this step, be careful and make sure you do not delete files that may belong to other apps, as this could impact those applications and your overall system’s stability.
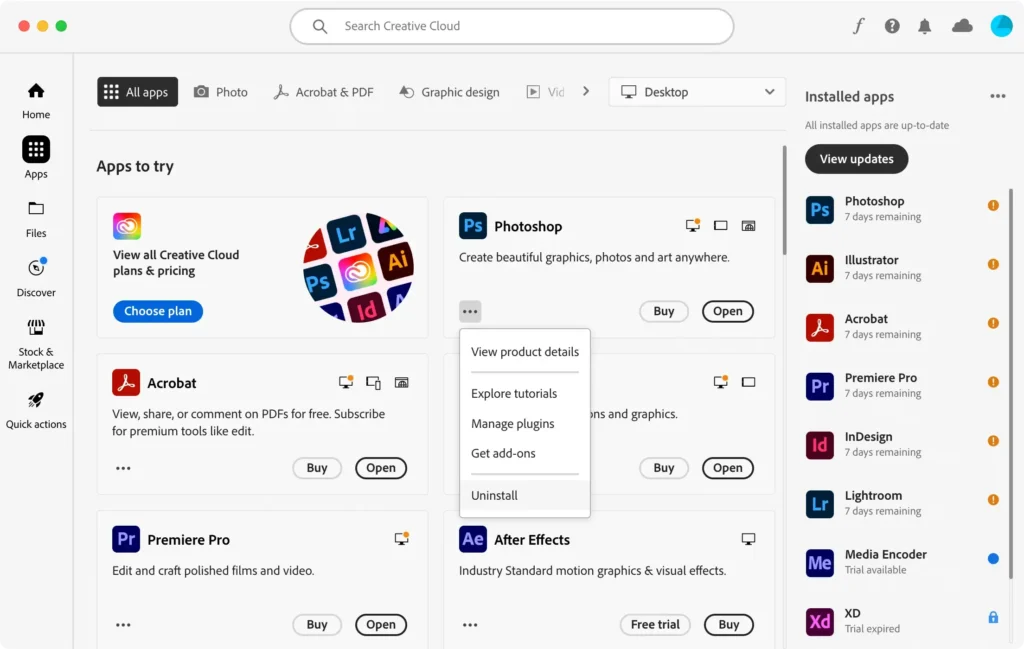
Use Adobe Creative Cloud to uninstall Photoshop
If you installed Photoshop through the Adobe Creative Cloud app, using its built-in uninstallation feature is a simpler way to remove the software. Here’s how you can do it:
- Launch Adobe Creative Cloud.
- In the Creative Cloud app, navigate to the
Appstab. You should see a list of installed Adobe applications. - Find Photoshop in the main window. Next to it, there will be a button represented by three dots. Click this button and then click
Uninstall. - You will be prompted to confirm if you want to delete Photoshop’s preferences and other associated files. Choose
Removeto proceed with the uninstallation.
Using Adobe Creative Cloud for uninstallation is straightforward and minimizes the risk of leftover files.
It seamlessly integrates with your existing Adobe suite, making it an efficient option for those who have multiple Adobe applications installed.
Conclusion
Thoroughly uninstalling Photoshop from your Mac is crucial for maintaining an optimized and clutter-free system.
By ensuring that all related files and directories are removed, you enhance your Mac’s performance and stability. Regularly cleaning up leftover files from uninstalled applications not only frees up space but also helps in keeping your system running smoothly and efficiently.
If you are parting ways with Adobe products entirely, you can also look into our article on how to uninstall Creative Cloud from your Mac.
For general information about uninstalling any app from your Mac, we have a guide packed with useful information on this topic as well.