How To Uninstall Chrome On Mac [2 Methods Explained]
Before we dive in
Trying to uninstall an app completely? SpyHunter for Mac includes an App Uninstaller that removes unwanted apps and their leftover files in just a few clicks.
Avoid clutter and save time — download SpyHunter right here and follow the steps to clean up your system.
If you’re scratching your head wondering how to uninstall Chrome on Mac, you’re in the right place.
While it might seem simple to drag Chrome to the Trash, a complete removal involves more work.
Whether you’re troubleshooting, decluttering, or switching browsers, properly uninstalling Chrome keeps your Mac running smoothly and protects your privacy.
In this guide, we’ll walk you through each step to fully uninstall Chrome on Mac, clear hidden files, and make sure your data is removed from both your system and Google servers.
Let’s dive in and tidy up your Mac by uninstalling Chrome the right way.
Tip: Always back up your data before uninstalling applications to avoid any data loss.
Completely remove Chrome on Mac with SpyHunter
The easiest and quickest way to remove Google Chrome on Mac is to use a dedicated uninstall tool like SpyHunter for Mac.
SpyHunter simplifies the uninstallation process by identifying all files linked to Chrome on your Mac, even those stored in hidden directories.
Here’s how to fully uninstall Google Chrome on your Mac with SpyHunter:
- Download SpyHunter for free here and follow the setup instructions.
- Open SpyHunter and go to the App Uninstaller tab.
- SpyHunter will start the scan and show you all installed applications and their files.
- From the scan results, locate Google Chrome. This list will include the main application and all related files and data.
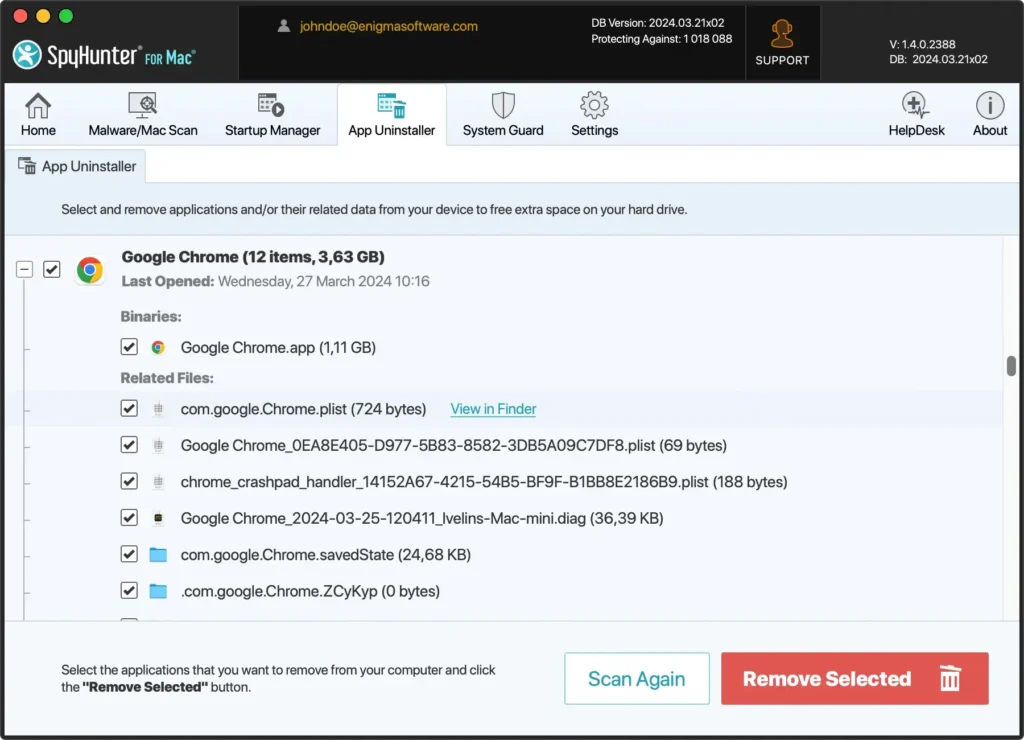
- Select the app and all the folders and files related to it.
- Follow the instructions to finalize the removal. This may require a restart.
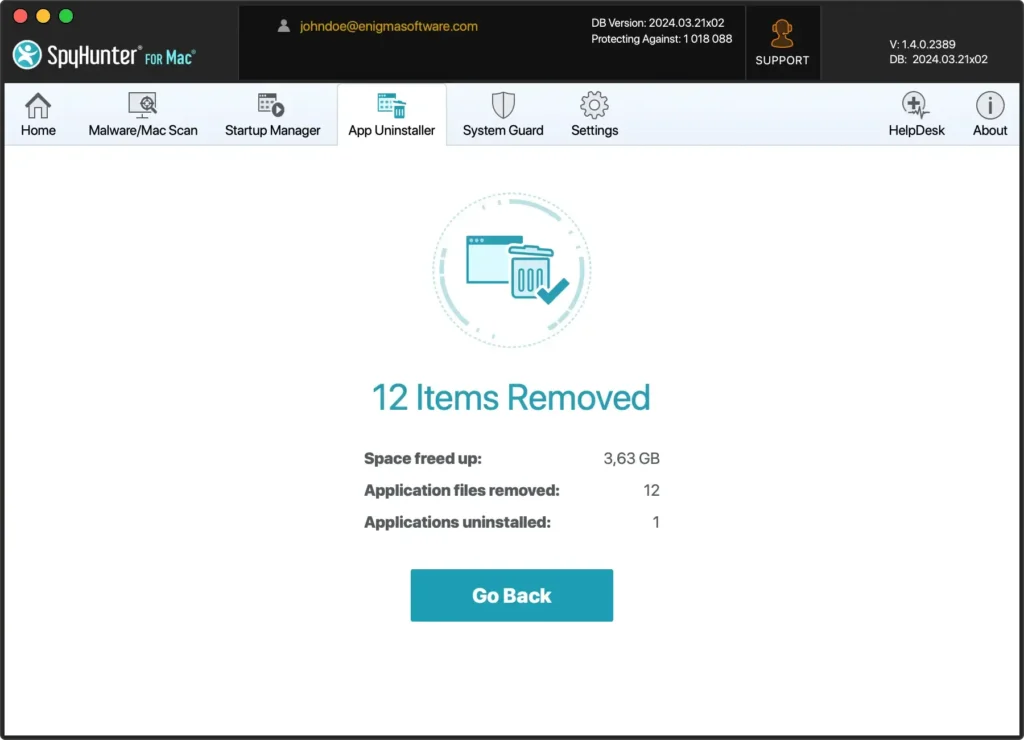
That’s it! With just a few clicks, you managed to delete Chrome and all its files.
With Chrome now uninstalled, your Mac will have extra storage space, improved performance, and the peace of mind that all personal browsing data is securely deleted.
How to uninstall Chrome on Mac manually
To manually remove Chrome from your Mac, you’ll need to delete both the main application and all the folders and files related to it.
When you uninstall Chrome, you are also able to delete your profile data.
Here’s a step-by-step guide to ensure Chrome and all its data are fully removed.
Step 1: Quit Google Chrome
Before deleting Chrom from a Mac, you need to quit the app first. This will ensure that the app and its services won’t prevent the uninstallation.
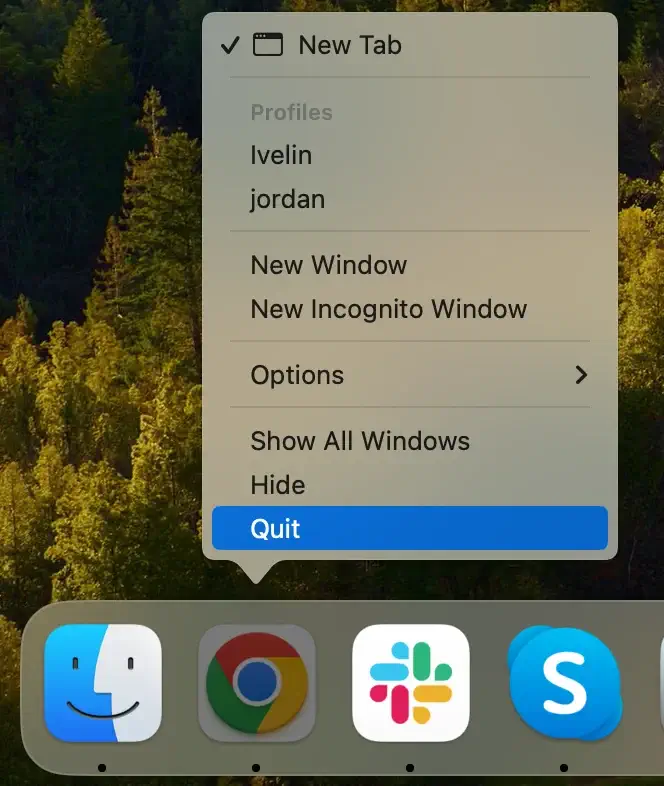
Quit via Dock: If Google Chrome is pinned to your Dock, you can simply right-click Chrome and select Quit from the contextual menu.
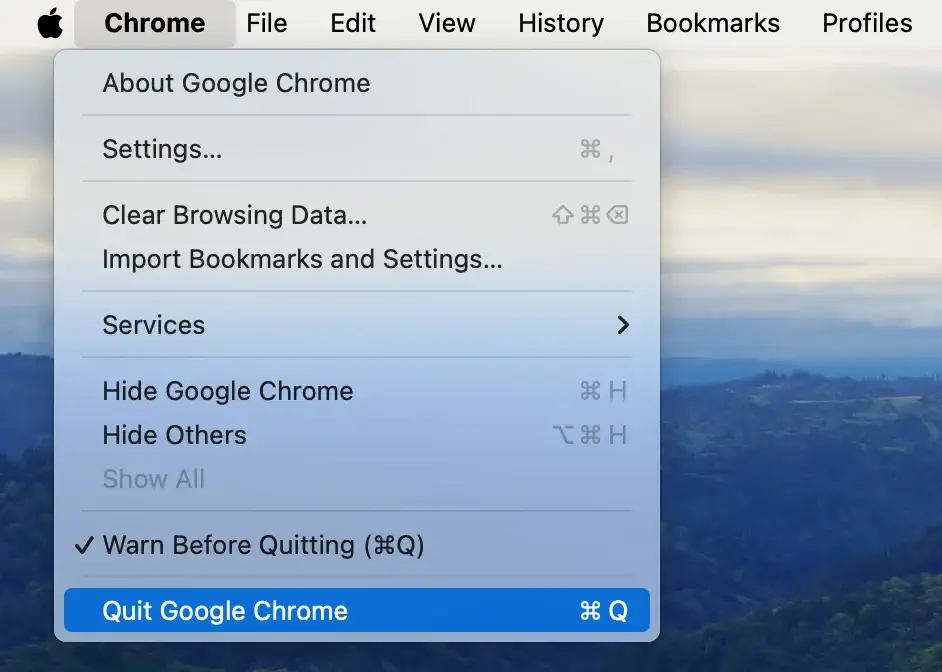
Use the Chrome Menu: With Chrome open, click Chrome in the menu bar at the top of your computer screen and select Quit Google Chrome from the drop-down menu. You can also press the keyboard shortcut Cmd + Q while the app is your active application.
Force Quit: Press Cmd + Option + Esc to open the Force Quit Applications window, find Google Chrome in the list, select it, and click the Force Quit button.
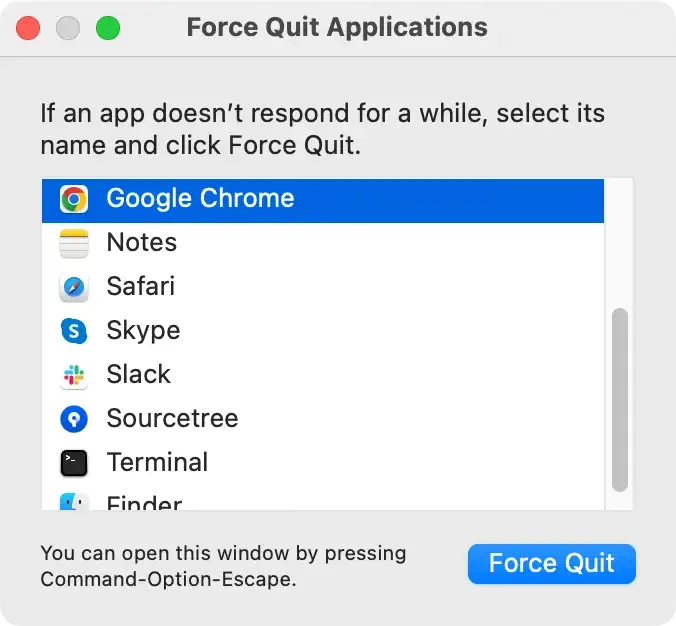
Ensuring that the app is quit correctly before you proceed with its uninstallation is an essential step.
It facilitates a smoother removal process and terminates all associated processes, paving the way for a clean and complete uninstallation.
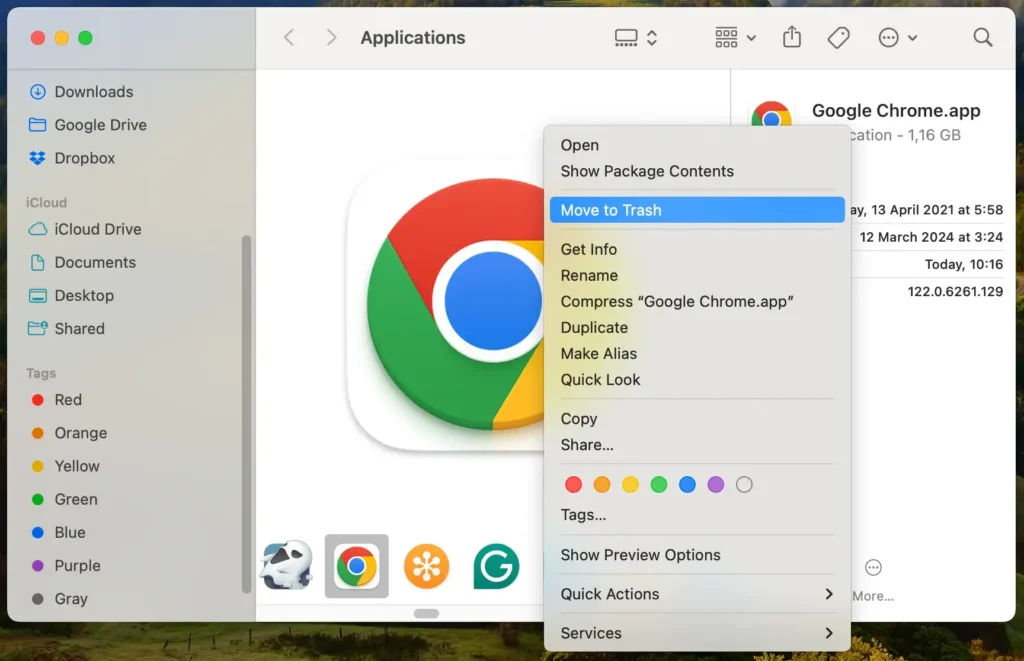
Step 2: Move Chrome to the Trash
Once Google Chrome is shut down, you can delete it from your Mac:
- Open
Finderand navigate to theApplicationsfolder. - Find the Google Chrome application and either:
- Drag Google Chrome icon into the Trash icon in your Dock, or
- Right-click Chrome and select
Move to Trash.
- If asked, type in your administrator password to confirm the action.
Step 3: Empty the Trash
After uninstalling, empty the Trash to complete the removal process:
- Go to the
Trashicon in your Dock. - Right-click and select
Empty Trashto permanently delete Google Chrome from your Mac.
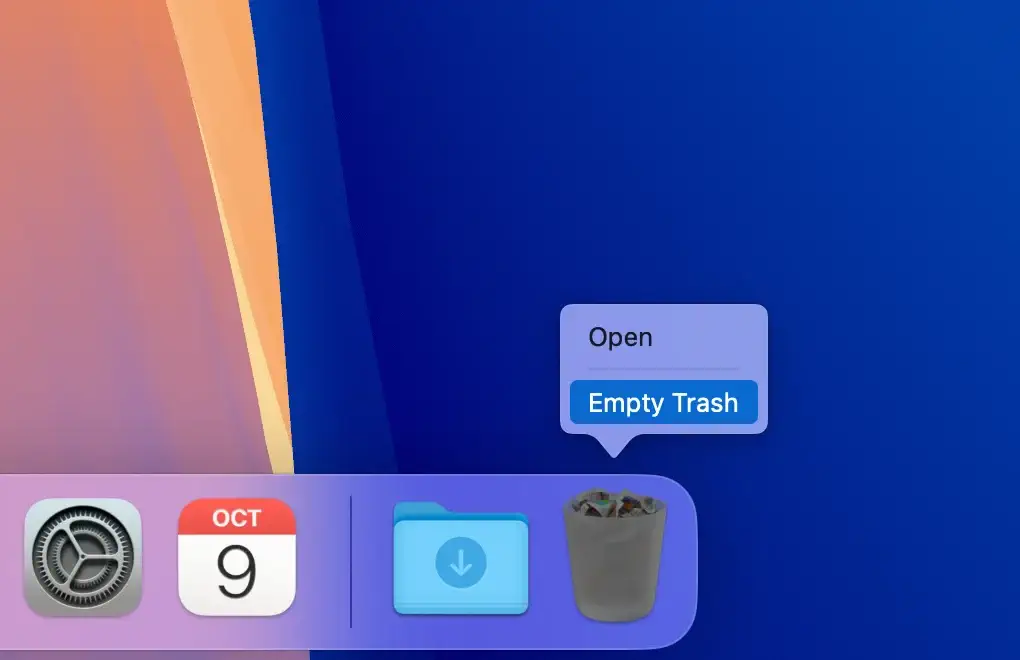
Note: At this stage, Chrome will be removed from your system, but associated data, such as your profile information, cache files, and browsing history, may still remain.
Step 4: Remove Google Chrome’s profile information and cached data
To fully uninstall Chrome, delete any profile and cached data stored in hidden folders on your Mac. Follow these steps to remove any associated files:
- Open
Finderand clickGoin the menu bar. - Select
Go to Folderand enter the following path:~/Library/Application Support/Google/Chrome - Click
Goto navigate to the Chrome folder. - Select all files within this folder by pressing
Command + A, then right-click and chooseMove to Trash. - Return to the
Trashand selectEmpty Trashto permanently delete these files.
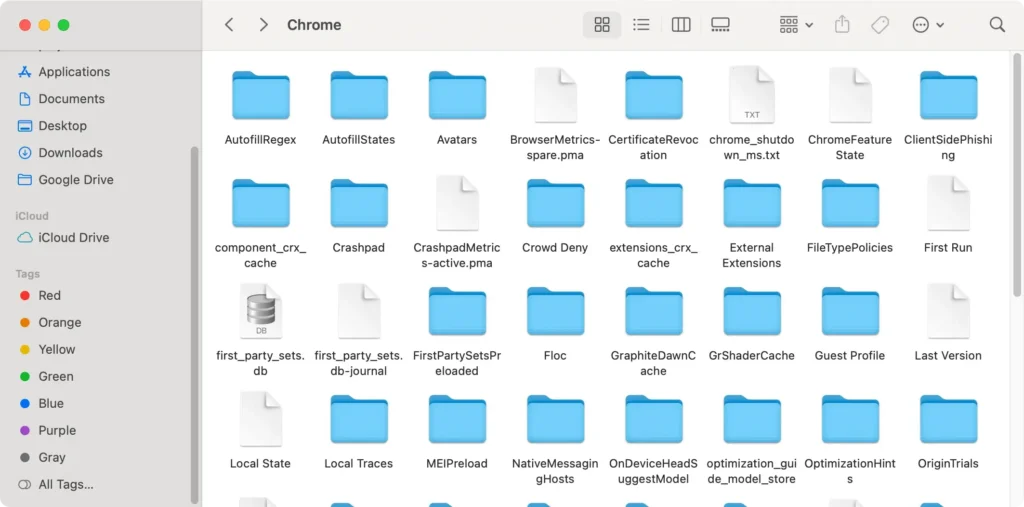
Quick Tip: The data generated by Google Chrome is stored in this folder. So deleting this folder will remove profile data, browsing history, stored passwords and bookmarks of your Google Chrome browser. Make sure you don’t need this data before you proceed.
Step 5: Clear Google Data from Google’s servers (Optional)
Some information might still be on Google’s servers if you are signed in to Chrome and syncing your data. To delete this data:
- Open Safari (or any other browser) and go to myaccount.google.com.
- Navigate to
Data & Privacyand selectDelete your data in this serviceto clear stored information, like browsing history, from Google’s servers.
Step 6: Check for remaining files in system folders (Optional)
Some files may remain on your system even after following the above steps. Here’s how to ensure they’re all removed:
- Open
Finderand clickCommand + Shift + Gto open theGo to Folderwindow. - Enter the following paths one at a time and check for any files related to Google Chrome:
~/Library/Caches/Google/Chrome~/Library/Preferences/com.google.Chrome.plist/Library/Application Support/Google/Chrome
- If you find any files, delete them by dragging them to Trash.
FAQs
Is it safe to uninstall Google Chrome on my Mac?
Yes, uninstalling Chrome is safe. Once removed, your Mac will switch the default browser to Safari, and you can browse the web as usual.
Can I uninstall Chrome and reinstall it later?
Yes, after uninstalling Chrome, you can reinstall it by downloading the latest version from the official Chrome website and following the installation instructions to set it up again.
Does uninstalling Chrome remove it from my iOS devices?
No, uninstalling Chrome on your Mac won’t remove Chrome from other devices like your iPhone or iPad. Chrome will still work on those devices separately.
That’s how you can uninstall Google Chrome on your MacBook. We hope this guide brings you a smoother browsing experience!