How To Remove Bing From Mac (Step-By-Step Guide)
Before we dive in
Before we dive in, let's make sure you stay safe online. We created SpyHunter because your security matters to us.
Protect your computer today — download SpyHunter right here! Check out our top tips below to keep your computer safe and secure.
If you’re experiencing automatic redirection to Bing, your Mac is likely infected with the Bing redirect virus.
This form of browser hijacker often arrives as bundled software and infiltrates your browser settings without consent.
The Bing redirect virus changes your preferred search engine to Bing, collecting data like IP addresses and browsing history to engage in traffic monetization.
It affects major browsers such as Safari, Chrome, and Firefox, leading to constant Bing redirects in search results.
In this guide, we’ll walk you through the essential steps to remove Bing redirect, restore your preferred search engine, and safeguard your Mac against similar threats.
What is Bing redirect virus on Mac?
The Bing redirect virus is not a true virus, as it doesn’t replicate itself or spread across devices. Instead, it’s categorized as a browser hijacker, a type of adware that modifies your browser settings without permission.
Once installed, it forces your search engine to Bing.com, overriding your preferred settings and affecting all browsers on your Mac, including Safari, Chrome, and Firefox.
Beyond simply redirecting searches, the Bing redirect virus gathers data such as your web searches, IP address, and browsing history, compromising online security. This internet activity tracking can be used to target you with ads, often leading to intrusive pop-ups and sponsored content in your search results.
Because it’s bundled with other software downloads, you might unwittingly install the Bing redirect along with seemingly legitimate applications, making it challenging to detect and remove.
Symptoms of Bing redirect on Mac
Mac users dealing with Bing redirects may notice the following:
- Homepage settings change to Bing or other unwanted sites.
- Search engine switches to Bing.com without permission.
- Slow browsing speeds and altered search engine settings.
- Unwanted extensions or profiles added to the browser, often in Safari’s Extensions tab or System Preferences.
- Ads and pop-ups appearing more frequently.
- Search queries rerouted to Bing.com without user permission.
How did Bing redirect get onto your Mac?
Bing redirect often sneaks onto Macs through various deceptive tactics. Here are the most common ways it can end up installed:
- Software Bundling: Free software or apps downloaded from third-party sites or torrents often come bundled with the Bing redirect virus, hidden within the installer.
- Fake Software Updates: Posing as legitimate updates, malicious websites may prompt you to install “necessary updates,” which contain the Bing redirect or other browser hijackers.
- Deceptive Pop-ups and Links: Clicking on suspicious pop-ups, links, or ads from malicious websites or even from email can trigger the installation of Bing redirect on your Mac.
Now that you know how it gets installed, let’s explore how to remove Bing from your Mac and restore your browser to its original settings.
How to get rid of Bing redirect on Mac
Removing Bing redirect from your Mac involves several steps, including manual removal options and an automatic solution with SpyHunter. Here’s how to tackle the issue effectively:
Remove Bing redirect virus automatically with SpyHunter
Once the Bing redirect virus infiltrates your system, it can be difficult to revert to the original browser settings.
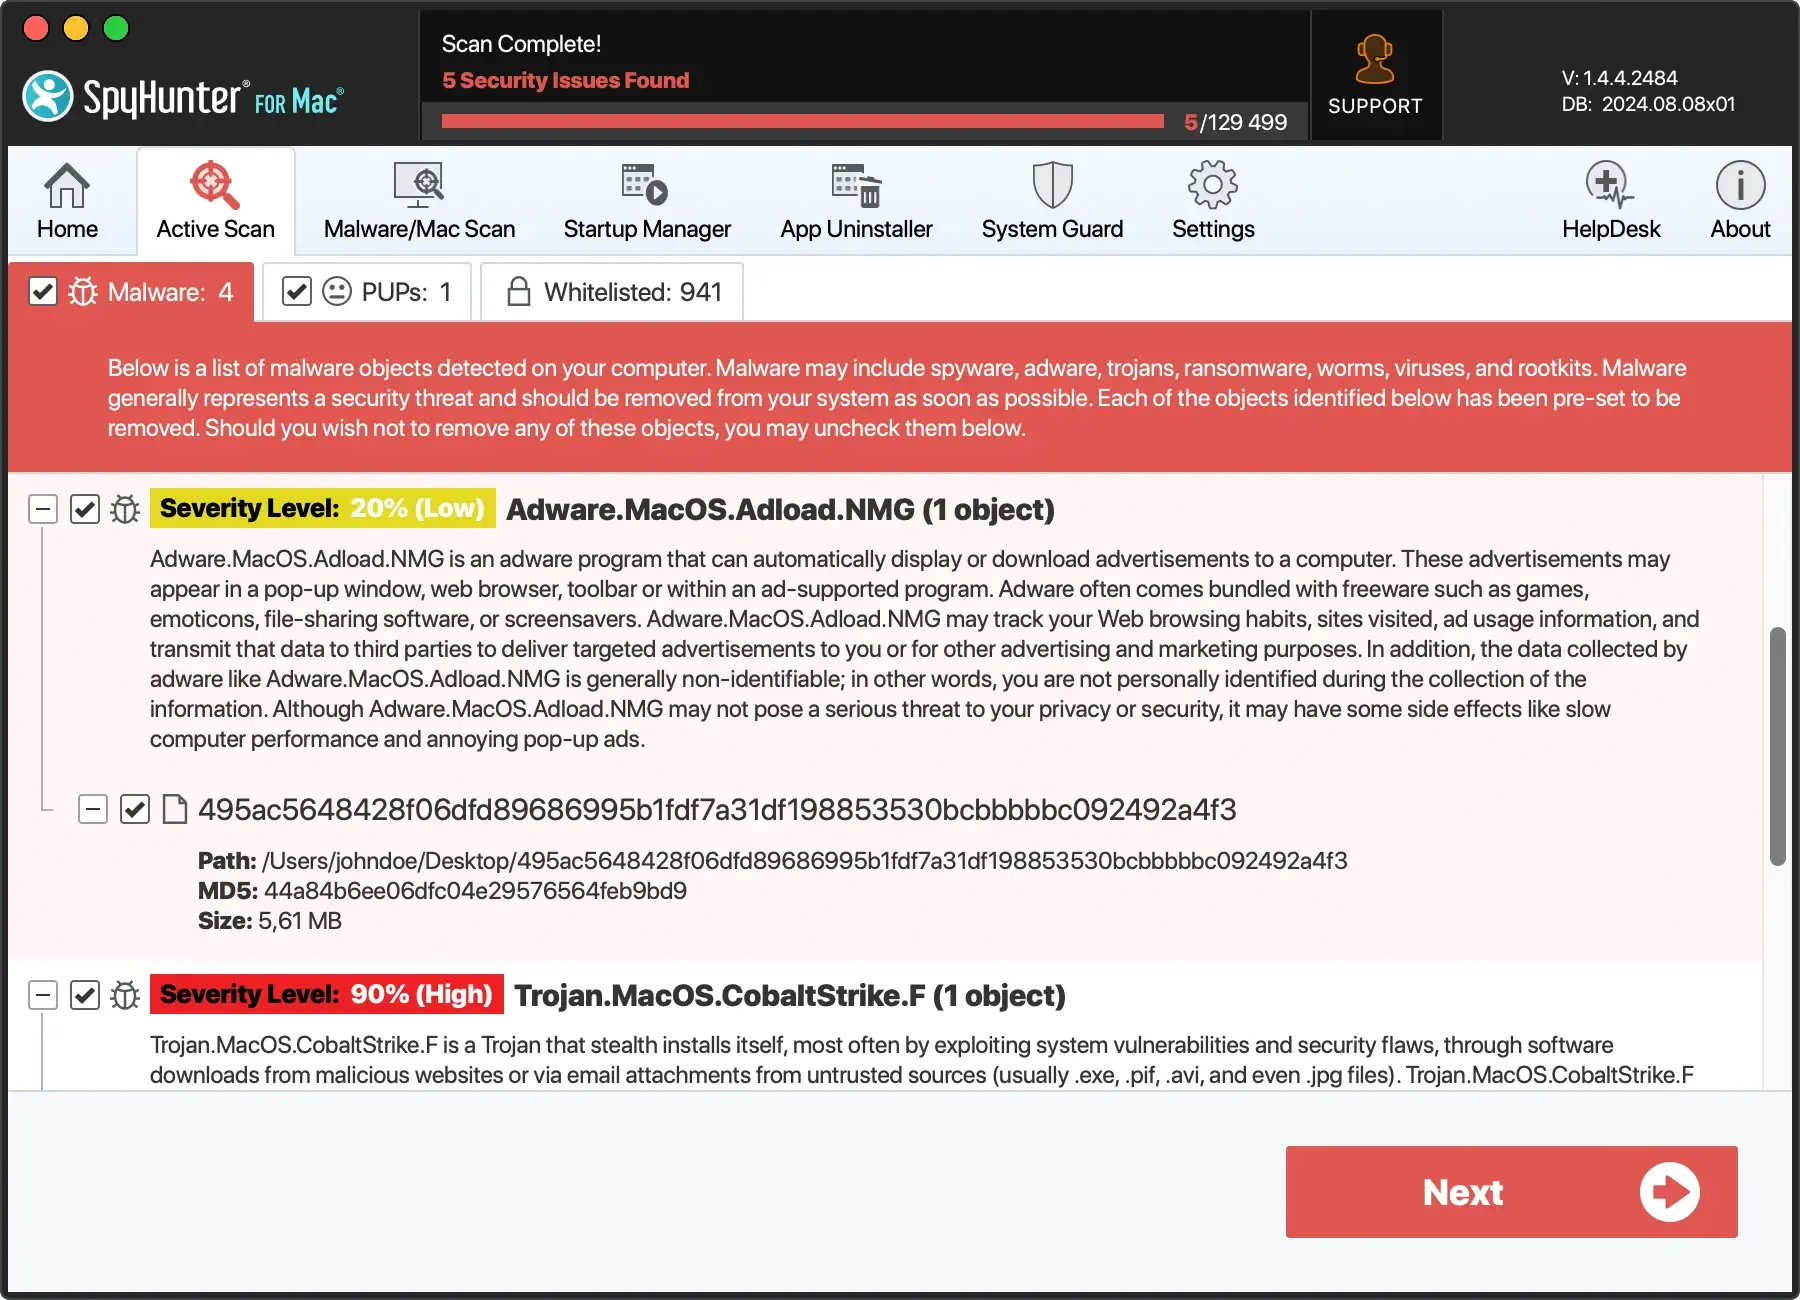
SpyHunter for Mac offers a quick, automated solution to detect and delete Bing redirect and any associated malware. Here’s how to use SpyHunter to remove Bing redirects:
- Download SpyHunter for free here and install it on your computer.
- Open SpyHunter and initiate a full system scan. This will detect any browser hijackers, including the Bing redirect virus, along with malicious browser extensions, malicious processes, and suspicious login items.
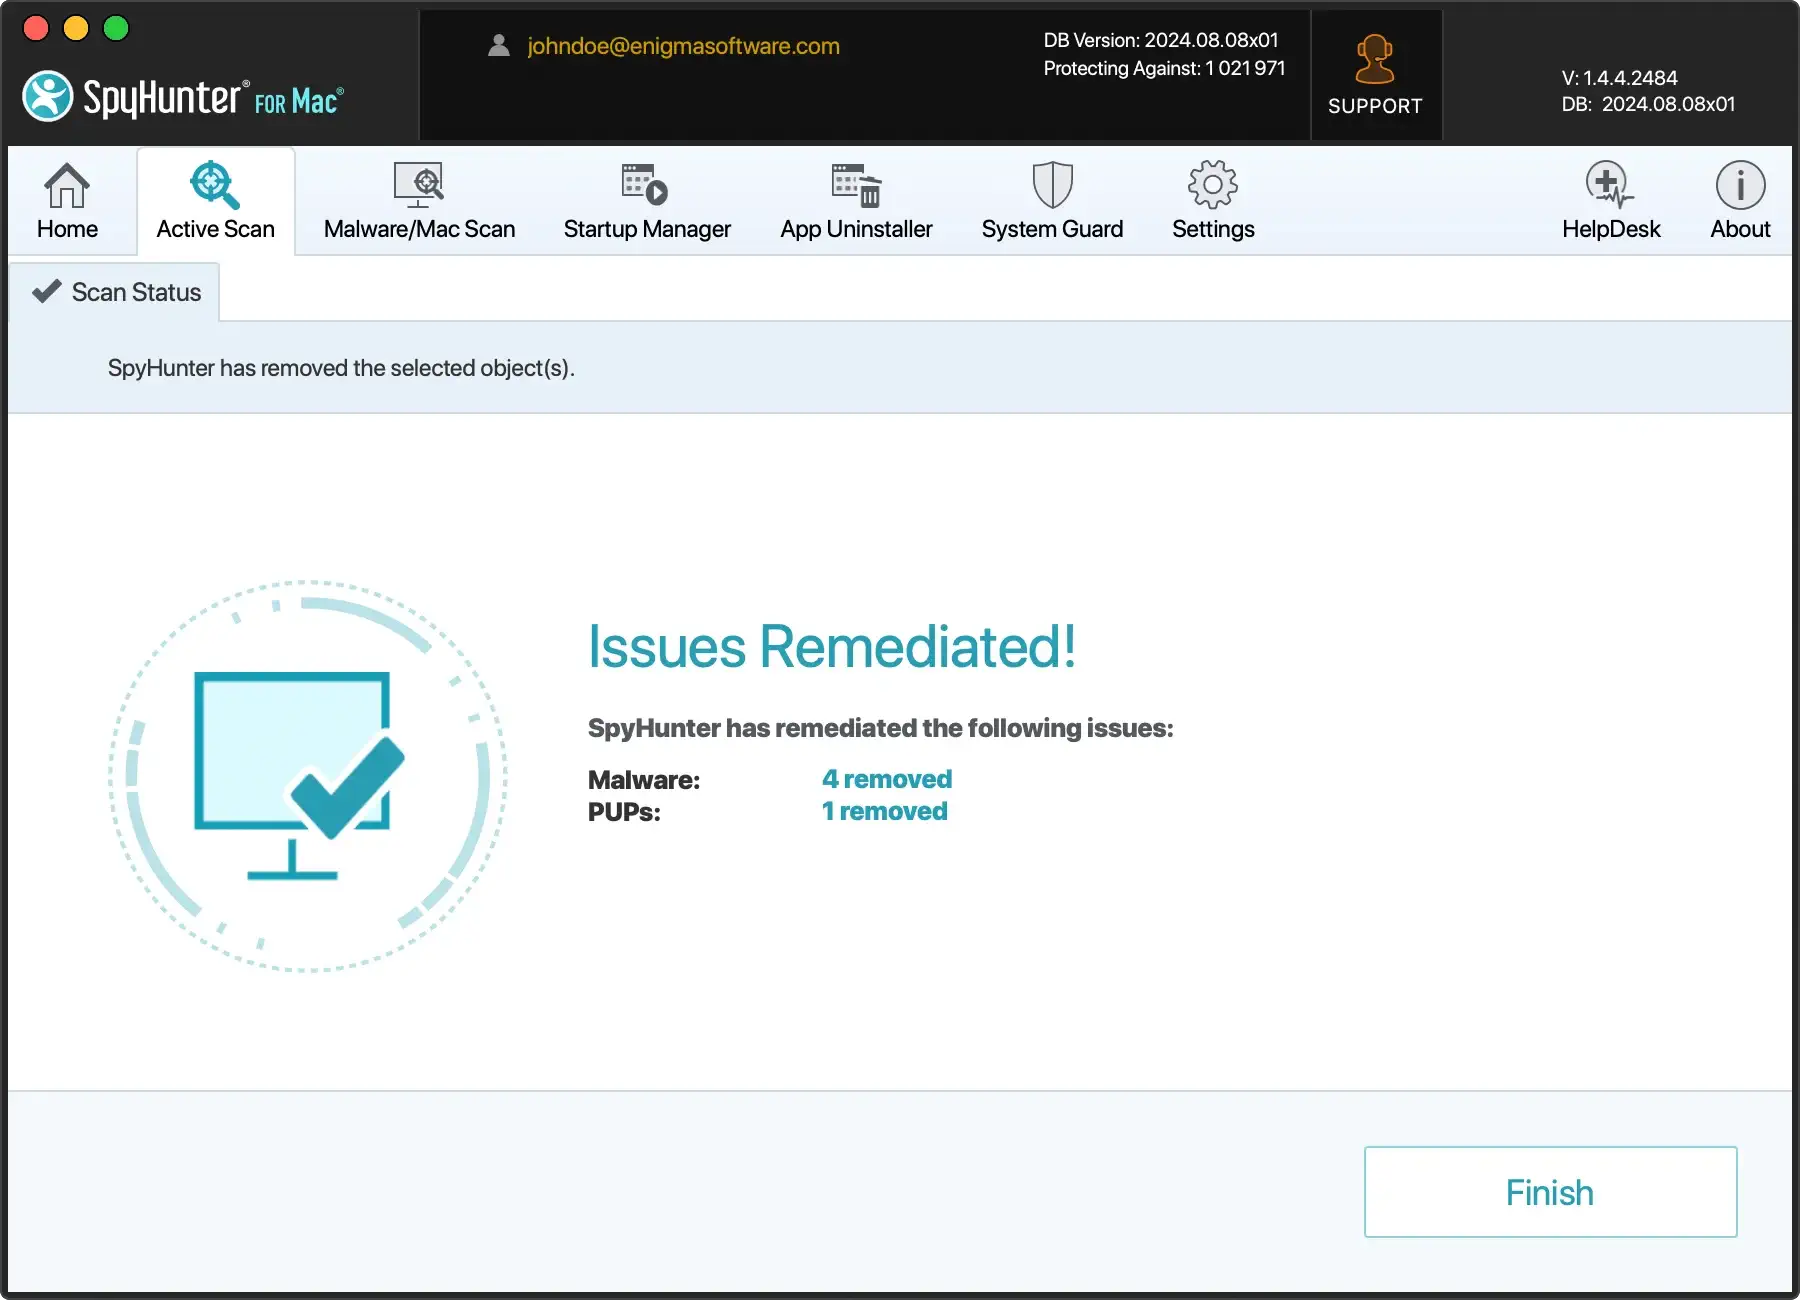
- Once the scan is complete, click Remove to delete any detected threats, ensuring Bing redirect and any associated malware are eliminated from your system.
SpyHunter’s ongoing scanning capabilities make it a valuable tool to keep your Mac safe from threats, including future browser hijackers, malicious apps, and PUPs.
How to remove Bing redirect from Mac manually
Removing Bing redirect manually requires thoroughness as it affects different areas of your system, including browser settings, extensions, and login items.
Here are the steps to follow:
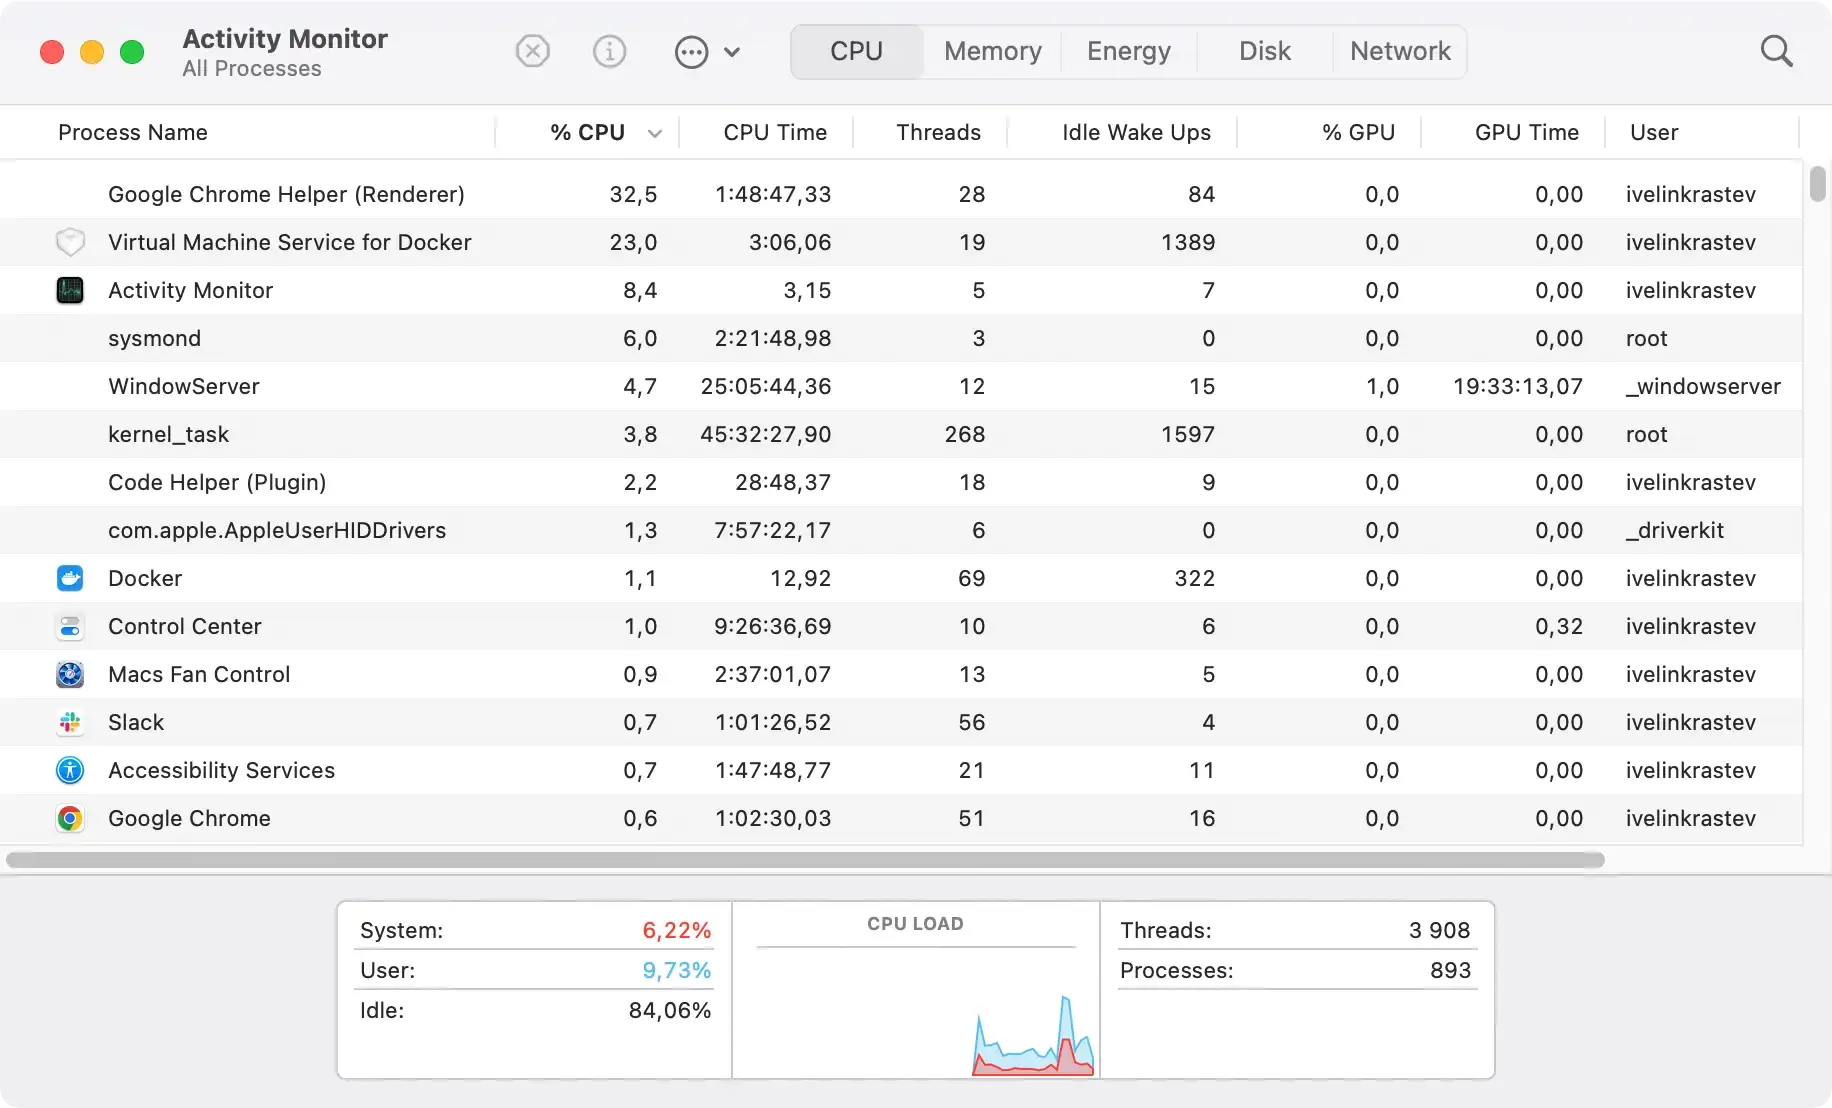
1. Stop suspicious processes
- Open
Activity MonitorfromApplications > Utilitiesor search for it using Spotlight. - In the
Activity Monitorapp, look for suspicious processes that could be related to Bing redirect or other malicious programs. - If you find any unfamiliar or suspicious processes, select them and click the
Quit Processbutton (X) in the toolbar to stop them.
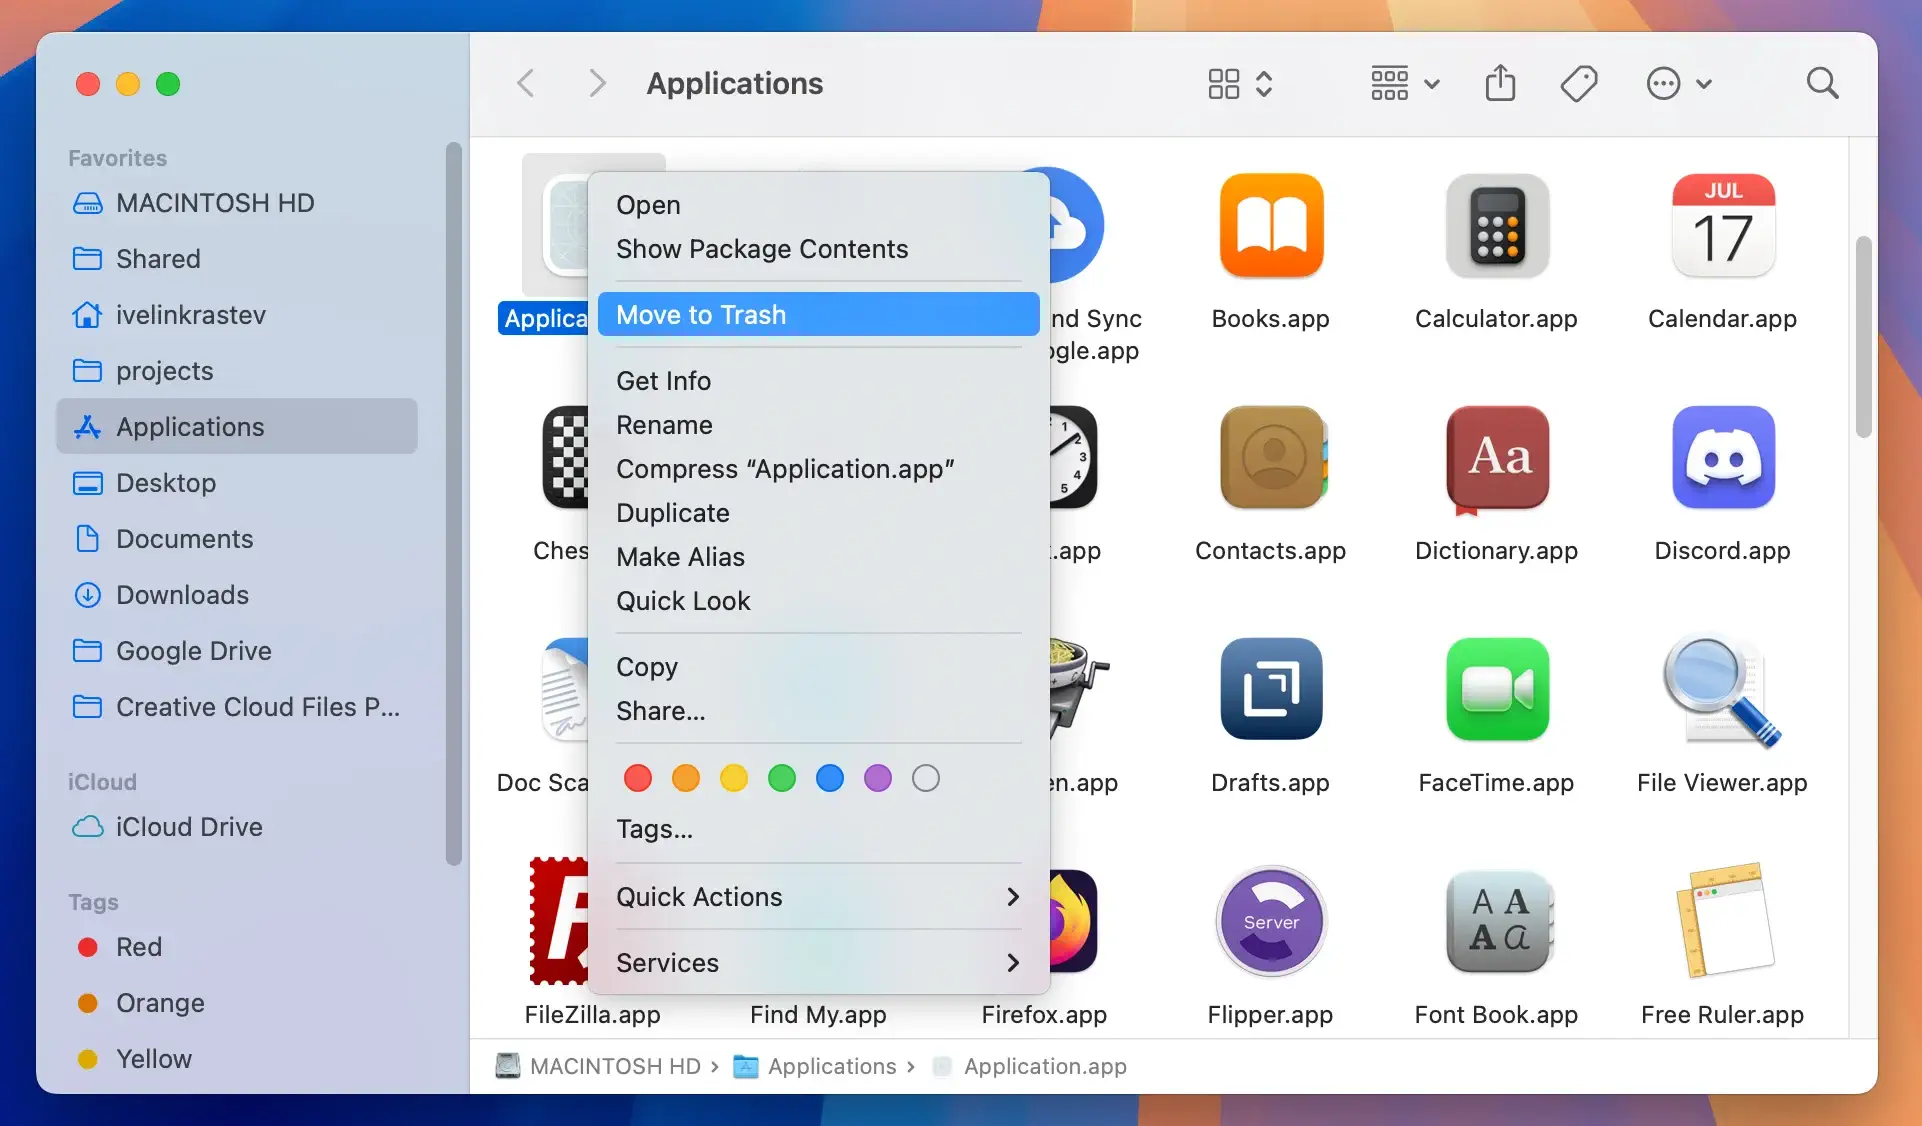
2. Remove malicious applications
- Go to the
Applicationsfolder inFinder. - Review all installed applications for any unknown or unwanted apps that might have installed Bing redirect, such as fake software updates or third-party apps you don’t remember downloading.
- Select the malicious app.
- Drag it to the Trash.
- Empty
Trashto delete it from your system.
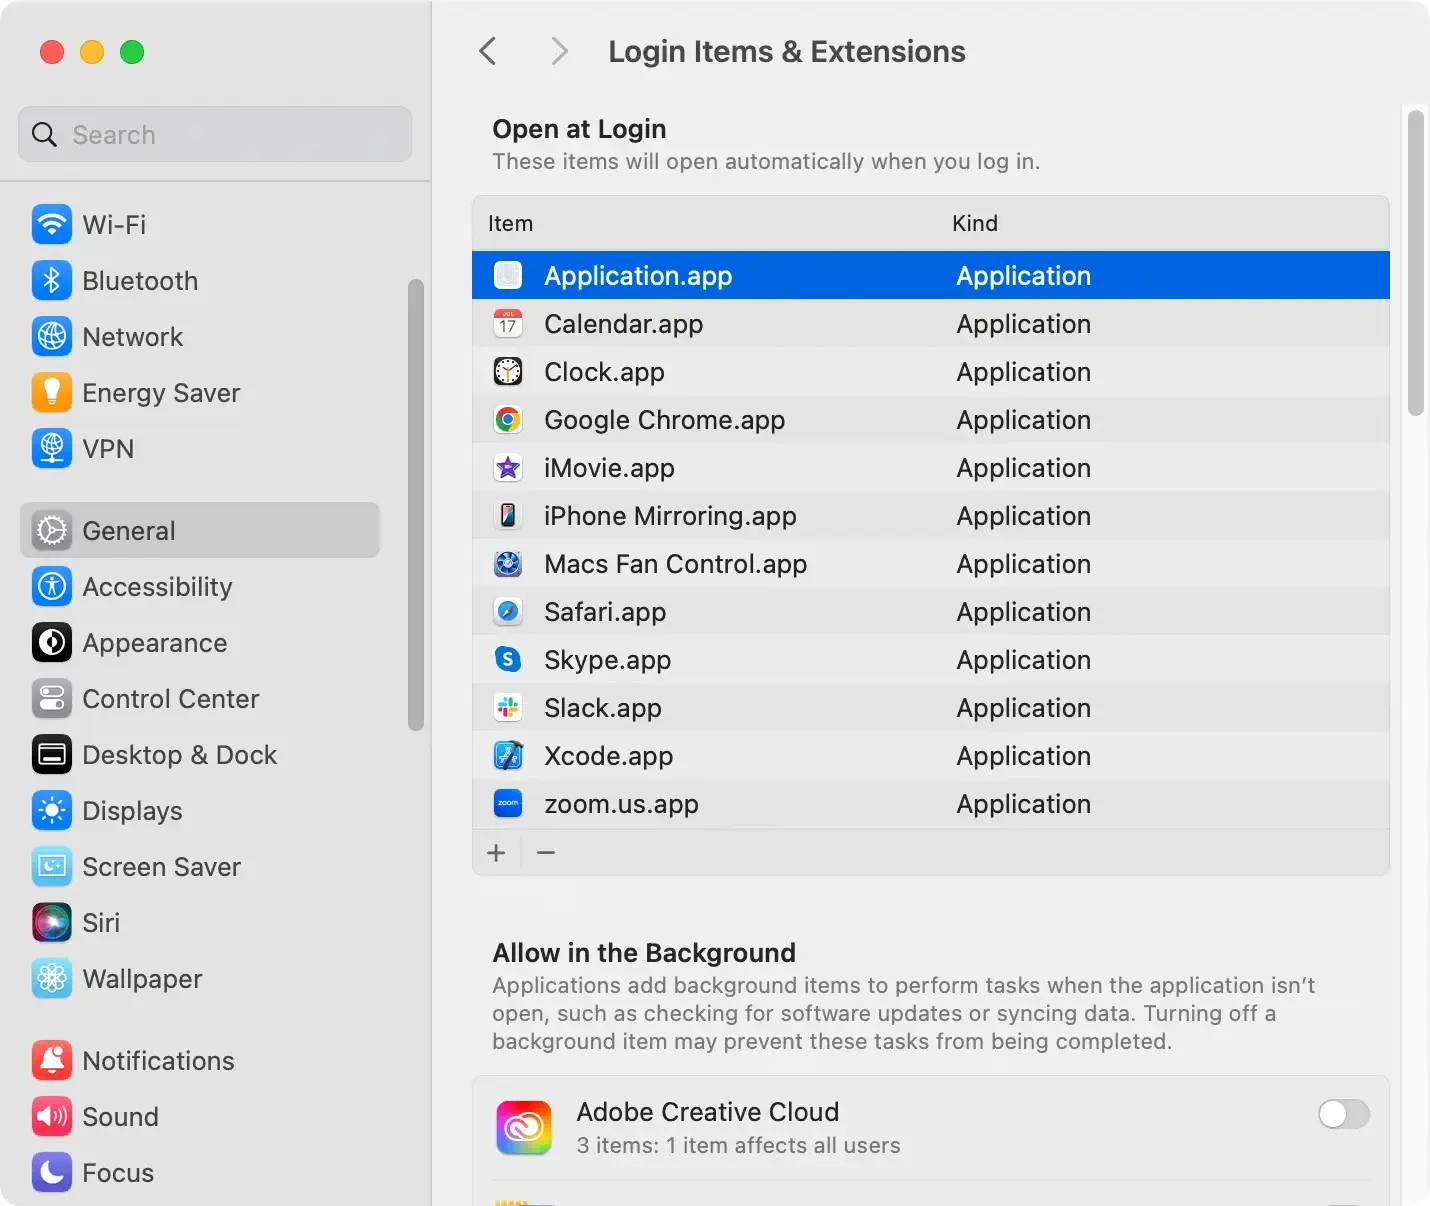
3. Delete suspicious Login Items
Sometimes, the Bing redirect virus or similar browser hijackers add themselves to Login Items, so they launch every time your Mac boots up.
- From the Apple menu, navigate to
System Settings. - Select
General > Login Items & Extensions. - Check for any suspicious login items.
- Select any unknown or recently added apps and click the “–” (minus) button to remove them from startup.
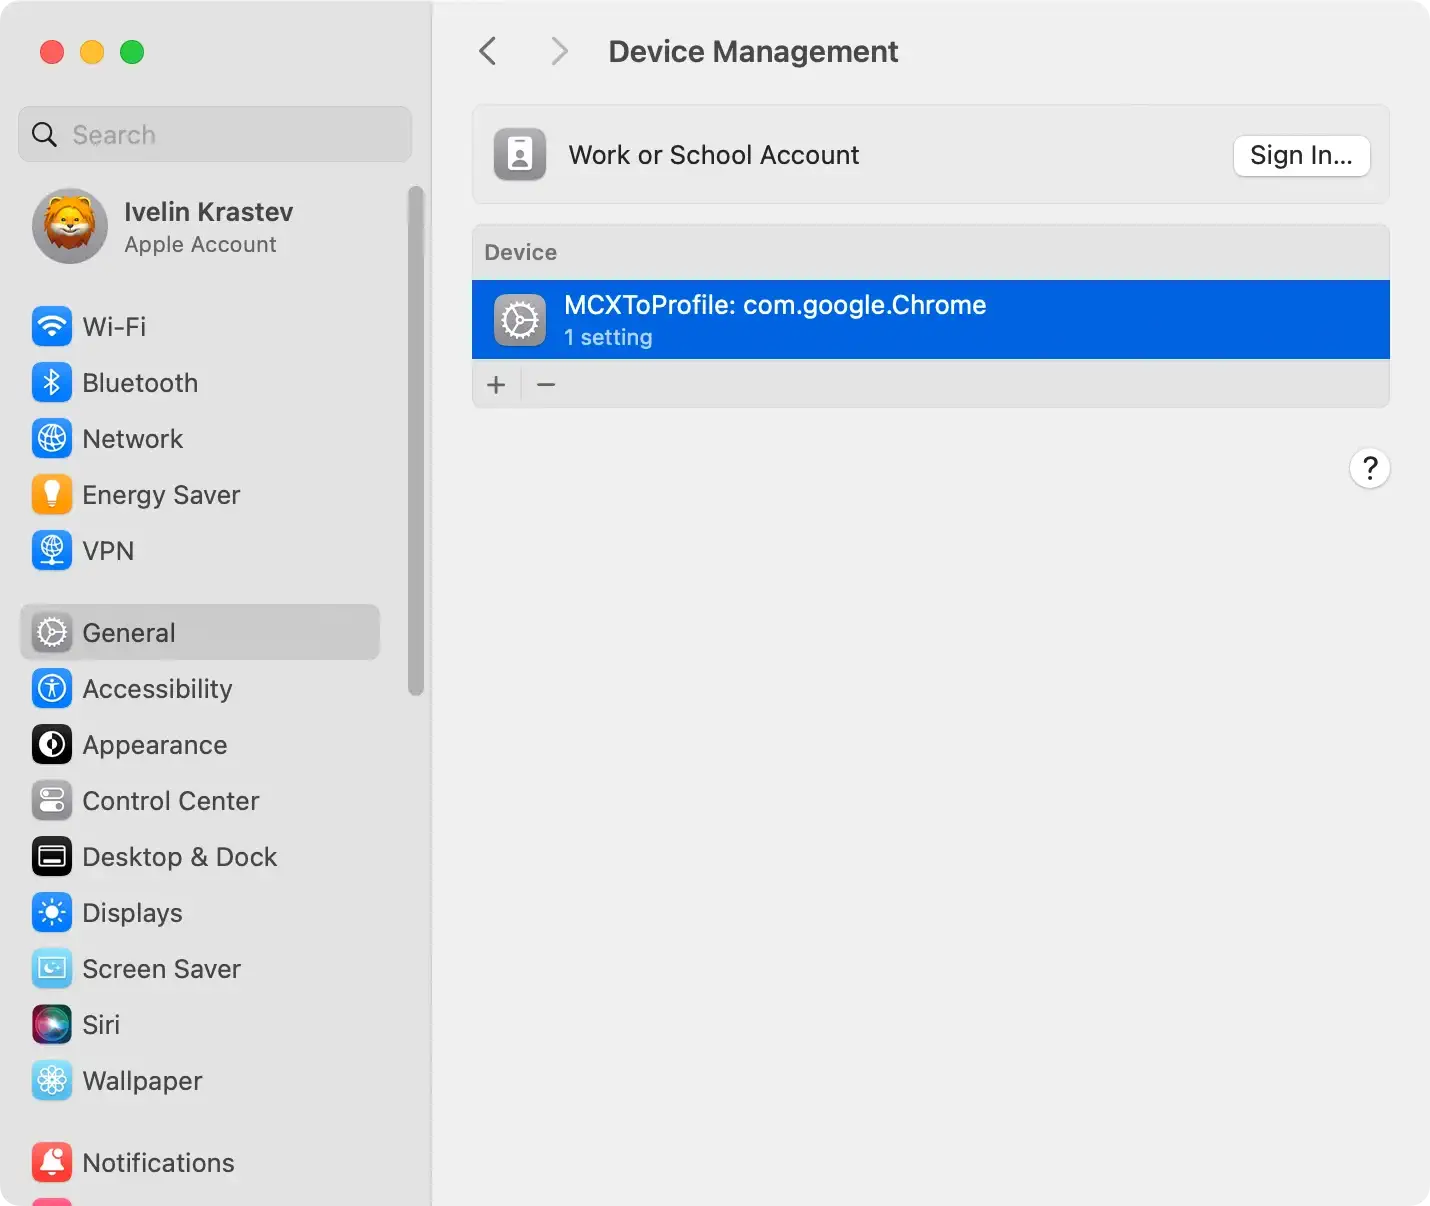
4. Remove malicious configuration profiles
User reports indicate that the Bing redirect virus may create malicious profiles on your Mac. To remove them:
- Open
System Settings. - Navigate to:
- On macOS Sequoia:
General > Device Management. - On older macOS versions:
Privacy & Security > Profiles(if available).
- On macOS Sequoia:
- Delete any profiles you did not set up yourself, as these profiles can force specific browser settings, like the default search engine, to remain as Bing.
- Select the profile you wish to remove, then click the Delete (-) button to remove it.
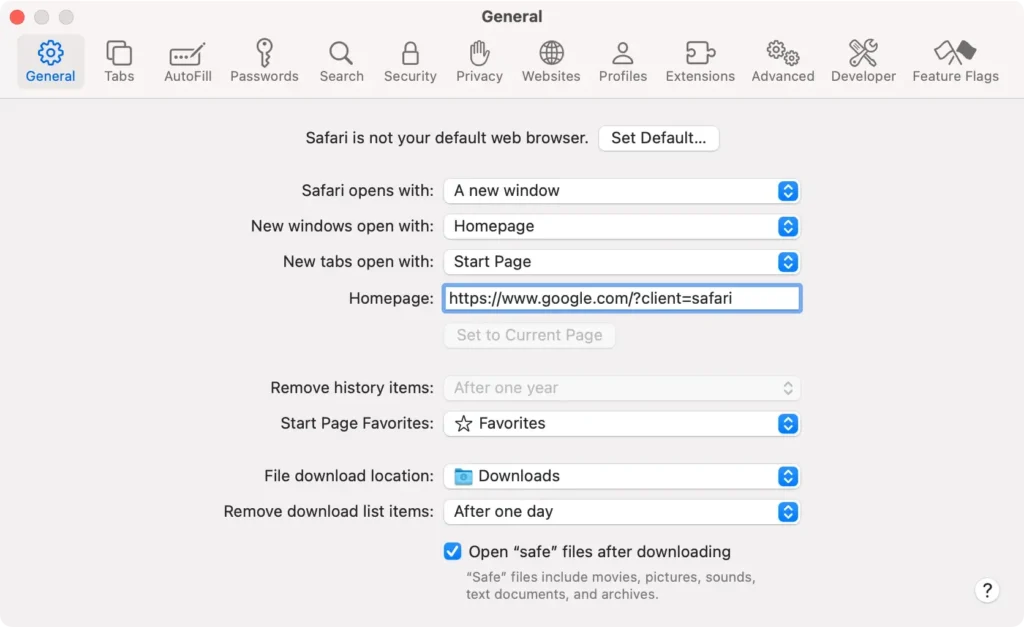
5. Remove Bing redirect from Safari
If you are using Apple’s default web browser:
- From the Safari menu, navigate to
Settings > Generaland change theHomepagefield to your preferred homepage.
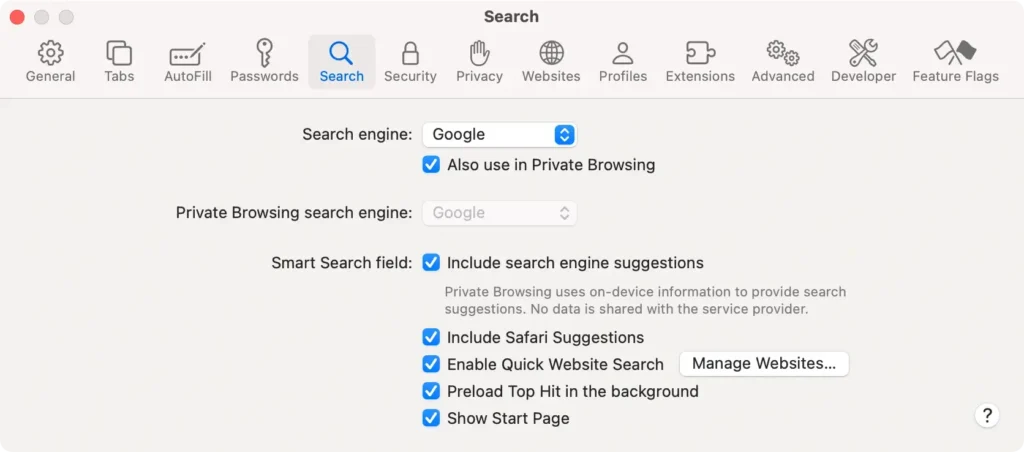
- In the
Searchtab, set your preferred search engine, such as Google, as the default search engine.
- Go to
Advanced > Show features for web developersto enable the Develop menu.
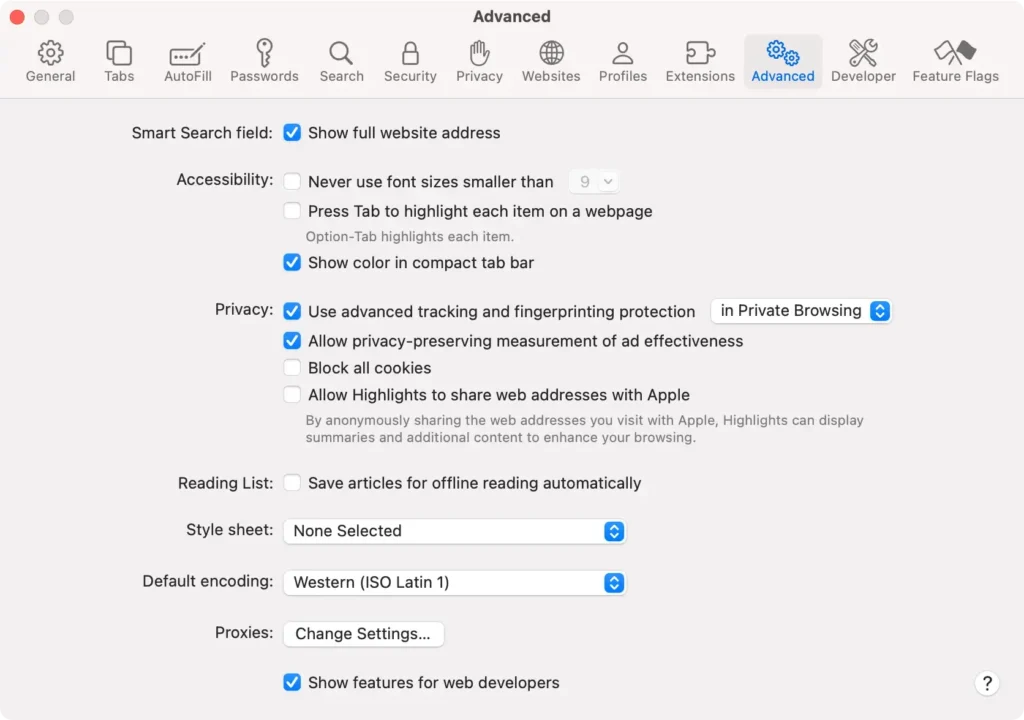
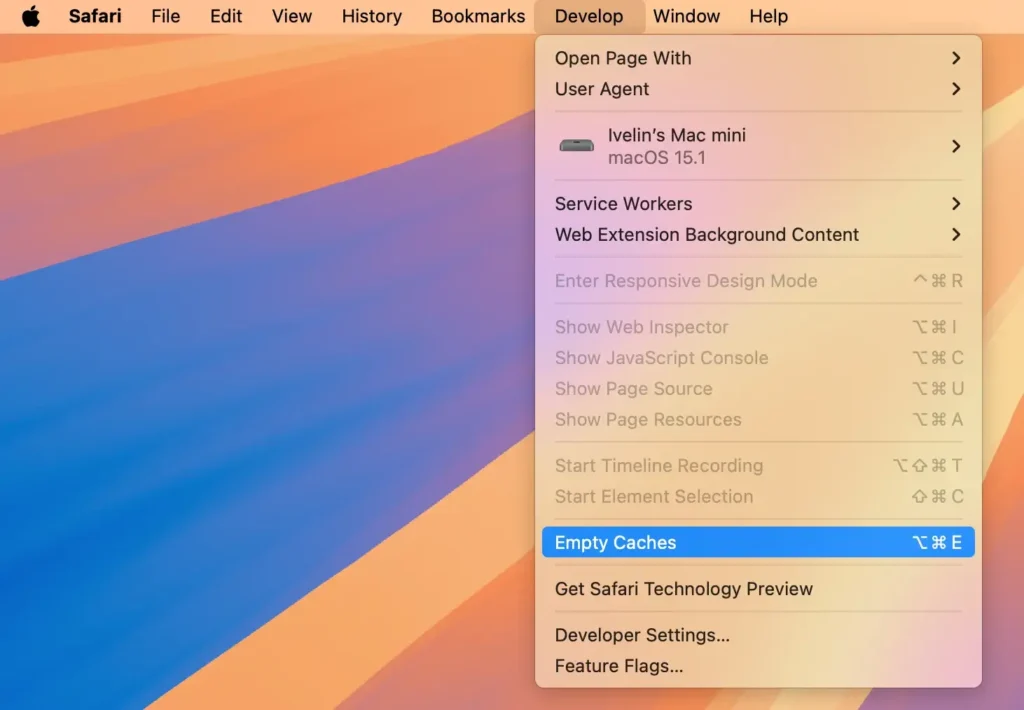
- In the menu bar, select
Develop > Empty Cachesto clear stored data.
- Go to
History > Clear Historyand selectAll Historyto delete browsing history and cookies.
6. How to remove Bing redirect from Chrome
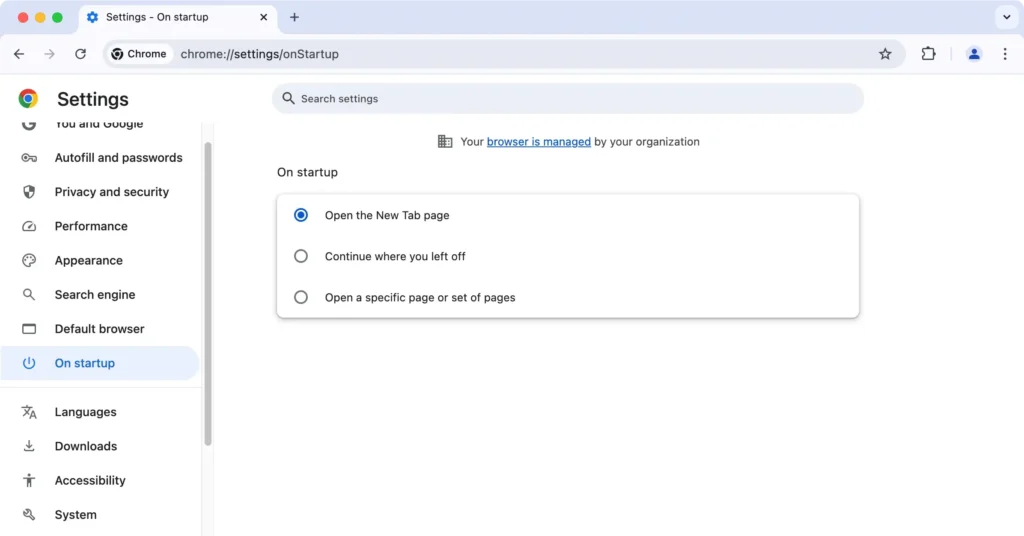
- Type
chrome://settingsinto the address bar and press Enter. - Go to
On startupand set your preferred homepage.
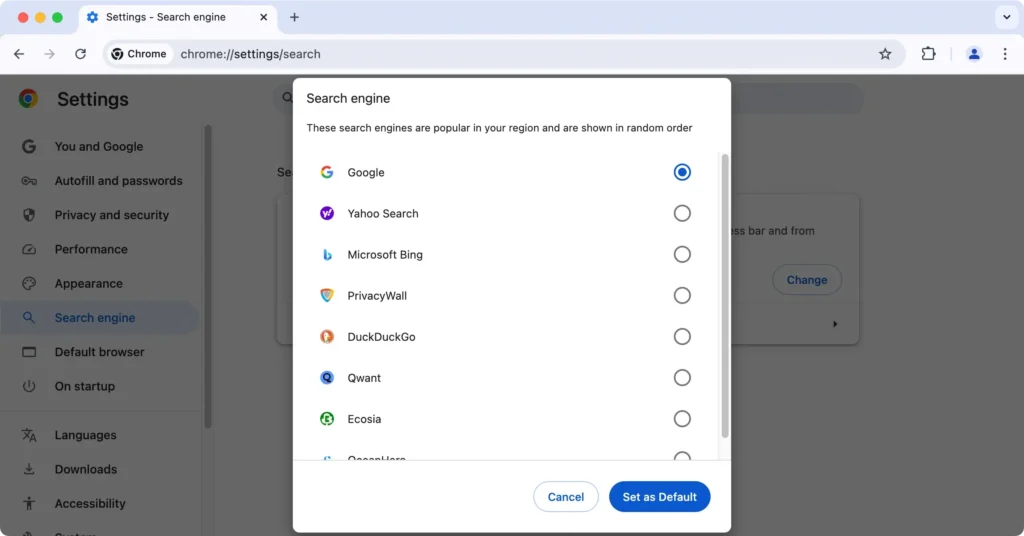
- Under the
Search enginetab, choose your preferred search engine from the list of search engines.
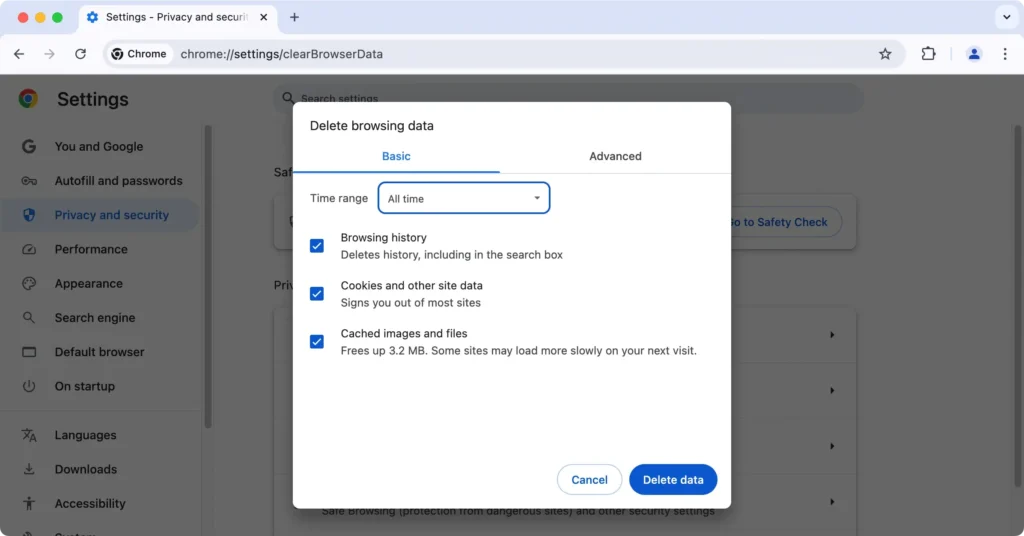
- In
Privacy and security, selectDelete browsing dataforAll timeand clear your browsing history, cache, and cookies.
7. How to remove Bing redirect from Firefox
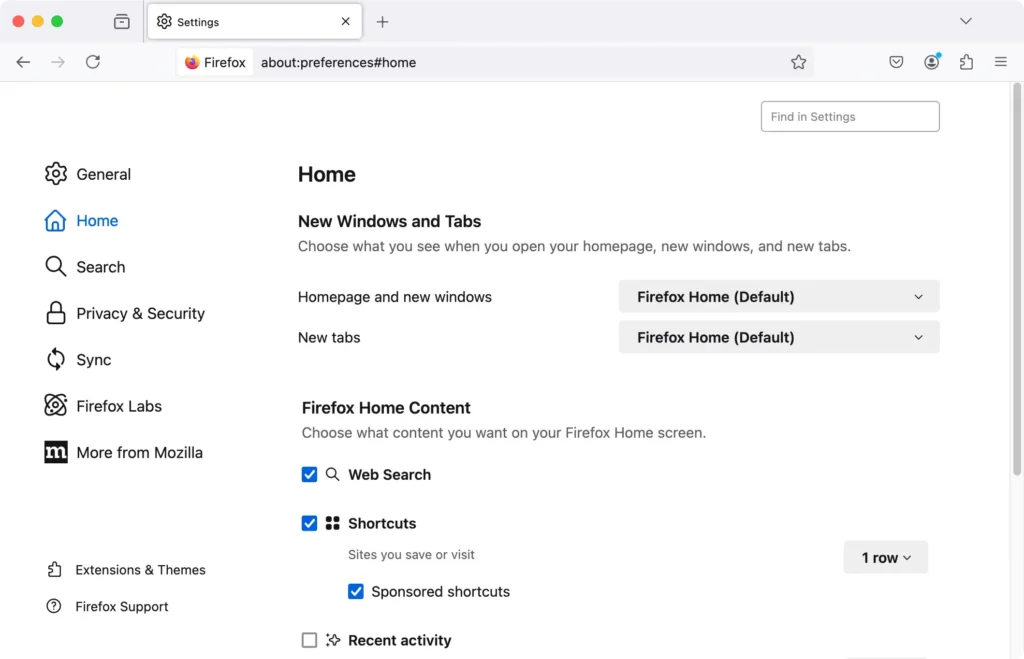
- Open
Firefox > Settings > Homeand set your preferred homepage.
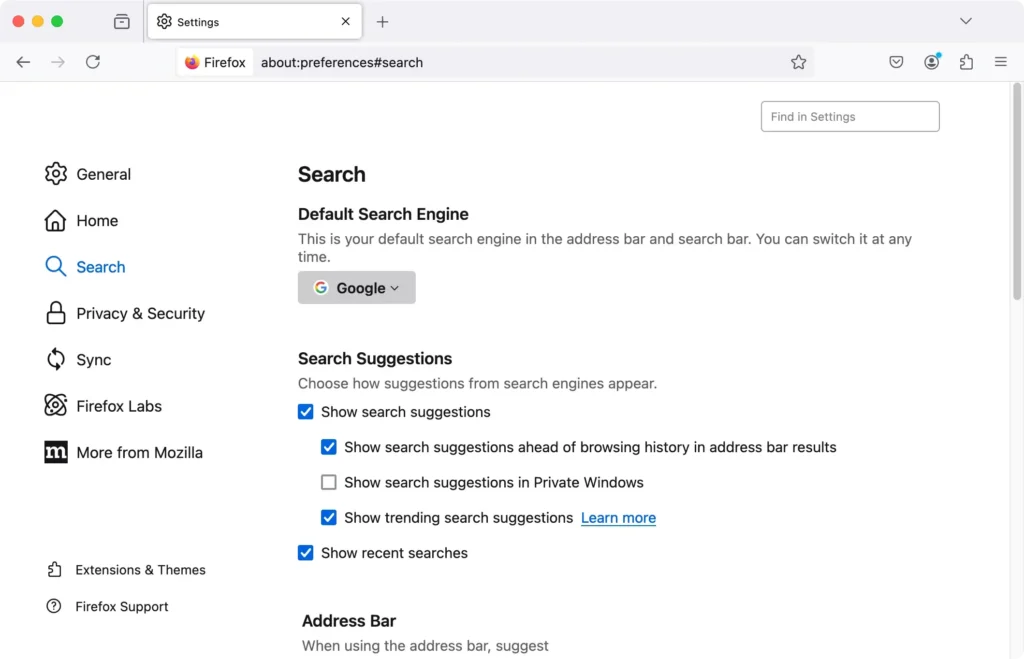
- In the
Searchtab, select your chosen search engine.
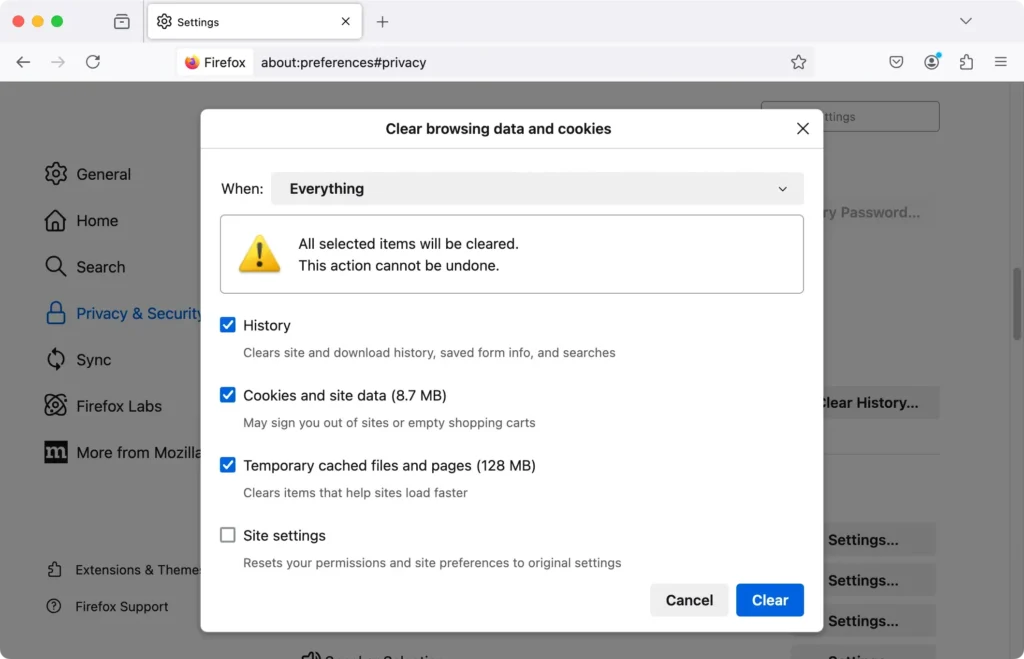
- Go to
Privacy & Security > Clear Historyand selectEverythingto clear all stored data.
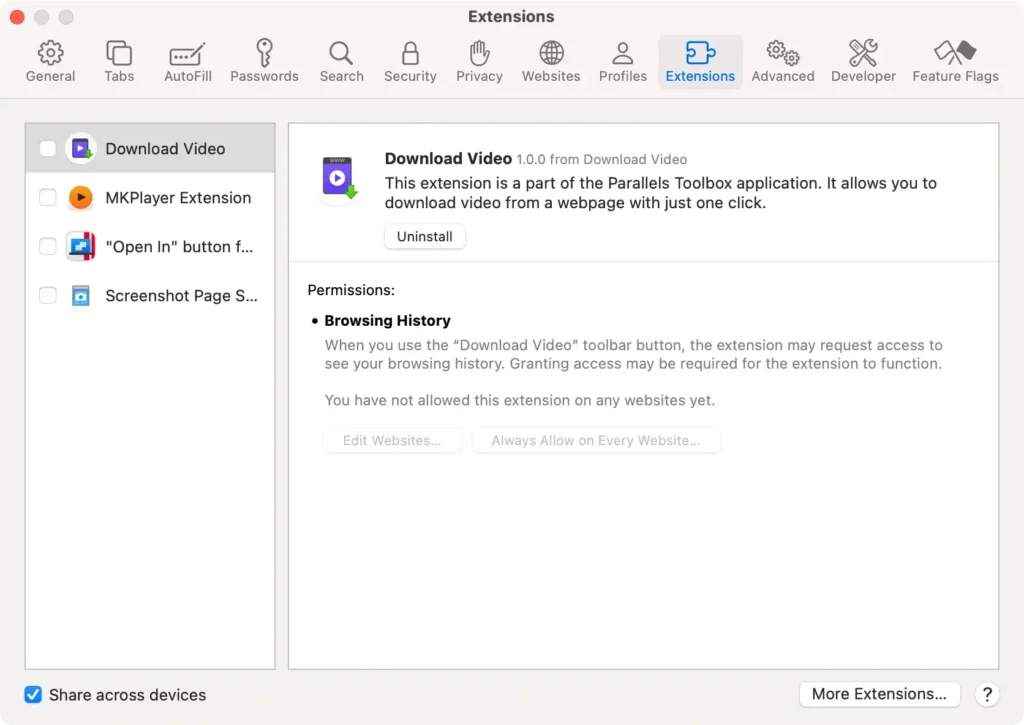
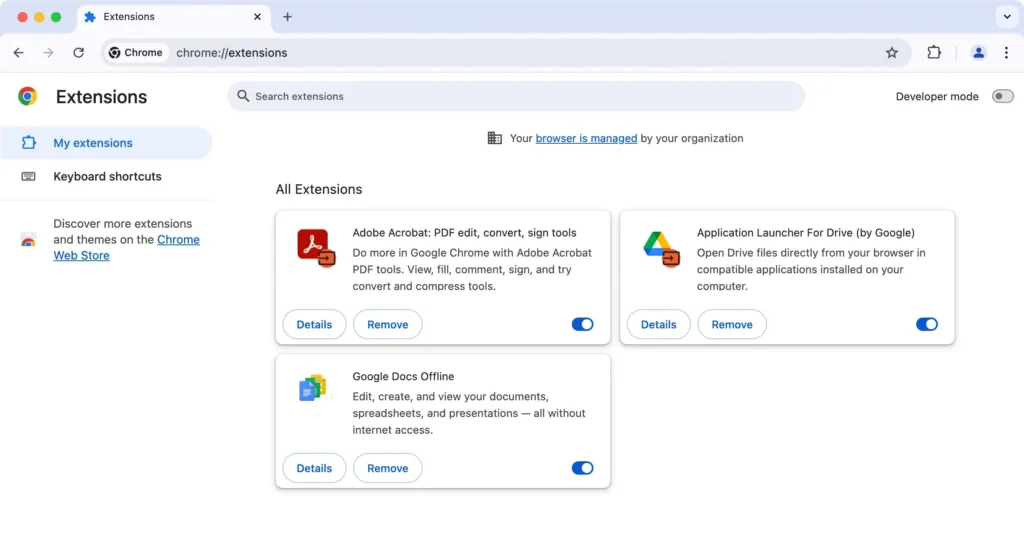
8. Remove suspicious browser extensions
Browser extensions are another common way that the Bing redirect virus infiltrates web browsers. Removing unwanted extensions is essential to get rid of Bing redirect.
If you are using Safari, go to Safari > Settings > Extensions and uninstall any extensions you don’t recognize.
For Google Chrome, type chrome://extensions in the address bar. Select all the extensions you want to delete, then click Remove.
And if you are a Firefox user, open the browser and type in about:addons in the address bar. Remove any unknown extensions.

9. Clear website data and caches
Clearing stored website data and caches can help remove any lingering effects of the Bing virus.
- Safari: Go to
Preferences > Privacy > Manage Website Dataand clickRemove All. Restart Safari to apply the changes. - Chrome: Go to
Settings > Privacy and security > Clear browsing dataforAll time. - Firefox: Select
Settings > Privacy & Security > Cookies and Site Data > Clear Data. Then restart Firefox.
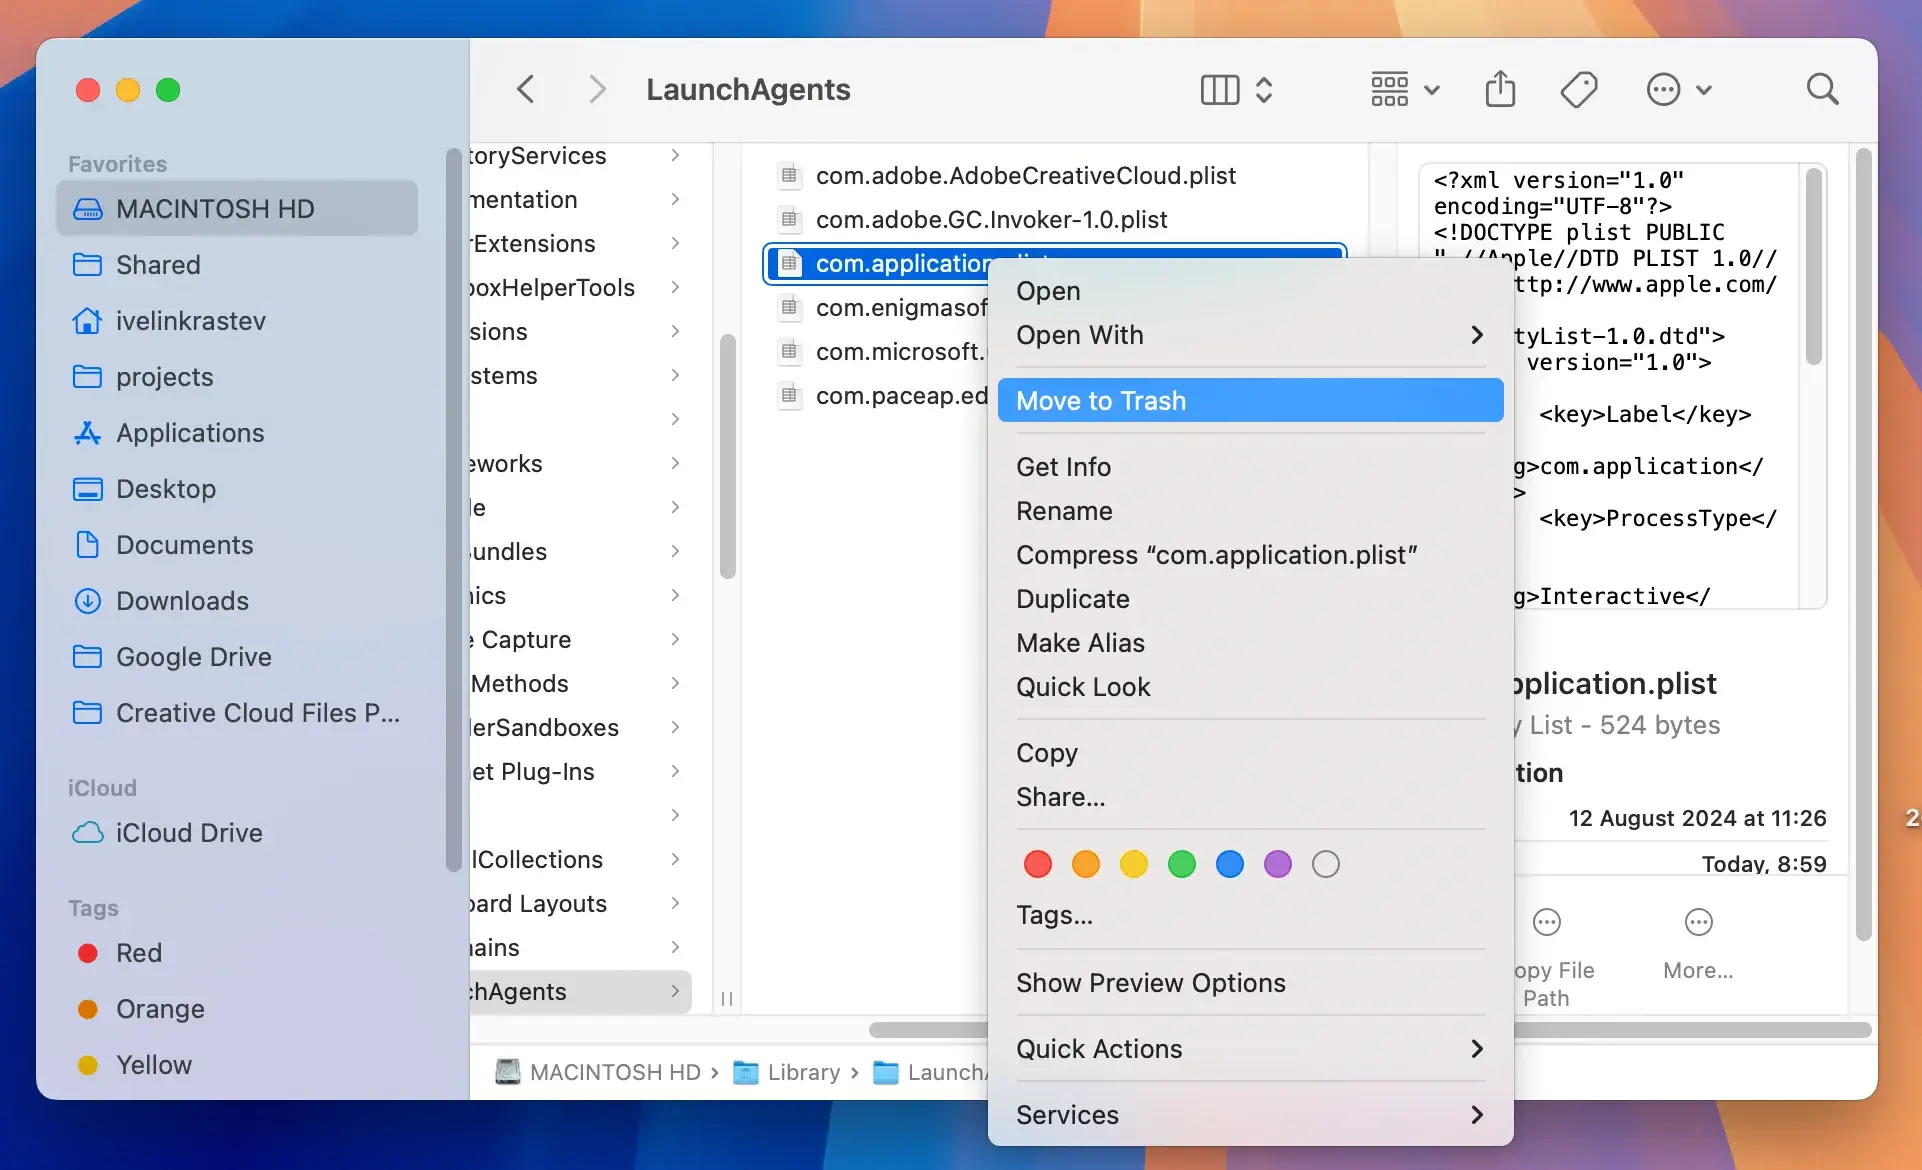
10. Check for hidden files and folders
Malicious programs like Bing redirect may place hidden files on your Mac. Use Finder to check specific folders:
- Open Finder and press
Shift + Command + Periodto show hidden files. - In your Mac’s Finder bar, open the
Gomenu and selectGo to Folder. - Navigate to each of the following directories:
~/Library/LaunchAgents//Library/LaunchAgents//Library/LaunchDaemons//Library/Application Support//Library/StartupItems/
- Look for any files related to the Bing redirect virus or suspicious files and delete them.
11. Reset your browser
If the Bing redirect persists, resetting your browser will remove all custom browsing settings and extensions and will reset your homepage to default.
Remember to back up your data, such as bookmarks, before you proceed.
By following these steps, you can remove the Bing redirect virus from your Mac and restore your preferred browser settings, ensuring a smooth and secure browsing experience.
Regular system maintenance and a reliable security app like SpyHunter can also prevent similar issues from occurring in the future.
How to protect your Mac from Bing redirect virus
Once you’ve managed to get rid of Bing redirect from your Mac, it’s essential to take steps to prevent future infections.
Browser hijackers like the Bing virus often disguise themselves within seemingly harmless software or links.
Here are some tips to protect your Mac against Bing redirect and similar threats:
- Avoid clicking on suspicious links, especially from unknown senders or websites. Malicious links in emails, messages, or pop-ups can lead to malware downloads or phishing attacks.
- Close any pop-ups claiming your Mac is infected or prompting you to download fake software updates. Genuine security alerts will never ask you to download apps directly from a pop-up.
- Only download applications from the App Store or reputable developers. Avoid third-party sites, especially those offering free software bundles, as these are often laced with adware and browser hijackers.
- If you encounter a message asking if you’re sure about installing an app from an unrecognized source, double-check the app’s legitimacy before proceeding. Confirm that it’s from a trusted source before bypassing Gatekeeper security alerts.
- Using a dedicated Mac cleaner is a good way to protect against malware. Reliable antivirus applications like SpyHunter for Mac provide real-time protection against threats like the Bing redirect, browser hijackers, and other malicious programs.
- Update your macOS and apps regularly to ensure that security vulnerabilities are patched. Updates also protect against the latest malware and browser hijackers.
- Review your Login Items and browser extensions every so often. Dubious login items and unknown extensions in web browsers like Safari, Chrome, or Firefox may signal the presence of unwanted software.
By following these preventive measures, you can significantly reduce the risk of future infections from Bing redirects and other browser hijackers.