How To Screenshot On Mac (Detailed Guide)
Before we dive in
Before we dive in, let's make sure you stay safe online. We created SpyHunter because your security matters to us.
Protect your computer today — download SpyHunter right here! Check out our top tips below to keep your computer safe and secure.
Ever needed to save or share exactly what’s on your computer screen? Enter the screenshot—a quick snapshot of your display.
Whether it’s snagging proof of a purchase, capturing an error for tech support, or just keeping a memorable chat, screenshots are the digital handyman in your computer toolkit.
This guide will show you how to screenshot on Mac, from taking basic full-screen shots to selective area captures, ensuring you never miss a detail.
What is a screenshot and why do you need one?
A screenshot is a digital image of what is visible on a computer screen. It captures exactly what you see on your display at that moment, allowing you to save or share it.
This feature is particularly handy when you need a concrete visual record of your screen’s content.
Whether it’s for saving a receipt, capturing an error message to get technical support, or simply sharing a funny comment on social media, screenshots act as a quick, reliable tool to document information that might change or disappear.

How to take a full-screen capture on Mac
Capturing a screenshot on a Mac is a simple process that can be useful for everything from saving important information to sharing images with friends or colleagues. The Mac operating system provides built-in shortcuts for these actions, ensuring you can easily and quickly capture whatever is on your screen.
Follow the instructions below, showing you how to screenshot on Mac.
Using Command-Shift-3 for instant screen capture
To take a full-screen screenshot on your Mac, use the keyboard shortcut Command + Shift + 3. This method captures everything visible on your monitor in a straightforward manner.
- Find the keys on your keyboard.
CommandandShiftare typically on the left side, while the3key is along the top row of numbers. - Press these keys together simultaneously. You should see your Mac’s screen flash, indicating a screenshot has been taken.
- Release the keys. By default, the screenshot will be saved automatically. You’ll find the file on your desktop, labeled with the current date and time to make it easy to locate.
This quick key combination ensures you never miss the opportunity to capture the perfect image of your entire screen’s contents. Whether for work, school, or personal use, it’s an essential skill for Mac users!
How to capture a specific area of your screen
Whether you’re creating a tutorial, presenting data, or need a quick reference, capturing a specific area of your computer screen can be incredibly useful.
Use Command-Shift-4 for targeted screenshots
Using the shortcut Command+Shift+4 transforms your cursor into a crosshair, enabling you to drag and select exactly what you want to capture on your screen. This tool is ideal for users who require control over their screenshot dimensions without having to crop images later.
Simultaneously press Command, Shift, and 4 together. Your mouse cursor will change to a crosshair. Point and drag to select the area you want to capture. Here’s how to manipulate your selection:
- Press and release the
Space bar: Converts the crosshair into a camera, allowing you to capture a window by clicking it. The captured window is enhanced with a white border and shadow for better visibility. - Hold the
Space barafter dragging: Locks the selected area’s size but lets you reposition it, useful for fine-tuning your capture area. - Hold the
Shiftkey after dragging: Freezes all but one edge of the selection, which you can adjust by moving your mouse, enhancing control over the screenshot’s dimensions. - Release and press
Shiftagain without releasing the mouse button: Allows for adjusting other edges, providing flexibility in resizing the captured area.
Once your area is defined, releasing the mouse or trackpad button will snap the screenshot, which is then saved to your desktop by default. If needed, any on-screen thumbnail can be clicked for immediate editing or dragged directly into documents or emails for quicker access.
This method emphasizes precision, enabling Mac users to achieve the exact screenshot results they need.
Using Command+Shift+5 for versatile screenshot options
Introduced with macOS Mojave, the Command + Shift + 5 keyboard shortcut revolutionizes how users capture and record their screens.
Pressing these keys simultaneously displays a versatile control panel at the bottom of your screen, offering several quick-access options to tailor your screen captures and recordings precisely to your needs.
Explore the on-screen control panel
Once you invoke the screenshot interface with Command + Shift + 5 on your Mac, you’re presented with a neatly organized panel loaded with different capturing tools.
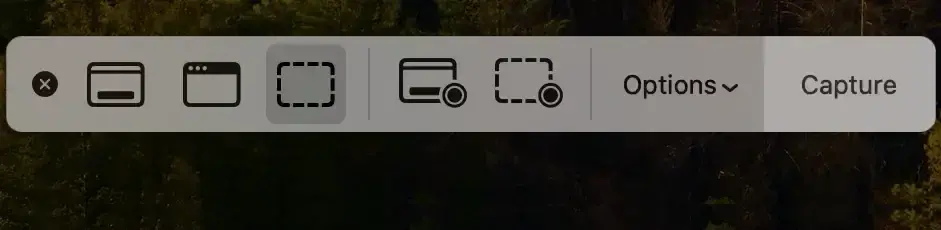
This panel enables you to select from capturing the entire screen, a selected window, or a manually selected portion of your display. The variety of screen capture options offers versatility and great new features.
The first button on the screenshot utility is used for a full-screen screenshot, as shown below.
Next to it is the button used to capture a specific active window. When you use this option, a blue-tinted highlight will show you the exact window you will capture.
Finally, the third button on the screenshot utility is used to screenshot an area you can pick using a free-form rectangular selection. Drag with your mouse to lock in your selection shape.

Adjacent to these are options for video recording—choose to record the entire screen or just a section of it. Such flexibility is particularly useful for creating tutorials or demonstrations directly from your device.
Having an integrated screen recorder is a great addition to newer versions of macOS. Screen recording has a variety of useful applications.

The panel also includes a convenient Options button. Clicking here reveals settings to save your screenshot or recording to various locations like Desktop, Documents, or Clipboard, and even set a timer delay—a handy feature for capturing dropdown menus or other temporary popups.
Improvements don’t end there. Toggle visibility of your mouse pointer in screenshots or disable the floating thumbnail option that temporarily appears after capture, which can be dragged into documents or quickly marked up.
If the control panel blocks part of your screen, simply drag it to another location to suit your workflow better.
Keep your Mac in shape with SpyHunter
SpyHunter is a Mac application focused primarily on security, which also offers several tools that can help you free up disk space on your system and keep everything, including your screenshots, very tidy and organized.
SpyHunter can detect and remove malware, including adware and unwanted apps that may be cluttering your desktop with ads or your browsers with unwanted pop-ups, getting in the way of your screenshots and exposing you to further security risks.
The application also includes a duplicate file finder and a large file scanner that can help you salvage storage space and boost performance.
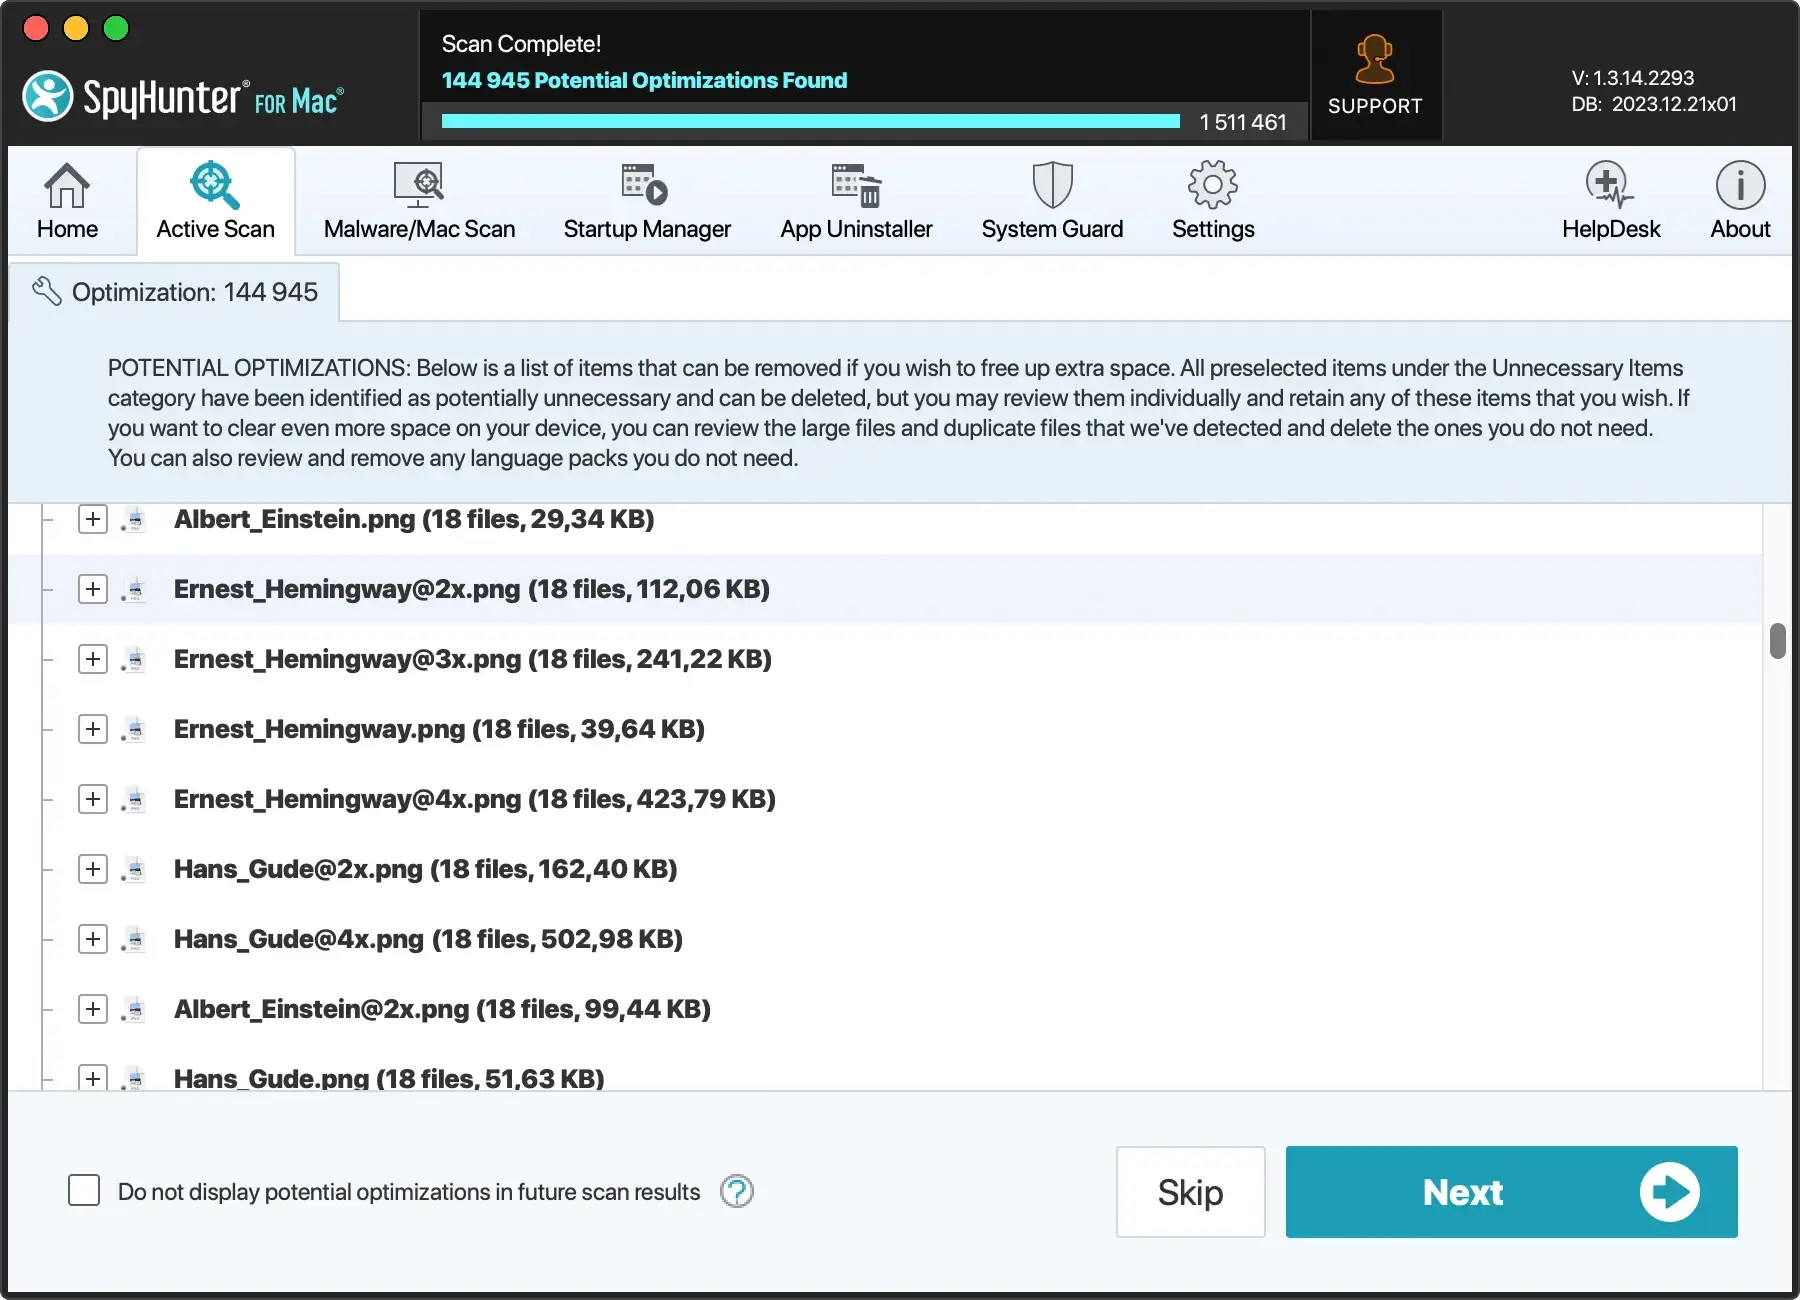
Download SpyHunter for free here and install the application to enjoy improved security and protection and explore the additional tools it provides, such as a dedicated app uninstaller and a duplicate file scanner.
Tips for capturing high-quality screenshots
Taking high-quality screenshots on your Mac involves more than just hitting a couple of shortcut keys. The clarity and detail of your screenshots can be significantly improved with a few simple tricks.
Whether you’re capturing images for a professional presentation, creating tutorials, or just saving memorable moments, these tips will help you get the best results.
Adjusting your Mac settings for the best results
To ensure your screenshots are as clear and useful as possible, start by adjusting a few settings on your Mac. First, consider the resolution of your display.
Higher resolution settings will result in sharper images. You can adjust this in the Displays section of System Settings.
Next, manage the clutter on your screen. Close unnecessary applications and browser tabs, and clean up your desktop. A less cluttered screen not only makes your screenshots look more professional but also helps focus attention on the important details.
Finally, if you’re planning to edit or mark up your screenshots, use built-in tools like Preview or third-party applications that provide advanced features for annotating or modifying images.
This can be particularly useful for adding explanations or highlighting key areas in tutorial content or presentations.
Editing your screenshots with built-in tools
Mac offers a variety of advanced editing features that allow you to easily edit screenshots just after you capture them. Once you snap a screenshot, it generates a preview in the lower right of your screen.
Clicking this preview opens up the screenshot in a program where you can mark it up immediately. This direct access to editing tools means that making quick changes, like adding annotations or highlighting important parts, is straightforward and efficient.
Simple edits directly in the preview window
Right after you take a screen shot on a Mac, you’ll notice the floating thumbnail—that small preview that shows up at the corner of your screen.
Clicking on this opens up a range of editing options accessible through the Markup View. Here’s a quick guide on how to enhance your screenshot right from this window:
- Add text: Use the text tool to insert explanations or titles directly on your screenshot. It’s great for clarity or adding quick notes for reference.
- Draw: Utilize the sketch tool to draw attention to specific areas or to hand-draw elements when more organic markup is needed.
- Crop: Easily adjust the borders of your screenshot to focus on the most vital information or to remove distractions from the periphery.
- Save and share: Once you’re satisfied with your edits, you can save the screenshot in a chosen format right from the same window or even share it immediately via Mail or Messages.
These built-in markup tools in the preview window provide a quick and accessible way to modify your screenshots without the need for additional software. This makes it an efficient choice for fast-paced environments where quick turnaround is crucial.
Safely storing and organizing your screenshots
When it comes to managing the numerous screenshots you might accumulate on your Mac, safety and organization are paramount. Storing these images properly not only helps safeguard sensitive information captured in them but also streamlines your workflow, making retrieval quick and easy. Establishing a good storage system can be the difference between navigating through a cluttered desktop and finding exactly what you need in a moment.
Create dedicated folders to avoid clutter
One practical step to keeping your screenshots organized is to create dedicated folders. This method drastically reduces desktop clutter and speeds up the finding process. Here’s how you can do it efficiently:
- First, open Finder on your Mac.
- Choose a location where you want to store your screenshots, such as
Documentsor a specificProjectsfolder. - Create a new folder by clicking
File > New Folder, and name it something you’ll remember like “Screenshots.” - Drag and drop your existing screenshots into this new folder.
By following these steps, you can create a dedicated space for your screenshots that keeps them separate from other files, eliminating the hassle of sifting through unrelated documents just to find a specific image. Also, consider using color-tagging within your folder for even quicker access to grouped files.
Organizing screenshots shouldn’t feel like a chore. By setting up a structured system once, you make future you very grateful!
FAQ on taking screenshots on Mac
What are the screenshot shortcut keys on Mac at a glance?
Here is a handy table that shows you all the Mac screenshots shortcuts you need in one place:
| Key combination | Effect |
Command + Shift + 3 | Screenshots the whole screen immediately |
Command + Shift + 4 | Allows you to capture a selected portion of the screen |
Command + Shift + 5 | Brings up the versatile screenshot tool with advanced options |
Can you take a screenshot of a specific application window?
Yes, you can easily capture a screenshot of a specific application window on your Mac using a simple keyboard shortcut:
- Press
Shift + Command + 4, which turns your cursor into a crosshair. - Press the
Spacebar. The cursor will switch to a camera icon. - Hover the camera icon over the application window you want to capture. It will highlight as you hover.
- Click the mouse or trackpad button to confirm the capture.
This method isolates and captures only the chosen application window, excluding all other screen content, making it a perfect tool for presentations, tutorials, or documentation where clarity and focus are necessary.