How To Get File Path On Mac (Step-by-Step Guide)

Before we dive in

Before we dive in, let's make sure you stay safe online. We created SpyHunter because your security matters to us.

Protect your computer today — download SpyHunter right here! Check out our top tips below to keep your computer safe and secure.

Download SpyHunter

Ever needed to find where a file or folder is on your Mac but didn’t know how?

Knowing the file path is super helpful whether you’re troubleshooting an issue or organizing your files.

In this post, we’ll cover simple and easy ways to find file paths on your Mac.

Regardless of your level of experience, these tips will help you navigate your files better and work more efficiently.

Let’s dive in and discover how to access file paths on your Mac easily!

Get a file path on a Mac via the Get Info window

One of the simplest and most user-friendly ways to find the file path on a Mac is to use the Get Info window.

This method is quick and provides a clear view of where a file or folder is located without any technical stuff, making it perfect for everyday users.

Here’s how you can use it:

  1. Open a Finder window by clicking the Finder icon in your Dock.
  2. Locate the item for which you want to get the path.
  3. Select the file or folder by clicking on it.
  4. Press Command + I or right-click (Control-click) and choose Get Info from the context menu.
get info menu action
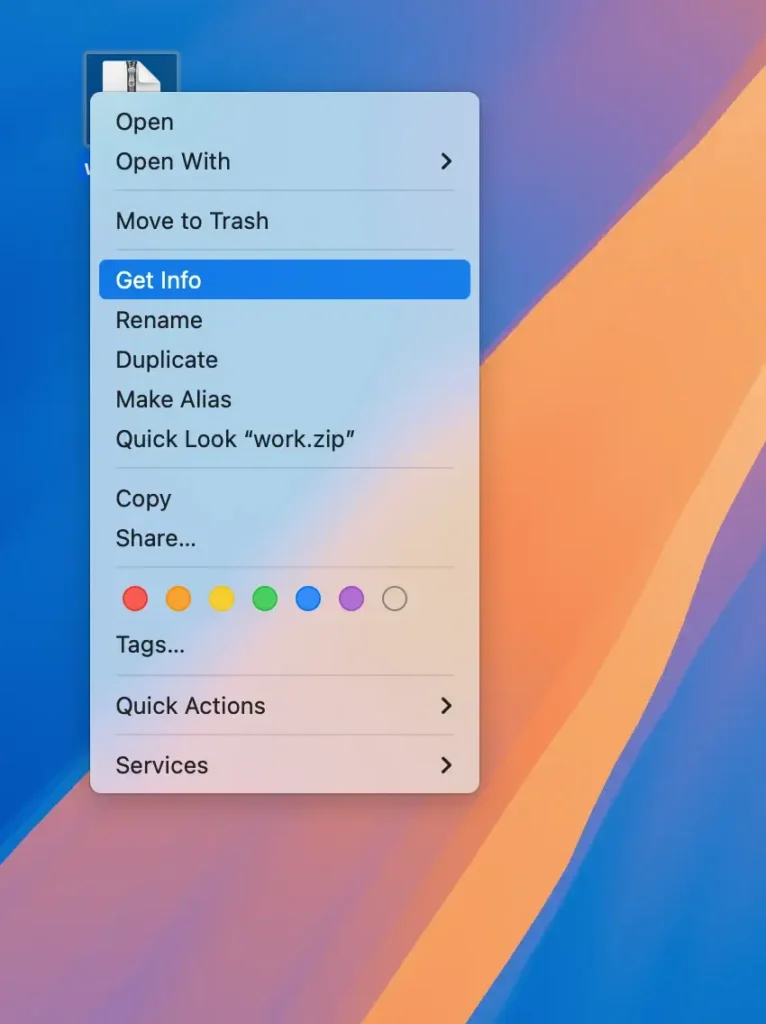
  1. In the Info window, look for the Where field. This is where you’ll see the path that shows you exactly where your file is located on your Mac.
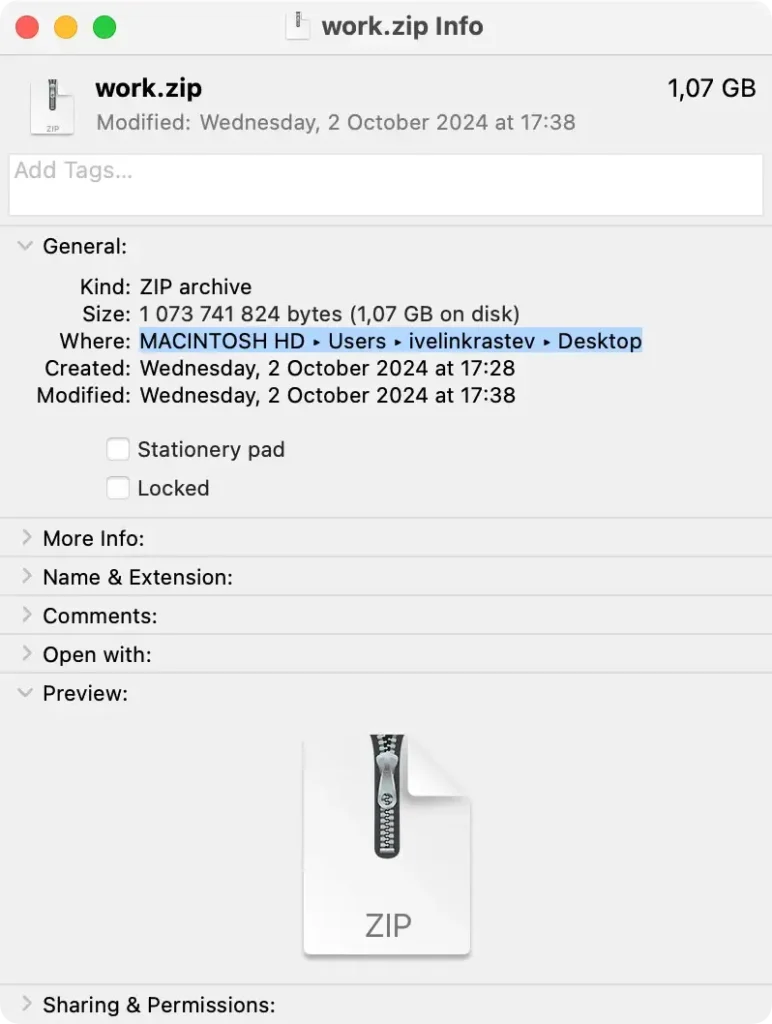
get info window
  1. Combine the Where path with the file name at the top of the window to get the exact location.
  2. To copy the file path, you can manually highlight the text in the Where field, right-click, and choose Copy.
copy pathname menu

The Get Info window is beneficial for finding a file’s location. But it also gives you additional details about the file, like permissions and storage usage.

If you’re looking for a quick and straightforward way to locate files and get their paths, this method is perfect for you. Moving on.

Show Path Bar in Finder to see file paths

One of the easiest ways to find the file path on your Mac is to enable the Path Bar in Finder.

This simple tool gives you a clear view of the directory path for any selected file, showing you exactly where it is located within your system.

To show the Path Bar, follow these steps:

  1. Open Finder.
  2. In the Finder menu bar at the top of the screen, click View.
  3. From the dropdown menu, select Show Path Bar.
show path bar finder menu action

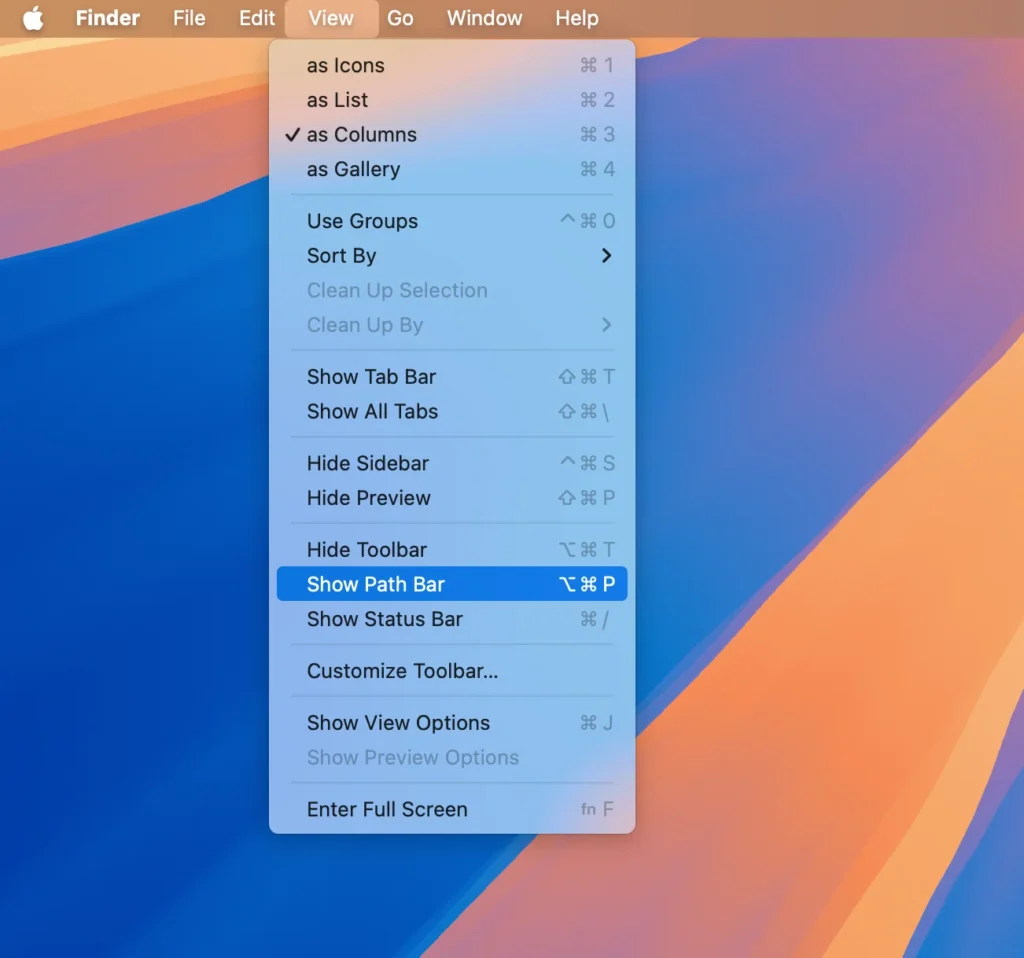
Once the Path Bar is enabled, it will appear at the bottom of each Finder window, displaying the exact location of the item you’ve selected.

file path on mac finder path bar

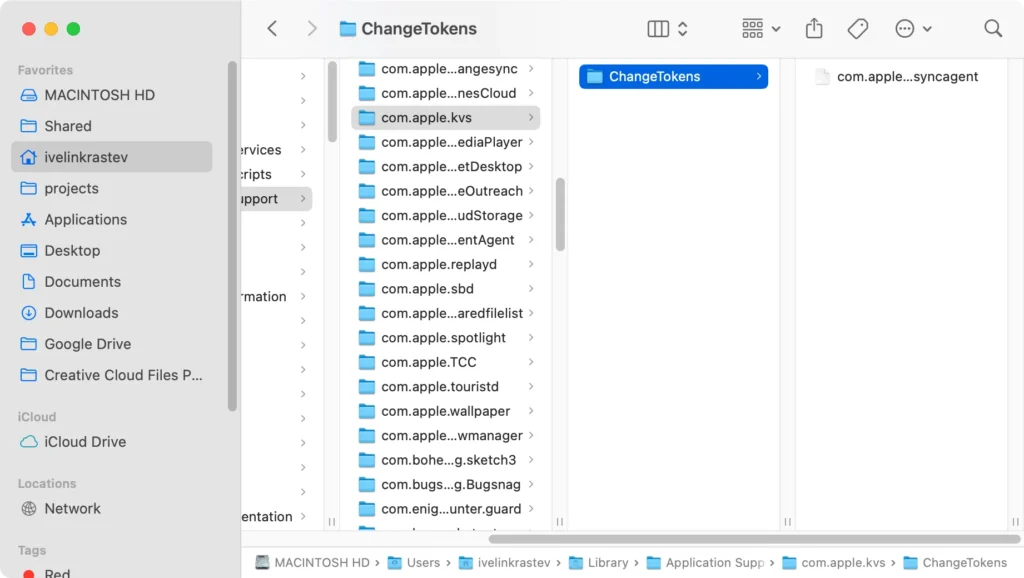
You can even interact with this bar: right-click or control-click on any part of the path to quickly jump to different folders within that path or to copy their locations.

This approach is an effortless yet effective way to locate files in Finder with ease.

Find file path on Mac using Terminal

For those who need the entire file path for use in the Terminal window, there’s a quick and easy way to get it without manually typing the entire path.

To get the exact file path, you can simply drag and drop the file or folder directly into the Terminal.

Here’s how to do it:

  1. Open the Terminal app.
  2. In Finder, locate the file or folder whose path you want to get.
  3. Drag the file/folder from Finder directly into the Terminal.

The entire file path will automatically appear in the Terminal.

copy a file path using terminal

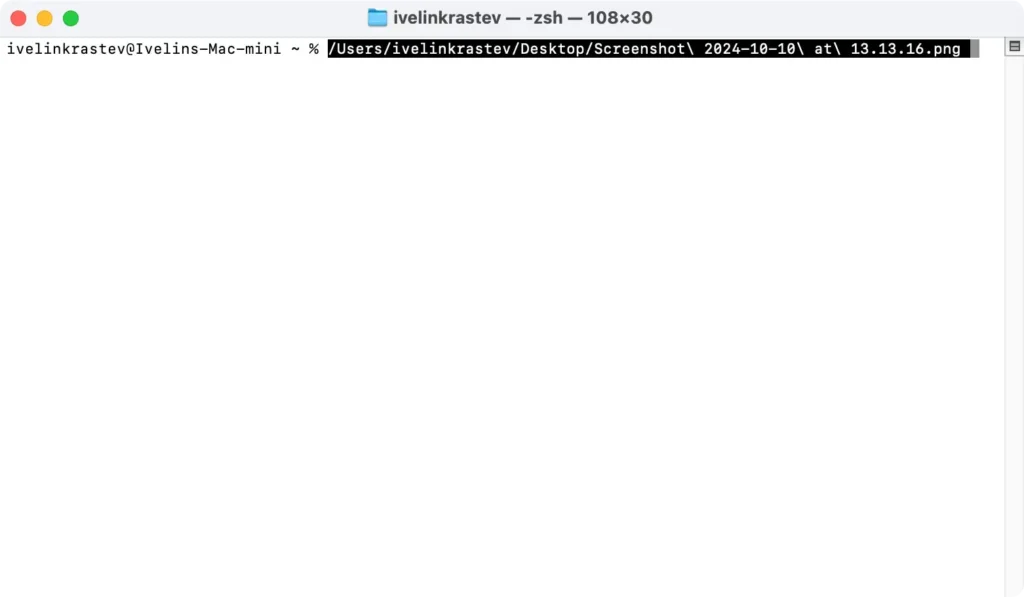
This is especially helpful when you’re working with the Terminal and need the precise file or folder path. It also saves you the hassle of typing out long paths manually, reducing the chance of errors.

Get a file path using Go to Folder

The Go to Folder feature in Finder is a fantastic shortcut for quickly locating files.

This is perfect if you want to navigate directly to a file’s location without searching through multiple folders.

Follow these steps:

  1. Open the Finder app.
  2. Click on Go in the menu bar at the top of the screen.
  3. Select Go to Folder… from the dropdown, or simply press Command + Shift + G.
  4. A dialog box will appear with a text box where you can enter the folder path or file path.
go to folder search box

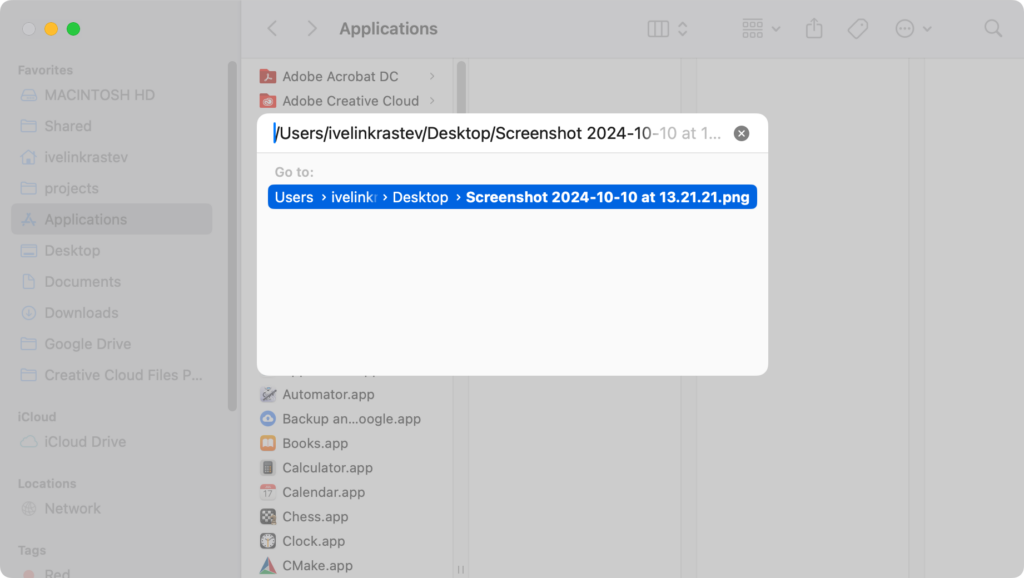
If you’re unsure of the exact path, you can also drag a file or folder into this search box from your Finder window.

The full path of the item will instantly appear in the field, allowing you to see its precise location.

This feature is convenient when you need to quickly access files deep within your folder structure.

Get file path: macOS Spotlight Search method

The Spotlight Search on Mac is a powerful tool not only for locating files but also for revealing their full file path.

With a simple shortcut, you can search for any folder or file on your Mac and quickly see where it’s stored. Here’s how:

  1. Click Command + Space to open Spotlight’s search bar.
  2. Type the name of the item you’re looking for.
  3. Once the file appears in the search results, hover over it with your cursor.
  4. Hold down the Cmd key, and the complete path of the file will appear at the bottom of the Spotlight window.

This technique is incredibly fast and efficient, especially when you don’t know the exact folder location of a file.

You can use Spotlight to find files and see their full path without ever opening Finder.

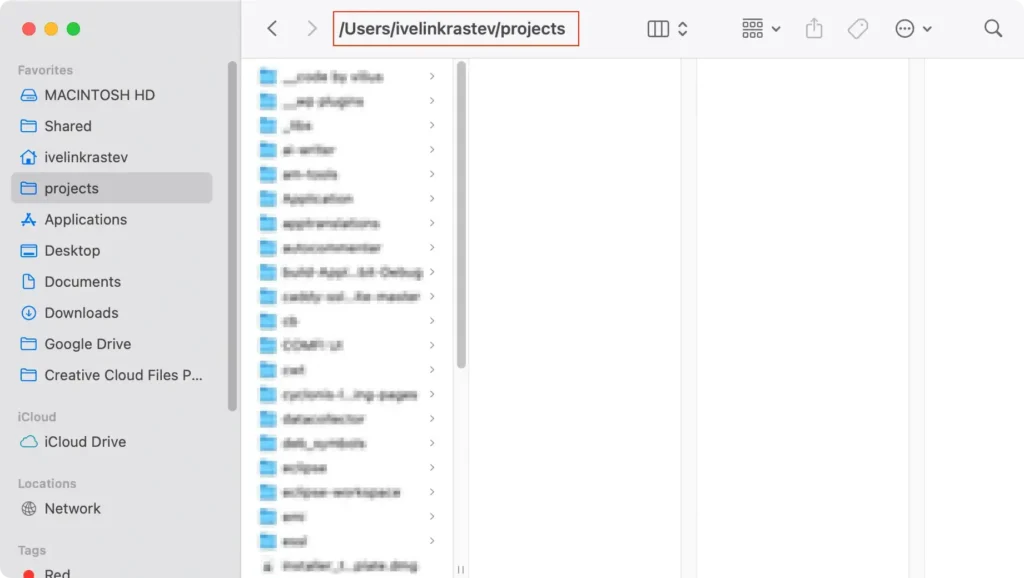
Display the folder’s pathname in Finder’s Title Bar

If you want to always see the complete file path of any file or folder directly in Finder, you can tweak a setting using Terminal.

This approach is helpful if you often need to know the location of a file or folder while browsing in Finder.

  1. Open Terminal by navigating to Applications > Utilities.
  2. Type the following instructions into the Terminal window and press Return: defaults write com.apple.finder _FXShowPosixPathInTitle -bool true; killall Finder
  3. Once the command is executed, all your Finder windows will now display the full file path in the title bar, giving you immediate access to the path of the file you’re viewing.
folder's pathname in mac finder path bar
  1. To undo this change and hide the path from the title bar again, simply enter this instruction and press Return: defaults write com.apple.finder _FXShowPosixPathInTitle -bool false; killall Finder

This is quick and simple. It gives you constant visibility of the directory path without additional clicks, which is perfect for those who want to keep their workflow streamlined.

Create an Automator Service to copy a file path

For a more custom solution, you can use Automator to create a service that will allow you to copy a file path directly to the clipboard with just a few clicks.

Once set up, this service will appear in your Finder context menu, saving you time in the future.
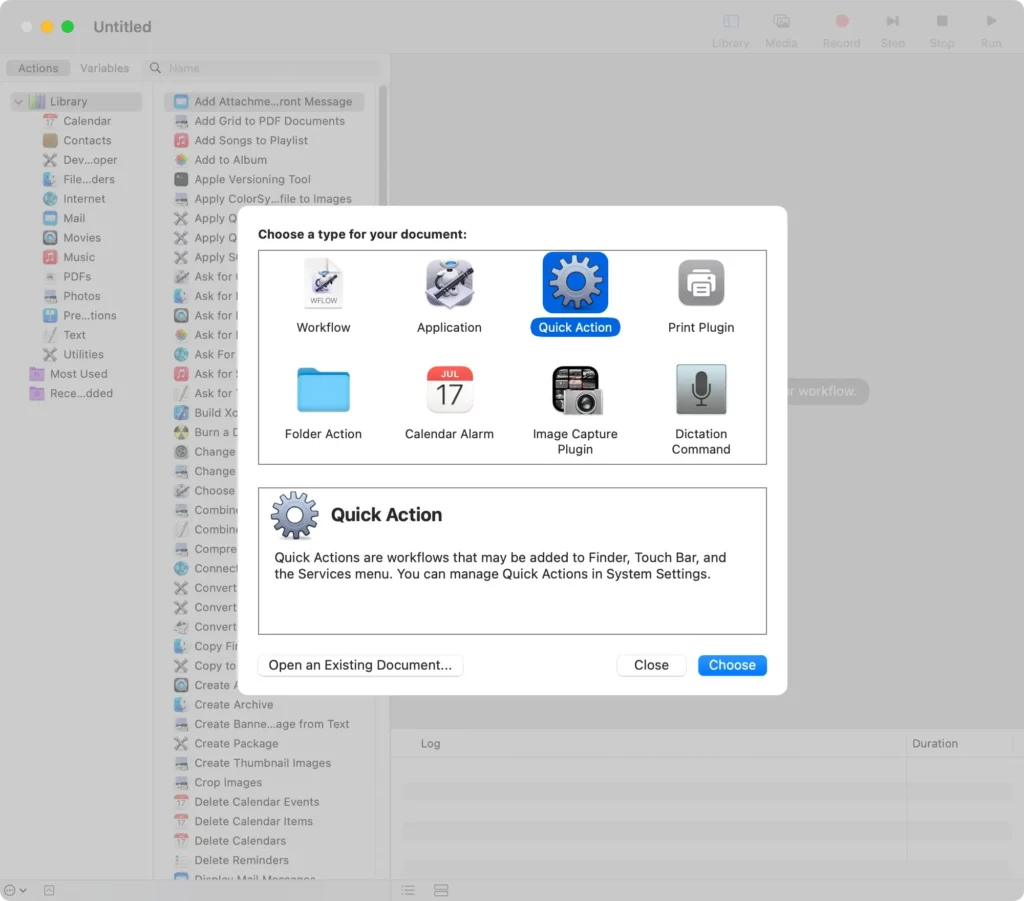
  1. Open the Automator app.
  2. Select Quick Action when prompted for the type of document you’d like to create.
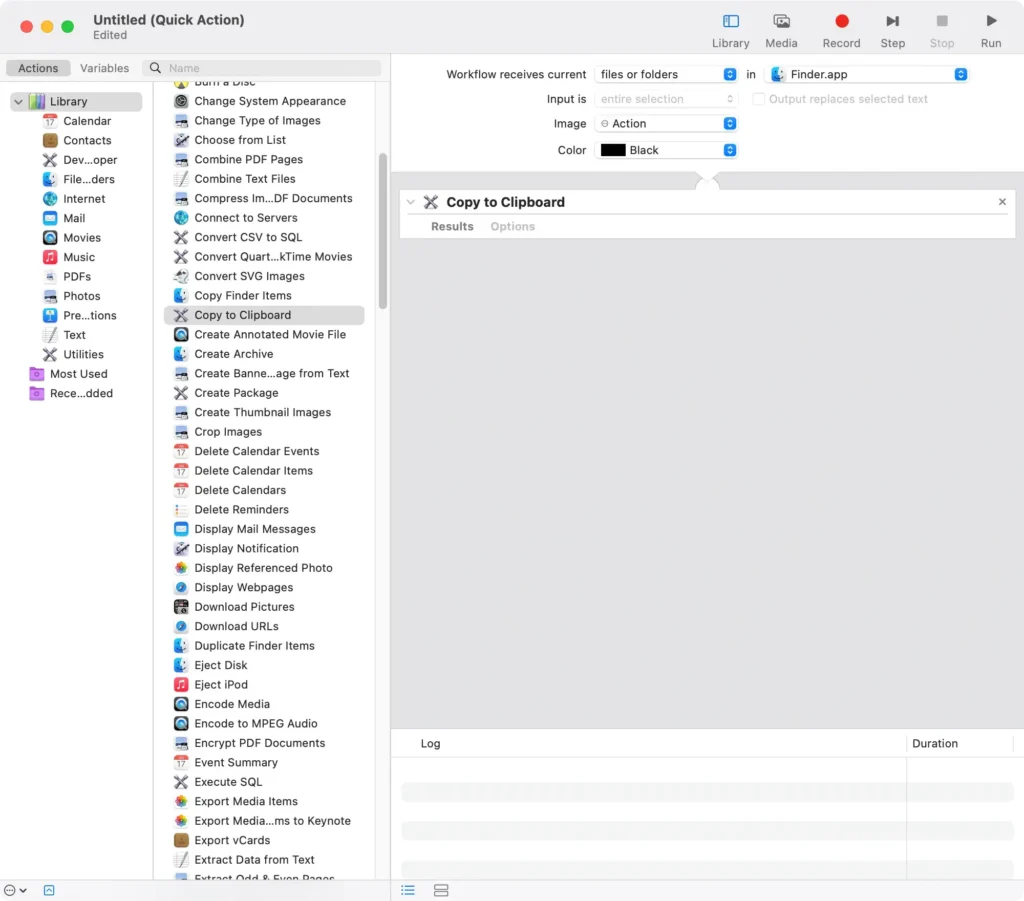
create quick action in automator
  1. Set the Workflow receives current to be files or folders in Finder.app.
  2. In the Library, search for the Copy to Clipboard action and drag it into the workflow.
copy to clipboard automator workflow
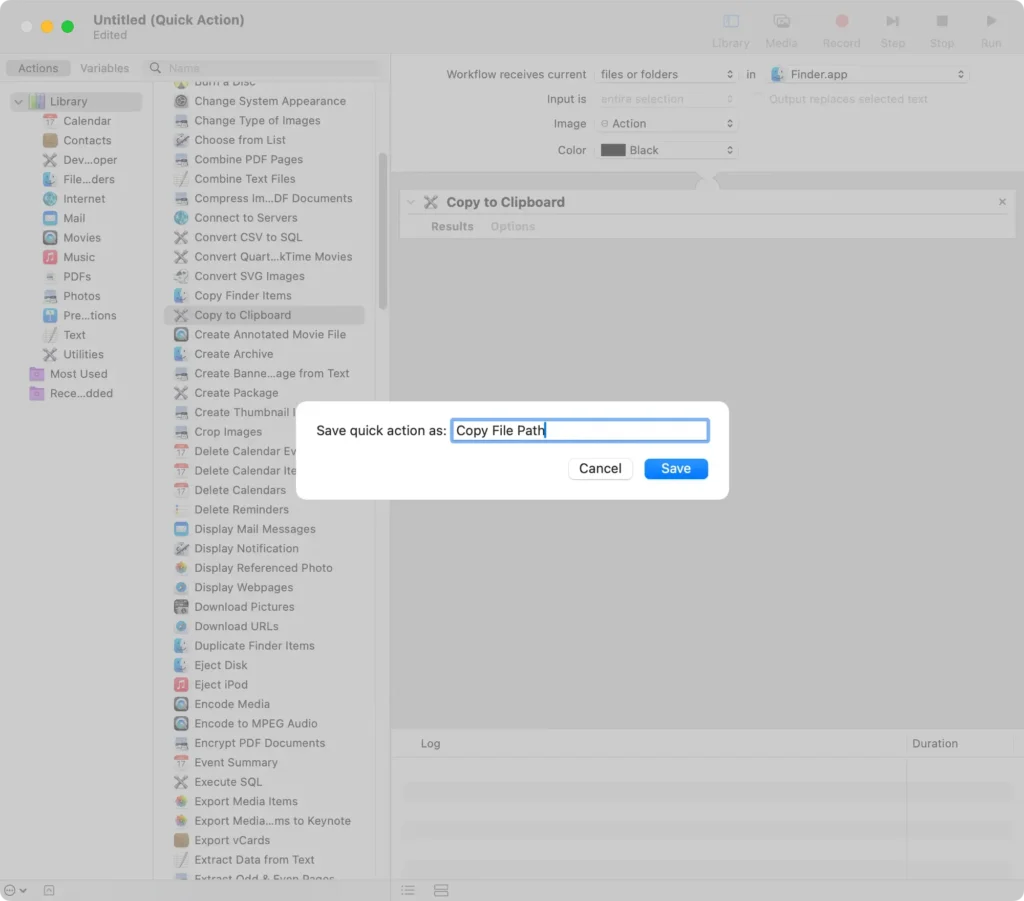
  1. Save the service with a name like Copy File Path.
save quick action as copy path
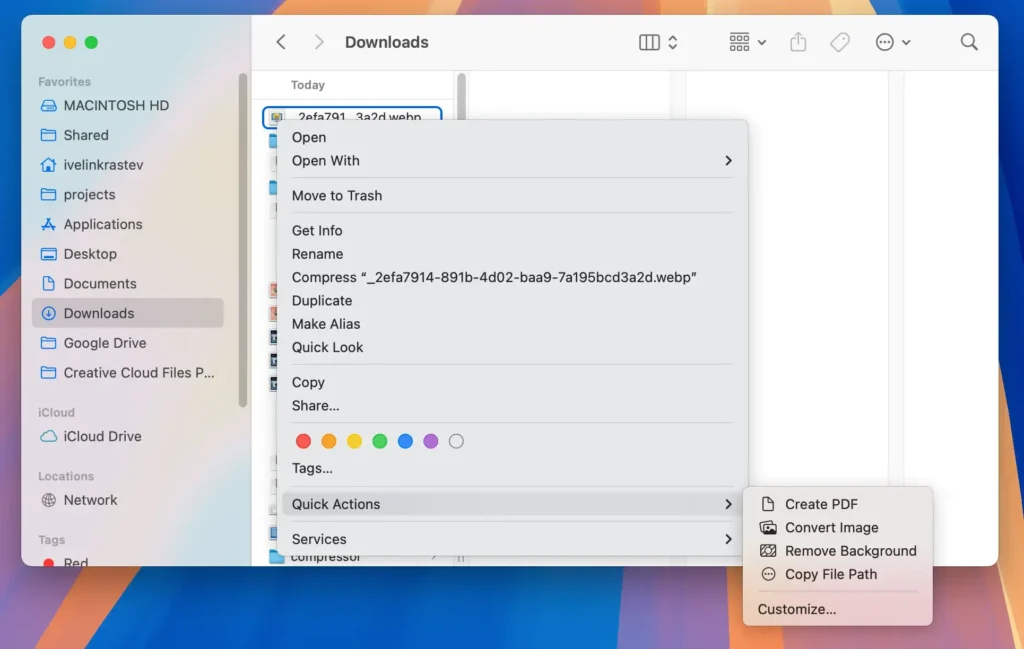
  1. Now, when you right-click on any file in Finder, go to Quick Actions, and you can select Copy File Path.
copy path quick action in finder

This is a convenient, automated solution for quickly copying file paths.

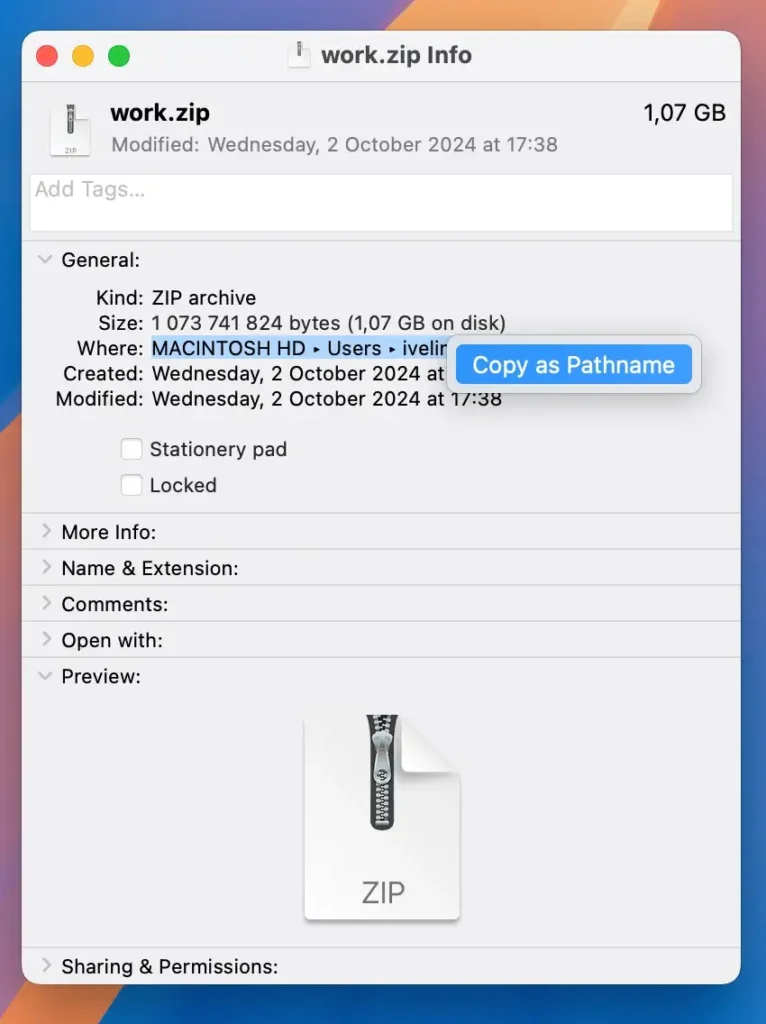
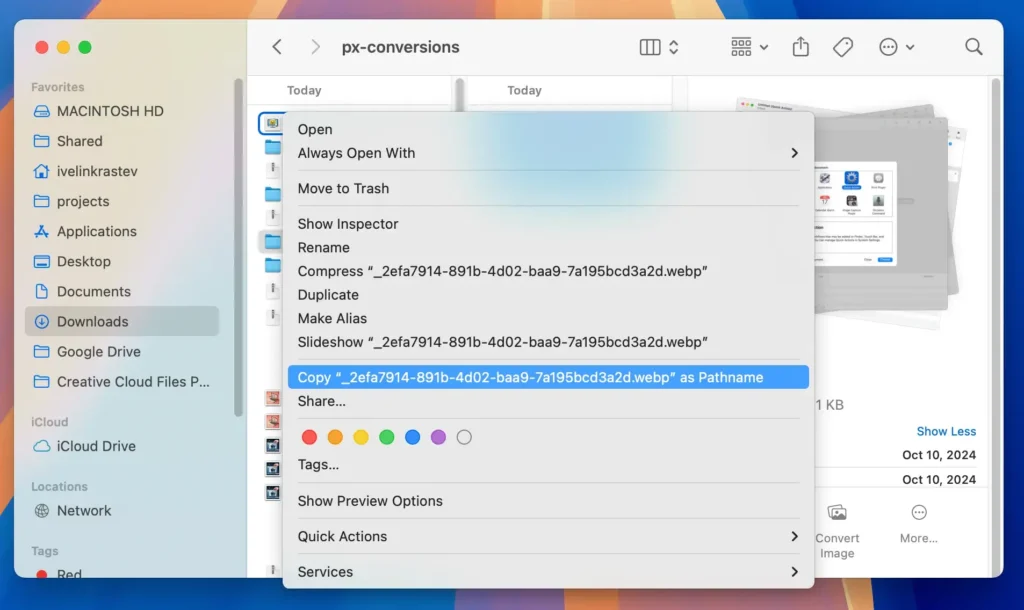
How to copy the file path

The easiest way to copy the entire file path of a file or folder is through the Finder context menu. This is a great everyday solution that does the job:

  1. Open Finder and locate the file or folder.
  2. Right-click on the item to open the Mac context menu.
  3. Hold down the Option key to reveal the additional option.
  4. Click Copy [filename] as Pathname.
  5. Paste the path wherever needed.
copy pathname in mac context menu

For a deeper dive into all the ways to copy file paths, check out our complete article on how to copy file paths on Mac.

Bonus: How to show hidden files on Mac

Sometimes, you might need to work with hidden files, which are not visible by default in Finder. To quickly reveal them:

  1. In Finder, press and hold Command + Shift + Period (.) to toggle hidden files on and off.
  2. Once the hidden files are visible, you can copy the file path using any of the methods mentioned in this article.

We’ve gathered all the ways to show hidden files on Mac in our detailed guide.

Share this post on your favorite social media
Keep Your Mac Fast and Secure
Optimize your Mac and stay malware-free with SpyHunter

For a better understanding of our policies, please review our Free Trial Offer below, EULA, and Privacy/Cookie Policy.

SpyHunter Free Trial: Important Terms & Conditions

The SpyHunter Trial version includes, for one device, a one-time 7-day Trial period for SpyHunter 5 Pro (Windows) or SpyHunter for Mac, offering comprehensive malware detection and removal functionality, high-performance guards to actively protect your system from malware threats, and access to our technical support team via the SpyHunter HelpDesk. You will not be charged upfront during the Trial period, although a credit card is required to activate the Trial. (Prepaid credit cards, debit cards, and gift cards are not accepted under this offer.) The requirement for your payment method is to help ensure continuous, uninterrupted security protection during your transition from a Trial to a paid subscription should you decide to purchase. Your payment method will not be charged a payment amount upfront during the Trial, although authorization requests may be sent to your financial institution to verify that your payment method is valid (such authorization submissions are not requests for charges or fees by EnigmaSoft but, depending upon your payment method and/or your financial institution, may reflect on your account availability). You can cancel your Trial by contacting EnigmaSoft’s payment processor (identified in your confirmation email) or EnigmaSoft directly no later than two business days before the 7-day Trial period expires to avoid a charge coming due and being processed immediately after your Trial expires. If you decide to cancel during your Trial, you will immediately lose access to SpyHunter. If, for any reason, you believe a charge was processed that you did not wish to make (which could occur based on system administration, for example), you may also cancel and receive a full refund for the charge any time within 30 days of the date of the purchase charge. See FAQs.

At the end of the Trial, you will be billed upfront immediately at the price and for the subscription period as set forth in the offering materials and registration/purchase page terms (which are incorporated herein by reference; pricing may vary by country per purchase page details) if you have not timely canceled. Pricing typically starts at $72 for 3 months (SpyHunter Pro Windows) and $42 for 3 months (SpyHunter for Mac). Your purchased subscription will be automatically renewed in accordance with the registration/purchase page terms, which provide for automatic renewals at the then applicable standard subscription fee in effect at the time of your original purchase and for the same subscription time period, provided you’re a continuous, uninterrupted subscription user. Please see the purchase page for details. Trial subject to these Terms, your agreement to EULA/TOS, Privacy/Cookie Policy, and Discount Terms. If you wish to uninstall SpyHunter, learn how.

For payment on the automatic renewal of your subscription, an email reminder will be sent to the email address you provided when you registered before your next payment date. At the onset of your trial, you will receive an activation code that is limited to use for only one Trial and for only one device per account. Your subscription will automatically renew at the price and for the subscription period in accordance with the offering materials and registration/purchase page terms (which are incorporated herein by reference; pricing may vary by country per purchase page details), provided that you are a continuous, uninterrupted subscription user. For paid subscription users, if you cancel, you will continue to have access to your product(s) until the end of your paid subscription period. If you wish to receive a refund for your then current subscription period, you must cancel and apply for a refund within 30 days of your most recent purchase, and you will immediately stop receiving full functionality when your refund is processed.

For CALIFORNIA CONSUMERS, please see the notice provisions:
NOTICE TO CALIFORNIA CONSUMERS: Per the California Automatic Renewal Law, you may cancel a subscription as follows:

  1. Go to www.enigmasoftware.com and click the "Login" button at the top right corner.
  2. Log in with your username and password.
  3. In the navigation menu, go to "Order/Licenses." Next to your order/license, a button is available to cancel your subscription if applicable. Note: If you have multiple orders/products, you will need to cancel them on an individual basis.

Should you have any questions or problems, you can contact our EnigmaSoft support team by phone at +1 (888) 360-0646 (USA Toll-Free) / +353 76 680 3523 (Ireland/International) or by email at support@enigmasoftware.com.
How do you cancel a SpyHunter Trial? If your SpyHunter Trial was registered via MyCommerce, you can cancel the trial via MyCommerce by logging into the MyAccount section of MyCommerce (see your confirmation email for further details). You can also contact MyCommerce by phone or email to cancel. To contact MyCommerce via phone, you can call +1-800-406-4966 (USA Toll-Free) or +1-952-646-5022 (24x7x356). You can contact MyCommerce by e-mail at ordersupport@mycommerce.com. You can easily identify if your trial was registered via MyCommerce by checking the confirmation emails that were sent to you upon registration. Alternatively, all users may also contact EnigmaSoft Limited directly. Users can contact our technical support team by emailing support@enigmasoftware.com, opening a ticket in the SpyHunter HelpDesk, or calling +1 (888) 360-0646 (USA) / +353 76 680 3523 (Ireland/International). You can access the SpyHunter HelpDesk from SpyHunter's main screen. To open a support ticket, click on the "HelpDesk" icon. In the window that appears, click the "New Ticket" tab. Fill out the form and click the "Submit" button. If you are unsure of what "Problem Type" to select, please choose the "General Questions" option. Our support agents will promptly process your request and respond to you.

———

SpyHunter Purchase Details
You also have the choice of subscribing to SpyHunter immediately for full functionality, including malware removal and access to our support department via our HelpDesk, typically starting at $42 for 3 months (SpyHunter Basic Windows) and $42 for 3 months (SpyHunter for Mac) in accordance with the offering materials and registration/purchase page terms (which are incorporated herein by reference; pricing may vary by country per purchase page details). Your subscription will automatically renew at the then applicable standard subscription fee in effect at the time of your original purchase subscription and for the same subscription time period, provided you’re a continuous, uninterrupted subscription user and for which you will receive a notice of upcoming charges before the expiration of your subscription. Purchase of SpyHunter is subject to the terms and conditions on the purchase page, EULA/TOS, Privacy/Cookie Policy and Discount Terms.

———

General Terms
Any purchase for SpyHunter under a discounted price is valid for the offered discounted subscription term. After that, the then applicable standard pricing will apply for automatic renewals and/or future purchases. Pricing is subject to change, although we will notify you in advance of price changes.
All SpyHunter versions are subject to your agreeing to our EULA/TOS, Privacy/Cookie Policy, and Discount Terms. Please also see our FAQs and Threat Assessment Criteria. If you wish to uninstall SpyHunter, learn how.